

Introduction: Sheet Metal Box


This is a great project to make if you are new to working with sheet metal. At this point in my class all of our sheet metal projects have been very simple with, at most, one bend. But, when we get to the this project my students always have a hard time trying to think through how to construct something from one piece of flat material. They begin to understand a little better when I relate what we are doing to an unfolded cereal box but until they work through making this box it usually doesn't make sense to them. This project makes them stretch their problem solving muscles by making them think through the correct order of operations to end up with a quality little container.
My students start off not liking this project as it really steps up the level of difficulty from our previous two projects but they end feeling very accomplished and finally coming to the conclusion the project wasn't really that hard to begin with. Plus, they like that they've finally made something that they can use and take home.
In this Instructable I'm going to walk you through how to make one of these simple sheet metal boxes!
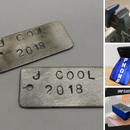
If you are just beginning to work with sheet metal I recommend also checking out my two previous sheet metal Instructables. They cover how to make SHEET METAL DOG TAGS and SHEET METAL VISE JAW COVERS.
Step 1: Video Walkthrough
If you prefer watching over reading the video above covers the step by step instructions for this fabrication project in under eight minutes.
Step 2: Tools and Materials


Tools and Equipment
- Ruler
- Try Square (Any square would work fine)
- Scratch Awl
- Aviation Snips
- Foot Shear (optional)
- Sheet Metal Break
- Bar Folder (optional)
- Spot Welder
Materials
- Sheet Metal ( I used 22 gauge)
- Layout Fluid (optional)
- Sand Paper
- Spray Paint (optional)
Step 3: Planning
Before we begin we need a plan of action. If you can't visualize how the flat pattern for a box should look with sheet metal, find an old shoe box or cereal box and unfold it. The patterns for a cardboard box will look very similar to what you need to plan out for the sheet metal box.
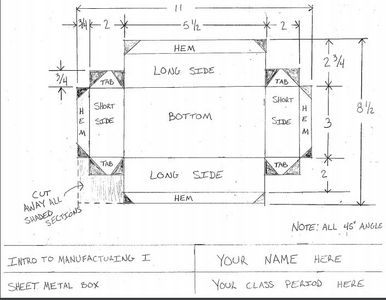
The box I have my students create in class ends up being 5.5" x 2" x 3.5". To make things easy for my students I designed our classroom box so it would be able to work on the size of a standard 8.5" x 11" piece of paper. This size allows my students to practice their layout pattern and folding on paper before they move to metal. If your plan works on a paper mock up it should work on sheet metal.
I've included a picture and a pdf file of the plans I use in my class. Feel free to use it exactly as dimensioned or just use it as a template for your own size of box.
Terms to know:
There are are couple of terms that you'll want to know to help you understand the plans if you haven't worked with sheet metal before.
Hem - A section of your metal that has been rolled over onto itself. The hems will be located on the top edges of your box to provide a nice smooth rounded edge instead of a sharp, jagged one.
Tab - An additional piece or strip of metal that will be used in assembling or holding the sheet metal to the desired form.
Attachments

Step 4: Mock Up (OPTIONAL)


Making a mock up out of cheap material is always a good practice to have when building something you are unfamiliar with doing. I have my students create their box out of paper first before I allow them to move on to working with the sheet metal. The process I show my students for laying out their pattern on paper is the exact same process they will use when they move on to the real deal. When you are finished with your mock up and it is the same size as what you planned; your work with sheet metal should go pretty smooth. If your mock up comes out with uneven sides, the corners don't connect, or its too small/large, then it will probably be a good idea to go back to the planning phase and make some revisions to your idea.
The order of operations for this step are as follows:
- Measure and mark your hem length from one edge of your paper.
- Draw a line parallel to the edge you measured from through your marked measurement.
- Repeat steps one and two for all the edges of your paper
- Measure and mark your hem plus your side length from one edge of your paper.
- Draw a line parallel to the edge you measured from through your marked measurement.
- Repeat steps four and five for all the edges of your paper
- Label the areas of the paper that will be used.
- Measure and mark your tab length off of one your sides.
- Draw a line parallel to the line you measured from to create square for your tab
- Repeat steps 8 and 9 for all of your tab locations.
- Label your tabs
- Draw roughly 45 degree lines to angle off your hems and tabs
- Cut out any part of your paper that is not labeled.
- Fold along your lines until you have a box.
Step 5: Cut to Size


Once you are prepared to work with your metal the first step you will need to take is to get your stock piece to the needed size. Using your plans measure and mark your overall size measurements on your metal. It is important to mark your lines nice and straight, a square will help you with that. If you do end up marking your lines slightly at and angle you will have a much harder time having your box come out as you planned.
For this step I used a foot shear to cut my metal to size. A foot shear made this step quick and easy and left me with nice clean edges on my metal. If you do use a foot shear be sure you line up your marked lines in the correct spot on your shear before cutting. I have included a picture showing how my marked line is right off the edge of the table of my shear, which will give me the exact measurement I want on my cut. A foot shear isn't necessary, as you could also do this step with hand snips.
The order of operations for this step are as follows:
- From the edge of your metal measure and mark your needed overall size dimensions.
- Use a square and scratch awl to mark straight lines through your marks.
- Cut along your marked lines to get your metal to the needed size.
Step 6: Layout


Now that your metal is to the correct size, it is time to mark your layout pattern onto the metal. I recommend using a square for this step if you have one, it will ensure you get as straight as marked lines as possible. Overall this is the same process as making the mock up, if you decided to complete that step. Just take your time and make sure the lines you are marking are correct and the way you want them to be. Below I've included the order of operations I have my students use.
The order of operations for this step are as follows:
- Measure and mark your hem length from one edge of your metal.
- Scratch a line parallel to the edge you measured from through your marked measurement.
- Repeat steps one and two for all the edges of your metal.
- Measure and mark your hem plus your side length from one edge of your metal.
- Scratch a line parallel to the edge you measured from through your marked measurement.
- Repeat steps three and four for all the edges of your metal.
- Measure and mark your tab length off of one your sides.
- Scratch a line parallel to the line you measured from to create a rectangle for your tab.
- Repeat steps 7 and 8 for all of your tab locations.
- Label all the areas on your metal that will be used for the box.
- Scratch 45 degree lines to angle off all of your hems and tabs.
Step 7: Cut to Shape


With your layout marked it is time to use aviation snips to cut your metal to shape. Overall this step is pretty easy, but using snips on metal can be a real grip strength workout. The biggest mistake my students make is going to fast and they end up cutting off one of their tabs. Take your time and make sure you are cutting the areas that are supposed to be cut.
The order of operations for this step are as follows:
- Use your aviation snips to cut your metal to shape.
Step 8: Clean Connection Areas


When you spot weld the box together you want as clean of connection between the metal as possible. That means before you start doing any bending you will want to clean up the portions of your metal where the spot welds will be located. It will be much easier to clean up your tabs and sides of your box now before you bend. To do this you will want to sand off the layout fluid and any oil and grease on the metal. This will allow you to have a clean metal to metal connection when we spot weld which will give us the strongest connection possible.
To do this just get some emery cloth or some 80 grit sand paper and clean off the inside and outside of your metal wherever your tabs will overlap your sides.
Step 9: Make Hems


As stated earlier hems are just a section of your metal that has been rolled over onto itself. The hems will be located on the top edges of your box to provide a nice smooth rounded edge instead of a sharp, jagged one. To do this step I will be using a bar folder but the process can be done with a sheet metal brake as well. Your goal with your hems is to have your doubled up layer of metal be flat without any bubbles or dents. The key to getting your hems correct is to use a tapping, not a heavy hammering, motion while also keeping your hammer head flat against your metal. If you use too much force or have your hammer head slightly angled you will end up with dents across your hems. Just like all the steps of any project you do, take your time and pay attention.
The order of operations for this step are as follows:
- Insert your metal into your bar folder up to your marked hem line.
- Pull your handle to fold your metal over 180 degrees
- Remove your now folded metal from the bar folder and place it back on the fold table with the fold facing up.
- Pull your handle again to the 180 degree position to better flatten your double layered portion of metal.
- Repeat steps 1-4 for all other hems.
- Place your hem on an anvil/solid surface and use your hammer to completely flatten your hems.
- Repeat step 6 for all other hems until all hems are completely flattened.
Step 10: Bend Into a Box


You are almost done. Once the hems have been made the next step is to bend your metal into a box. You will be working with a sheet metal brake to complete this step. The goal here is to clamp your brake teeth right on your lines. If your line is clamped down at an angle to your brake teeth, you will bend your metal at an angle and your box will not come out as you hope. Also, you will need to move some teeth on your break or you will not be able to fold your metal correctly. Move the teeth on your break around until you have a setup where you can insert your shorter side underneath so your tabs won't be crumpled during bending.
The order of operations for this step are as follows:
- Use your clamping bar handle to lift up the teeth of your brake.
- For this step the line you should be using should be the line that will bend your side and tabs at the same time. In my example it would be my "Long Side" line. Slide your metal piece underneath the teeth and line your marked line up with the edge of the teeth.
- Lower the clamping bar handle down to clamp your metal into place.
- Use your bending leaf handles to slowly fold your sides and tabs to 90 degrees.
- Return your bending leaf to neutral position and lift up your teeth to remove your bent metal.
- Repeat steps 1-5 for the opposite side of your box.
- Flare out your tabs slightly so your sides and tabs are not perfectly aligned. Use a vise or some pliers for this.
- Go back to the break, lift up the folding leaf, and insert your unfolded sides under your correctly positioned teeth.
- Clamp down on top of your marked line, with your teeth and line parallel to each other.
- Use your leaf handles to bend your sides slowly up to 90 degrees or until you can go no further without damaging your box.
- Lift up your teeth and remove your folded side.
- Repeat steps 8-11 for the opposite side of your box.
- Lightly bend your tabs back closer to the edge of your sides. I use a vise for this but you could also use a hammer to tap them back into place as well.
Step 11: Spot Weld


You now have a box! But without some form of fastening/assembly the box can be unfolded or deform pretty easily. To keep it in the shape you want it we need to make some sort of connection between your tabs and the sides of your box. For this I am going to spot weld the tabs to the sides of the box. If you don't have a spot welder, mechanical fasteners would work fine as well. Something like pop rivets or machine screws is what I would recommend if you wanted to go that route. You already prepared your metal for this process in a previous step, so all that is left is to actually spot weld. Please be sure to wear all the required and proper PPE (Personal Protective Equipment) when using the spot welder. Our spot welder owners manual recommends safety glasses, a face shield, gloves, closed toed shoes, and long pants.
The order of operations for this step are as follows:
- Position your box between the electrodes where you need to weld. This area should be on your tabs.
- Pinch down on your metal by slowly pressing down on your foot pedal and be sure you have your electrodes correctly positioned.
- When you are ready press your foot pedal all the way down and hold until your spot welder cycle is finished. You should hear the electricity cycle on and then off. Keep the pedal pressed down until you hear the cycle end.
- Release the foot pedal and reposition your box to the next spot that needs welded.
- Repeat steps 1-4 until your box is completely fastened together.
Step 12: Finished!


You now have a nice little container to use around the shop! If you feel the need for a lid, like I show in some of the pictures, just repeat the same process but make the box slightly bigger overall, but only design it to have about half the height.
For painting I used just regular spray paint that can be used on metal. Be sure to clean your metal up before painting by sanding it clean of oil and rust. Then be sure to wipe away any dust or metal shavings left behind after the clean up.
This Instructable I found to be more challenging to explain just through texts and pictures. If you need further explanation on a given step just leave me a questions in the comments below and I'll try to answer to the best of my ability.
If you make a box, let me know!
Enjoy creating and learning!


