

Introduction: Ubidots + ESP32- Predictive Machine Monitoring


Predictive analysis of machine vibration and temp by creating mail events and a record of vibration in google sheet using Ubidots.
Predictive Maintenance and Machine Health Monitoring
The rising of new technology i.e, the Internet of Things, heavy industry has started adopting sensor-based data collection to solve its biggest challenges, principal among them process downtime in the form of shutdowns and process delays. Machine monitoring also called predictive maintenance or condition monitoring is the practice of monitoring electrical equipment through sensors in order to accumulate diagnostic data. To achieve this, data acquisition systems and data loggers are used to monitor all kinds of equipment, such as boilers, motors, and engines. Following condition are measured:
- Temperature and Humidity Data Monitoring
- Current and Voltage Monitoring
- Vibration Monitoring: In this article, we will read Temperature, vibration and publish the data on Ubidots. Ubidots supports graphs, UI, notifications, and emails. These features make it ideal for predictive maintenance analysis. We will also get the data in google sheets which will make predictive maintenance analysis more easier.
Step 1: Hardware and Software Required
Hardware:
- ESP-32
- IoT Long Range Wireless Vibration And Temperature Sensor
- Long-Range Wireless Mesh Modem with USB Interface
Software Used:
- Arduino IDE
- Ubidots
Library Used:
- PubSubClient Library
- Wire.h
Step 2: Steps to Send Data to Labview Vibration and Temperature Platform Using IoT Long-range Wireless Vibration, Temperature Sensor and Long-range Wireless Mesh Modem With USB Interface:
- First, we need a Labview utility application which is ncd.io Wireless Vibration and Temperature Sensor.exe file on which data can be viewed.
- This Labview software will work with ncd.io wireless Vibration Temperature sensor only
- To use this UI, you will need to install following drivers Install run time engine from here 64bit
- 32 bit
- Install NI Visa Driver
- Install LabVIEW Run-Time Engine and NI-Serial Runtime
- Getting started guide for this product.
Step 3: Uploading the Code to ESP32 Using Arduino IDE:
- Download and include the PubSubClient Library and Wire.h Library.
- You must assign your unique Ubidots TOKEN, MQTTCLIENTNAME, SSID (WiFi Name) and Password of the available network.
- Compile and upload the Ncd__vibration_and_temperature.ino code.
- To verify the connectivity of the device and the data sent, open the serial monitor. If no response is seen, try unplugging your ESP32 and then plugging it again. Make sure the baud rate of the Serial monitor is set to the same one specified in your code 115200.
Attachments

Step 4: Serial Monitor Output

Step 5: Making the Ubidot Work


- Create the account on Ubidot.
- Go to my profile and note down the token key which is a unique key for every account and paste it to your ESP32 code before uploading.
- Add a new device to your Ubidot dashboard name ESP32.
- Inside the device create a new variable name sensor in which your temperature reading will be shown.
- Create a dashboard in Ubidots.
Step 6: OUTPUT

Step 7: Creating Events in Ubidots


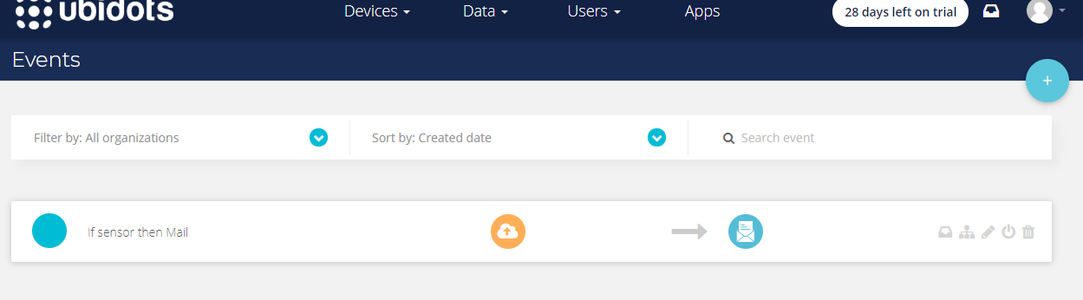
- Select Events (from the Data dropdown).
- To create a new event, click the yellow plus icon in the upper right corner of the screen.
Types of Events: Ubidots support already integrated events to allow you to send Events, Alerts, and Notifications to those who need to know when they need to know. Ubidots' prebuilt integrations include:
- Email notifications
- SMS notifications
- Webhook events - learn more
- Telegram notifications
- Slack notifications - learn more
- Voice Call notifications - learn more
- Back to Normal notification - learn more
- Geofence notifications - learn more
- Then choose a device and associating variable that indicates the devices' "values".
- Now select a threshold value for your event to trigger and compare it to device values and also select time to trigger your event.
- Establish and configure which actions are to be executed and the message to the receiver: Send SMS, Email, Webhooks, Telegrams, Phone Calls, SLACK, and webhooks to those who need to know.
- Configure the Event notice.
- Determine the activity window the events may/may not be executed.
- Confirm your Events.
Step 8: Output of Event in Your Mail

Step 9: Export Your Ubidots Data to Google Sheets


In this, we can extract the data stored in the Ubidots cloud for further analysis. The possibilities are enormous; for instance, you could create an automatic report generator and send them to your customers every week.
Another application would be device provisioning; if you have thousands of devices to deploy, and their information is in a Google Sheet, you could create a script to read the sheet and create a Ubidots data source for every line on the file. Steps to do this-
- Create a Google Sheet and add two sheets to it with these names:
- Variables
- Values
- From your Google Sheet, click on "Tools" then "Script Editor...", then "Blank Project".
- Open the Script Editor.
- Add the code below (in the code section) to the script Script.
- Done! now open your Google Sheet again and you'll see a new menu to trigger the functions.
Step 10: Result


![Tim's Mechanical Spider Leg [LU9685-20CU]](https://content.instructables.com/FFB/5R4I/LVKZ6G6R/FFB5R4ILVKZ6G6R.png?auto=webp&crop=1.2%3A1&frame=1&width=306)


