

Introduction: Updating a USBasp Chinese Clone Using an Arduino Uno


![Writing Your Hand Written Text With a Plotter [G-Code]](https://content.instructables.com/FTY/0K4F/LW82OIZV/FTY0K4FLW82OIZV.png?auto=webp&crop=1%3A1&frame=1&width=130)
![Tim's Mechanical Spider Leg [LU9685-20CU]](https://content.instructables.com/FFB/5R4I/LVKZ6G6R/FFB5R4ILVKZ6G6R.png?auto=webp&crop=1%3A1&frame=1&width=130)
If you have an old USBasp Programmer, and you keep getting CLK errors when trying to program the larger AVR microcontrollers like the ATMega2560.
This Instructable is how to update your USBasp to 1.06 Firmware using an Arduino Uno.
Note!
If you have the latest firmware, chances are you have connected it up wrong.
Depending on which chip your programmer has, depends on which firmware to use.
- ATMega8 = usbasp-v1.06-alpha-2016-05-18-atmega8.hex
- ATMega48 = usbasp-v1.06-alpha-2016-05-18-atmega48.hex
- ATMega88 = usbasp-v1.06-alpha-2016-05-18-atmega88.hex
These are a forked version.
- The GitHub repository can be found here: bperrybap/usbasp at 1.06-alpha (github.com)
- If you want the originals you can visit PeterVH/usbasp

Supplies


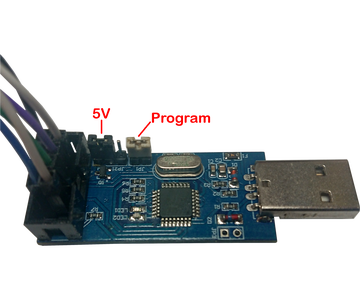
Your USBasp (USBavr serial programmer) Module to upgrade.
- More commonly known as a "USB in-circuit programmer for Atmel AVR controllers"
- I will be upgrading the one shown.
- The one I have has the ATMega8 chip.
- You may need a jumper to put your USBasp Module into programming mode.
Note!
There are many manufacturers of this Module, They may look slightly different, but in general they will have all the same components and connections.
An Arduino Uno
- I assume you have Arduino IDE installed if you have an Arduino Uno.
- The version of Arduino IDE I have is 1.8.19
- I won't be using the IDE to program the USBasp.
- I will Use the Arduino IDE to turn the Arduino Uno into a programmer.
- We use the Arduinos IDE copy of AVRDUDE installed to program the USBasp.
- Using the Arduino IDE's copy of AVRDUDE keeps us on the same page so to speak.
Dupont Cable and Connectors.
- Cable to connect the Arduino Uno to the USBasp via ICSP/ISP (In Circuit Serial Programming)/(In System Programmer).
Step 1: Turn the Arduino Uno Into a USBasp/AVRISP


We need to turn the Arduino Uno into a USBasp.
To do this is quite easy using the Arduino IDE.
- Connect your Arduino Uno to your computer via the USB.
- Go to "Tools" and set the board to "Arduino Uno".
- Set the COM port to the port the Arduino is connected to.
- Go to "File" => "Examples" => "ArduinoISP" and choose "ArduinoISP", this will open a new instance Arduino IDE.
- In the new instance of the Arduino IDE: Click the Upload Button to upload the sketch to your Arduino Uno.
Note!
In this sketch there are options for other boards and the way the connections are made.
- We just leave it at the default settings.
Step 2: Connection


Six cables and a jumper are required.
- Connect a jumper across the pins of "JP1".
- As we are using an Arduino, "JP2" should be set to 5V.
In this setup:
- Arduino Uno is the Master.
- USBasp is the Slave.
Note!
There is one exception to the wiring of the Arduino ISP.
- Pin 10 on the Arduino Uno is used to RESET the Slave.
- All other cables on the Arduino Uno can use the pins on the ISP Header.
Under normal circumstances
Under normal circumstances we would use the USBasp to program an AVR chip like the Arduino Uno, but in this instance we are using the Arduino Uno as a USBasp to upgrade the USBasp Module.
So, the USB from the computer plugs into the Arduino Uno.
Step 3: Programming


We are not going to use the Arduino IDE to program the USBasp.
- But within the installation of the Arduino IDE is a copy of AVRDUDE.
- It is AVRDUE that the Arduino IDE uses to program AVR microcontrollers.
- We are going to use this installation of AVRDUDE.
I am using version 1.8.19 of Arduino IDE, the following is based on this version and is installed in the default location on C drive.
If you haven't installed this version in the default location you may have to find your copy of AVRDUDE and change some paths used in the commands.
- Usually for avrdude.exe: <Where you installed Arduino>\hardware\tools\avr\bin
- Usually for avrdude.conf: <Where you installed Arduino>\hardware\tools\avr\etc
This is the command to upload the firmware (All one command/one line):
"C:/Program Files (x86)/Arduino/hardware/tools/avr/bin/avrdude" -C"C:/Program Files (x86)/Arduino/hardware/tools/avr/etc/avrdude.conf" -v -p atmega8 -c arduino -P COM5 -b19200 -U flash:w:usbasp-v1.06-alpha-2016-05-18-atmega8.hex:i
What you may need to change:
- "C:/Program Files (x86)/Arduino/hardware/tools/avr/bin/avrdude" Check that the path is correct.
- "C:/Program Files (x86)/Arduino/hardware/tools/avr/etc/avrdude.conf" Check that the path is correct.
- atmega8 This is the chip that is on the USBasp we are upgrading.
- COM5 This is the port that the Arduino Uno is plugged into.
- usbasp-v1.06-alpha-2016-05-18-atmega8.hex This is the HEX file we are uploading.
We use the command in a command prompt terminal.
- Before using the command you need to navigate to the folder where you saved the HEX file.
- You may be able to just right-click inside the folder you have the HEX file and chose "Open in Terminal"
- Another way is to type "cmd" in the search bar, and choose "cmd.exe". This way you will have to navigate to the directory from the command prompt using the "cd" command, followed by the path to the folder.
For example:
PS C:\> cd C:\Documents\USBasp\usbasp-1.06-alpha\bin\firmware
Once you are in the terminal window at the location of the HEX file, send the command.
- If you want to use "Windows PowerShell" terminal put a "& " in front of the command (there is a space after &).
- If all goes well it should look like the screenshot.

Participated in the
Anything Goes Contest


![Tim's Mechanical Spider Leg [LU9685-20CU]](https://content.instructables.com/FFB/5R4I/LVKZ6G6R/FFB5R4ILVKZ6G6R.png?auto=webp&crop=1.2%3A1&frame=1&width=306)


