Introduction: Glow Tie
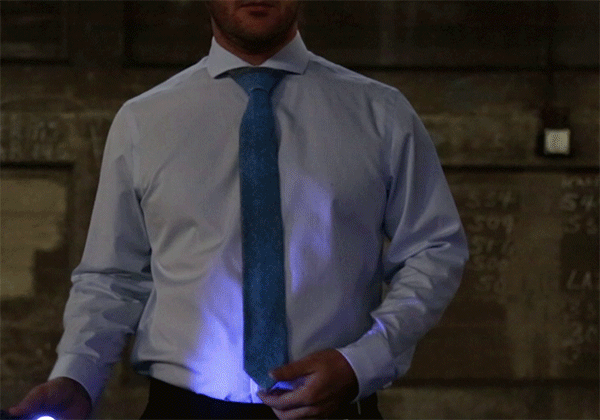
Light up your next formal event with a glow tie! You're sure to be the most popular person when you draw shapes on your tie with your UV flashlight and then let everyone else have a turn.
The effect fades after a few minutes and you can apply a new design, allowing you to keep your look fresh all night.
The best part is that the tie still looks great even when it's not charged up and glowing. Making your own is easy and can be completed over a weekend.

Ready to get glowing? Let's make!
Step 1: Supplies
The glow powder is added to a liquid medium which is then applied to the tie. The medium is made from silicone caulking which is diluted in mineral spirits.
You'll want to use 100% clear pure silicone caulking. Look for "silicone I" as "silicone II" has mold retarding agents, we want pure silicone. The silicone can be thinned with mineral spirits. You can find both the caulking and the mineral spirits at your local hardware store.
To make the tie glow you'll need some glow in the dark powder, and a UV flashlight (blacklight) to make it react and glow.
You'll also need a woven tie (not silk), I got mine at a thrift store.
Step 2: Tie Selection
I chose a tie that was not silk, since we want a fabric that has some texture for the glow powder to really get into. A silk tie would be too uniform and smooth the the glow powder to really be effective.
I chose a textured synthetic blend tie over an all silk tie as I thought they were more visually interesting, silk ties are typically a flat canvas to display art and woven ties add an element of depth. Though I used a synthetic woven, you could also buy an all cotton tie if you can't find one locally. This tie label says that it's made from 55% polyester, 21% wool, 18% acrylic and 6% other fabrics, which means it has 100% awesome potential for this project.
Step 3: Mix Medium
To make a medium that can be brushed onto the tie we'll need to thin the silicone caulking with plenty of mineral spirits.
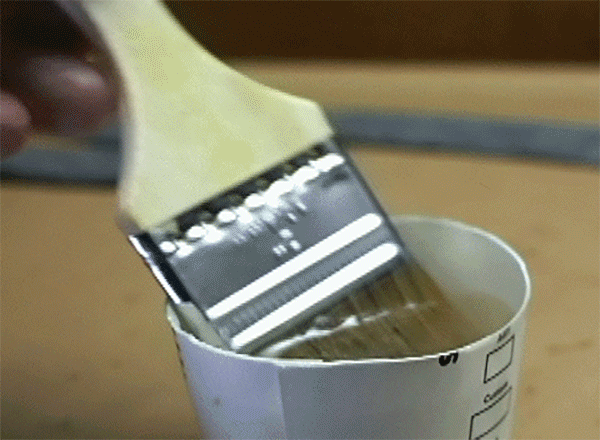
I started with a ratio of 5:1, 5 parts mineral spirits to 1 part caulking. Put both into a disposable paper cup and mix thoroughly. At first this is going to look like too much mineral spirits and not enough caulking, but the caulking is incredibly thick and after a few minutes will begin to thin in the mineral spirits. You're looking to achieve a very runny medium with no clumps, lumps, or anything even resembling the caulking.
The GIF below should be the viscosity you are looking for, something like very runny maple syrup. Oh, it's going to smell terrible so make sure to work in a well ventilated area.

Step 4: Add Glow Powder
Once your medium is completely mixed you can add your glow powder. You can add more or less depending on your preference and glow factor, I used about 2 ounces (50 grams) of powder for this tie.
Pour the glow powder into the mixing cup and stir until all the powder has been incorporated and you have a homogeneous mixture.
Step 5: Brush Onto Tie
I used a bristle chip brush to apply the medium onto the tie. Chip brushes are meant for resin, acetone, and epoxy, so are a suitable choice for this application.
The brush was dipped into the mixture and generously applied all over the tie where I wanted a glow effect. The tie was then hung up to dry in a warm area for a day. The smell from the caulking is still pretty terrible even after a day of drying, but goes away after about a week. You can test your glow tie now after charging it up under UV light, apply a second coating of glow medium if your glow isn't bright enough.
Step 6: UV LED Flashlight
To make this tie glow you'll need to first charge it up with UV light. This can happen outside in daylight, then going into a darkened area inside, but more likely you're already at an event and want to reveal your cool tie and won't have time to charge it up with the sun.
I got this powerful UV flashlight "blackight" online that works really well. There's loads of sizes and styles available, so chose one that suits your needs best.
Step 7: Charge Up and Glow!
After a week of degassing your glow tie should be ready to wear. Suit up with your favourite shirt and you'll be the brightest guy at the party!
Have you made your glow tie? I want to see it!
Happy making :)

Participated in the
Homemade Gifts Contest 2015

Participated in the
Make It Glow! Contest

Participated in the
Sci-Fi Contest


