Introduction: Arduino Based Beer Fermenter Thermostat

The idea was to make an arduino based thermostat for a fridgecombined with a heat source without hacking the fridge itself.
For this project you will need (links refer to Belgian webshop so you can see an example):
- Arduino (or Funduino etx.) 3
- 2 relay module (BTE13-003)
- LCD 16x2
- DS18B20 Temperature sensor in probe
- 1 10kOhm resistors (for the Leds in the LCD)
- 2 220 Ohm resistor (for the pushbuttons)
- 1 4.7 kOhm resistor (to pull down the DS18B20)
- 2 power sockets
- some 220V power cord/electric wiring
- 2 pushbuttons
- loads of dupont wires ;-)
- a fridge
- a heat source to put in the fridge (I used a heat mat from a terrarium)
Step 1: Step 1: the General Idea

We want to set a fermentation temperature using 2 push buttons (up and down). Being able to change this comes in handy as we can push the temperature down to 2°C to lager as well. Changing goes in steps of 0.5 centigrade.
The desired temperature is displayed on the second line of the LCD.
We read the temperature from the sensor. The sensor can be put in the beer (mind infection) or you can stick it to the side of the fermentation barrel with a moist sponge. The moist spong will assimilate the temparature more slowly.
The temperature from the sensor is displayed on the first line of the LCD.
The temperature from the sensor is compared to the temperature which is set. It can be off maximum 1 centigrade. If is too cold, a relay is pulled so the heat source is activated. If it is too hot, a relay is pulled to activate the fridge.
Step 2: Step 2: Hooking Up Everything
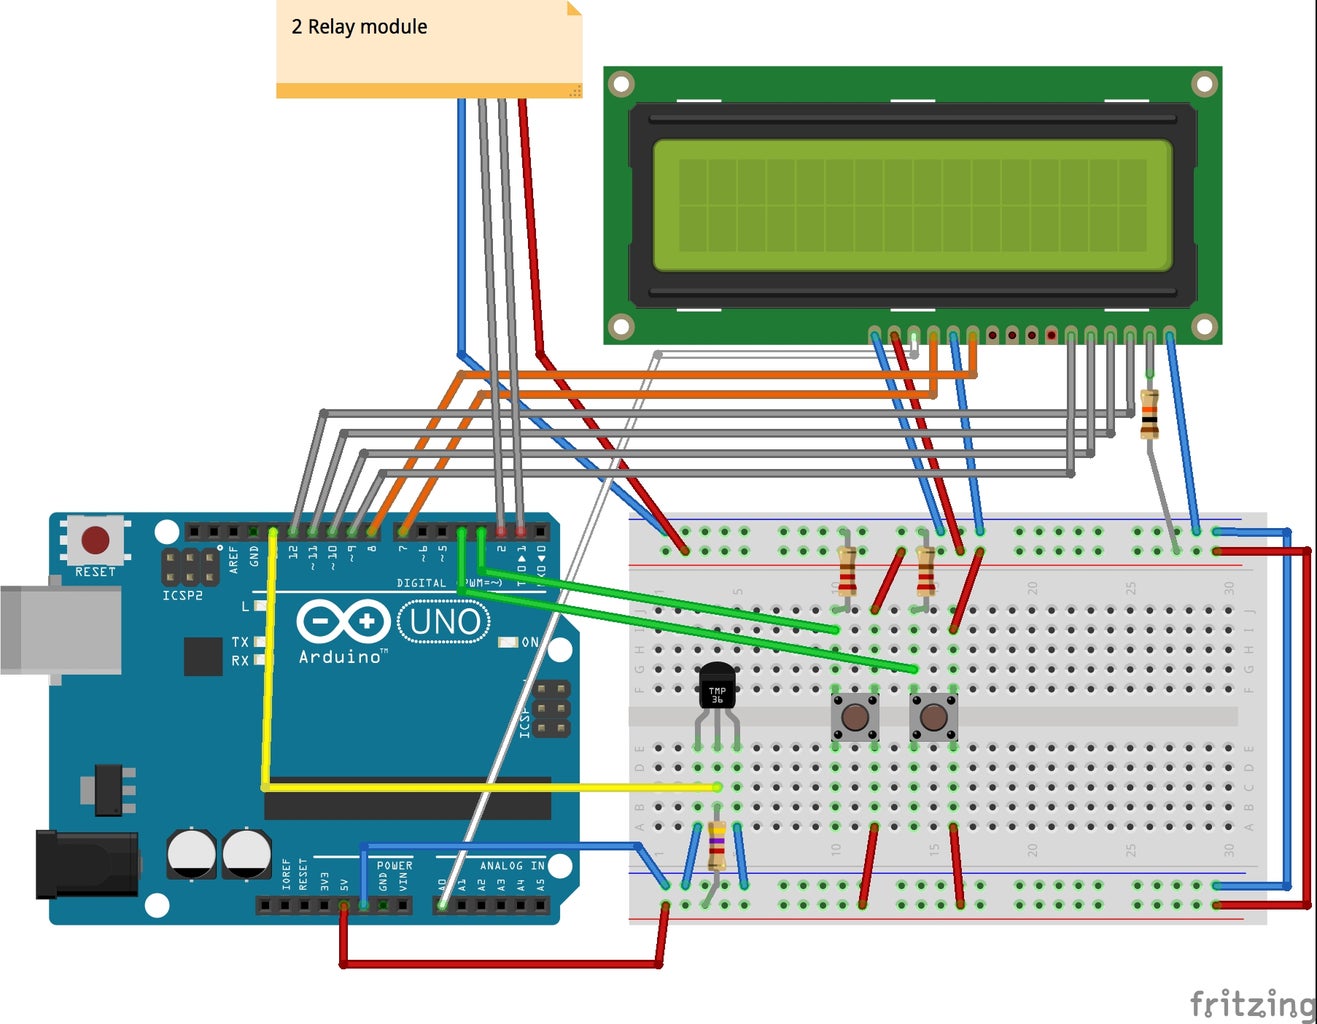
Look at the Fritzing scheme to hook up everything.
Things to mind:
- the relays are off when pulled to high, so when the power to the arduino drops heat and fridge will go on! The relays connect to Digital Pins 2 and 3. The realay module takes power from the arduino. If you use a Relay module with more than 2 relays, use separate power.
- we use the temp sensor in parasite mode. This means that both VCC and ground ar pulled to the GND. The data line is connected to the power with a 4.7 kOhm resistor. The dataline also connects to Digital pin 13.
More info on how to connect DS18B20.
- LCD is connected in a classic way. Pin order RS 7, Enable 8, D4 to D7 go 9 tot 12). RVV and RSS to ground, VCC to 5V. The power to the led uses a 10kResistor (pin 15 on LCD). The brightness (pin 2 on LCD) goes to Analog 2 so you can set the brightness in the script, if this is fine, you don't need a pot to regulate brightness.
- The two pushbuttons connect to the power on one side and the other side pulls to GND with a 220 ohm resistor and connects to Digital pins 4 and 5.
More info on the how to of the pushbuttons.
Step 3: Step 3: the Script
The script uses sevreal libraries you will need to install first.
Beacause there are several tasks that need different timing, I used a library called softtimer. You can set different tasks that use different delays.
Hotstarting a fridge several times over a short period of time will quickly ruin it. So you need to delay the on and off time for the different relays for about 3 minutes. This way you won't kill the fridge.
On the other hand, you can't put your arduino on hold for 3 minutes as you need to be able to change the temparetaure with the pushbuttons.
SoftTimer takes care of this. For softtimer to work you need 2 libraries:
PCIListener.h and SoftTimer.h (download).
For the Dallas Temperature sensor you need the OneWire Library and the DallasTemperature Library. Both can be installed from within th Arduino IDE.
The LCD takes the LiquidCrystal library. This comes with Arduino IDE.
The relays don't need a library.
The script splits up into 3 tasks:
- setting the relays, this uses a delay of 3 minutes (set by saying 3*60*1000)
- Reading the temperature, this uses a delay of 2 seconds.
- Setting the temperature, using a delay of 5 milliseconds. Basically the Arduino constantly listens is a button is pushed. The delay avoids floating.
The script has been annoted so you can understand what each step does.

Step 4: Step 4: Issues to Be Resolved
The prototype needs better powering. I'll convert the model to 1 plug which will have an adapter to power the Arduino and also send power over the relays.
Using this type of relay has a downside. When you power up the system, the relays go on and off really quickly, this is a hazard to the fridge's compressor. So it is best to first power up the thermostat and then plug in the fridge.
Off course I'll need to make it look better... it's only a prototype ;-)