

Introduction: Arduino Color Tracking LED Matrix | ChromaMatrix AI


ChromaMatrix AI is an engaging web application that uses artificial intelligence to interpret images (colors) from a webcam and controls an LED matrix via Bluetooth based on the video feed analysis. This interactive project combines web development, machine learning, and hardware integration to create a dynamic visual experience.
Difficulty Level: ⭐⭐⭐
Follow us on Instagram for more projects: www.instagram.com/random_stuff_we_make
Supplies


All the material mentioned here is easily available in your local market as well as online stores.
- Cardboard Sheet
- Masking Tape
- Bluetooth Enabled Controller Board (ESP32 or Arduino Nano 33 BLE sense)
- WS2812b Addressable LED Strip
- 18 AWG Hookup Wire
- Jumper Cables
- Female DC Power Jack
- DC adapter 5 volt 10A (Optimal current required for full white is 9A)
- Webcam (If using PC)
Step 1: Designing the LED Matrix


- First, you need to cut your cardboard sheet in the size of 12 x 12 inches. Then you need to mark 10 points/holes on your cardboard with a pen/pencil/marker on top & bottom points to make guide markers for LED strip & holes for the wires. You can place the LED strip on cardboard & mark on 1st LED & 15th LED (image 3).
- The Next step is to cut the LED Strip in 10 pieces. Each piece should be 15 Pixels/LEDs long.
- Then stick the pieces on the cardboard with some adhesive glue. (Refer to the image 4).
- Refer to the connections from the circuit (Image 6).
- Connect GND/0V of each LED strip piece.
- Connect VCC/+5V of each LED strip piece.
- Connect Data Out of 15th LED in each strip piece to the Data In of 1st LED in the next strip.
- Connect two wires for each Positive & Negative Connection & one wire for Data In of 1st LED of 1st strip.
- At last, connect a Female DC jack to one pair of Positive & Negative wires for power injection.
- General Precautionary Measures(Optional):
- Stick the masking tape on the backside of the cardboard to secure the connection wires. (Image 3).
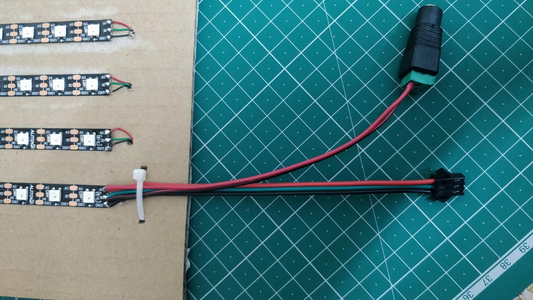
- Use a plastic tie to secure the input wires (Image 4).
- Note: Double-check the connections before powering up the device.
- Correction: The LED strip in the circuit image is 10 LED long, Please Consider it to be 15 LED long. Thanks for your cooperation.
Step 2: Arduino Code

- Upload this code to ESP32 using Arduino IDE.
- Make connections according to the code.
Github Repo Link : https://github.com/randomstuffwemake/ColorTrackingLEDMatrix/
NOTE: This project utilizes Google Teachable Machine for AI Model. You can also create your model and use the same with this project. However you need to make minor changes in the JS file.
Step 3: Working
- Open this webpage: ChromaMatrixAI
- Connect your device.
- Have fun with the project.
If you like this project and want to learn more please subscribe us on youtube & follow us on Instagram : www.instagram.com/random_stuff_we_make
