

Introduction: Arduino and ESP8266 With I2c LCD Display


Our main objective here is to show the operation of the serial i2c module for LCD Display 2x16 or 20x4. With this module, we can control the displays mentioned above while using only two pins (SDA and SCL). This makes communication very simple and frees up several other of our microcontroller’s GPIOs.
Let's show the operation on both the UNO and ESP8266 Arduino. Check it out!
Step 1: Arduino Uno

Step 2: WiFi ESP8266 NodeMcu ESP-12E

Step 3: 16x2 Serial LCD Display

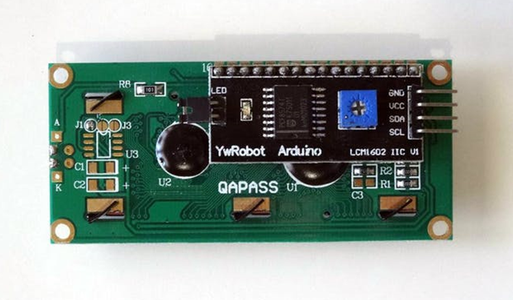
Step 4: I2c Serial Module

In this part, we show the adapter that was bought separately. We welded the display, which is parallel, in the back. Through the i2c pins, the display will then communicate directly with the Arduino. Therefore, through a microcontroller, this Arduino will manage all the commands to the display, facilitating both its connection and programming.
Step 5: I2c Serial Module Connected to the LCD Display
Step 6: Mounting With Arduino

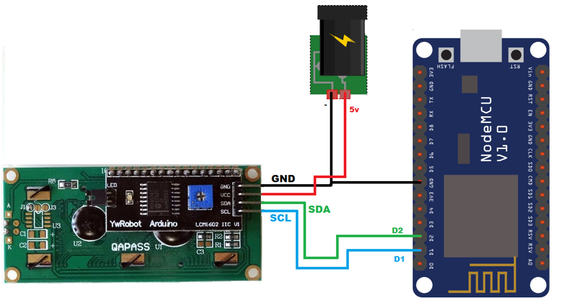
Step 7: Mounting With ESP8266
Step 8: Library
Add the "LiquidCrystal_I2C" library for communication with the LCD display.
Access the link and download the library.
Unzip the file and paste it into the libraries folder of the Arduino IDE.
C: / Program Files (x86) / Arduino / libraries
Step 9: Source Code
We start by defining the libraries and constants we will use with our code.
#include <Wire.h> // responsável pela comunicação com a interface i2c
#include <LiquidCrystal_I2C.h> // responsável pela comunicação com o display LCD

// Inicializa o display no endereço 0x27
//os demais parâmetros, são necessários para o módulo conversar com o LCD
//porém podemos utilizar os pinos normalmente sem interferência
//parâmetro: POSITIVE > > Backligh LIGADO | NEGATIVE > > Backlight desligado

LiquidCrystal_I2C lcd(0x27,2,1,0,4,5,6,7,3, POSITIVE);
Setup
Here, we will only initialize our object for communication with the display.
void setup()
{
//inicializa o display (16 colunas x 2 linhas)
lcd.begin (16,2); // ou 20,4 se for o display 20x4
}
Loop
Our program will make the display blink every 1 second. This is a simple program that already involves everything we need to communicate with the display.
Turn on / off backlight, position cursor for writing.
void loop()
{
//acende o backlight do LCD
lcd.setBacklight(HIGH);
//posiciona o cursor para escrita
//.setCursor(coluna, linha)
lcd.setCursor(0,0);
lcd.print("FERNANDOK.COM");
lcd.setCursor(0,1);
lcd.print("ACESSE!!!");
delay(1000); //intervalo de 1s
//desliga o backlight do LCD
lcd.setBacklight(LOW);
delay(1000); //intervalo de 1s
}