

Introduction: BB Maze Puzzle Game


Enjoying the simple things in life, I play with marble rolls and mazes. Therefore, I thought I would make a difficult rolling maze using several .177 size BB s.
THE GOAL OF THE GAME IS TO MOVE THE LOOSE BB's INTO THE OPEN HOLES.
Most puzzles I had previously used were small - approximately 2 inch by 2 inch with about 4 bbs.
It ended up to be an 8-inch-by-8-inch square game with ½-inch high walls.
My design goal was for 15 to 20 BBs, I ended up with 18 bbs.
Also for complexity I only used one black BB for the goal of landing it in the center of the puzzle maze.
I used sturdy aluminum sheet, along with strong PVC walls.
I did several tests
- What size hole to use with 177 bb
- Does the hole need to be dimpled to be useful (it does not)
- Putting rips in to increase the difficulty
- What paint to use - water based did not work with the aluminum
- The Adhesion of gel glue to hold down the PVC to aluminum instead of screws or nails - glue worked great
Supplies


- GEL super glue
- ISP Isopropyl Alcohol
- Paper towel
- 0.177 Black anodized steel BB - 25X
- 0.177 Silver Zinc plated steel BB - 25X
- 1/2 inch by 1/2 inch PVC screen trim - radiused from one edge to the other
- Paint Pen oil based
- Sheet aluminum cut to 8 inch by 8 inch
- Aluminum - Trim coil used for house siding (thickness - nominal 0.022 or 0.024 inch)
- Small Glass bottles
- Blue tape easy peel
- Water based color pencil - easy wipe off of layout
- Cardboard glue sheet - waste sheet
Step 1: TOOLS


- Spiro graph
- large ring
- Small Ring
- modified hole #10 to 3.32 diameter hole to accommodate paint pen
- Drill electric small Dremel
- 1/8 drill bit
- 3/32 drill bit
- Hammer
- center punch - used scratch awl
- deburring tool
- sheet metal bending pliers small and large
- small back saw large tooth
- miter box with 45 degree locations
- tin snips
- 1/2 drill bit for deburring
- 4 or more small ratchet clamps
- 8 or more small spring clamps
- sheet metal deburr tool yellow
- pin vise to hold drill
- razor knife large
- razor craft knife
- Straight edge to use with razor knife to cut aluminum sheet
- Pencils
- Markers
- metal ruler with cork back
- plastic micrometer
- Plastic triangle for design
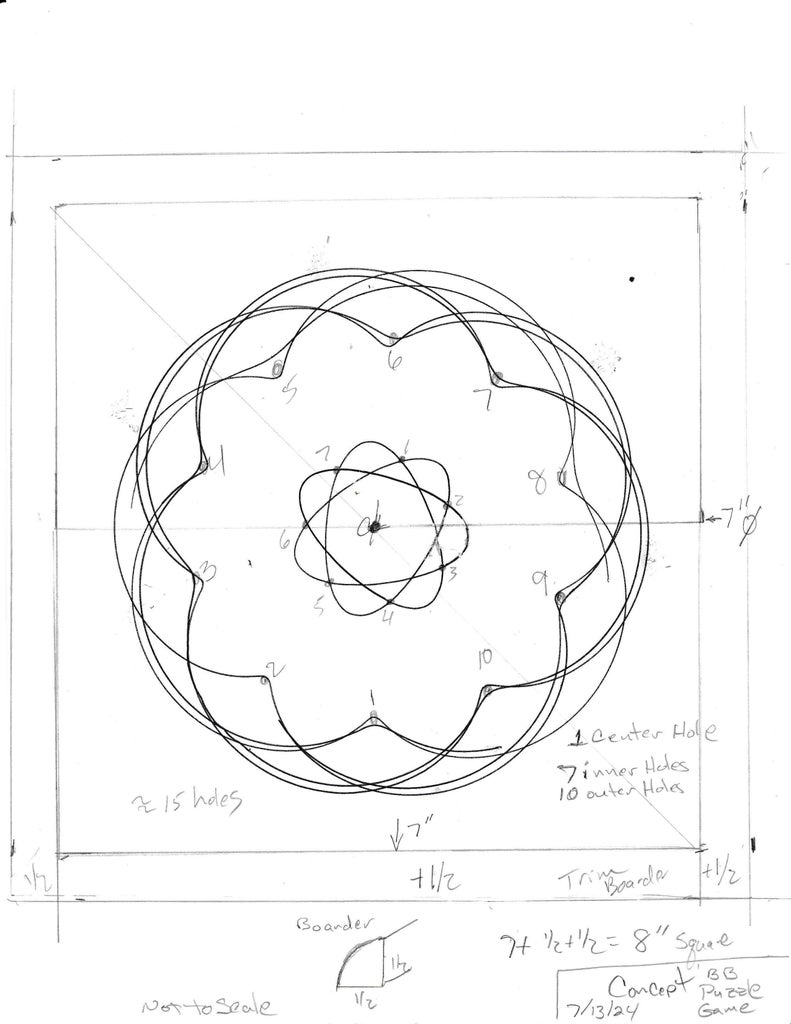
Step 2: Design


Most puzzles I had previously used were small - approximately 2 inch by 2 inch with about 4 bbs.
I wanted something a little more.
I did a prototype with 4 holes
Started with Spiro graph inside of large circle and small gear created a nice pattern that would work for hole placement.
Tried different holes on with the small gear on the outside of large circle to come up with a pattern
once I found some good designs I start using basic tools like ruler and triangle to come up with the area 7 inch by 7 inch needed for the design and holes.
I planned on using 1/2 inch trim pieces for the frame.
So I added an additional 1 inch on each side to come up with the need of an 8 inch by 8 inch aluminum sheet.
Laid out hole locations and numbered
Step 3: Cut Deburr and Clean Aluminum


CUT TO SIZE
Using the large razor knife and straight edge (Using the razor knife only scores the metal) my size of 8 by 8 inch.
Note, I have cut small sections from the coil to make it easier to make smaller sheets.
I used my large sheet metal bending tool to bend the aluminum back in forth to snap off the scrap piece.
DEBURR
Using the deburring tool I deburred 4 sides and then flipped it over and repeated with the back 4 sides
CLEAN THE SURFACE
- Using ISP Isopropyl Alcohol
- Paper towel
Step 4: Add Design to Aluminum


Pick the colors
I used several colors on the white side of the aluminum to pick my colors.
Drill out small gear
In order to get the paint pen to fit the gear hole, I hand drilled out the number 10 hole
- using the pin vise and the 3/32 drill bit
Lay out the design
Using the water based pencil
I made a mark from corner to corner to find the center of the sheet
I measured the large Spiro gear
- determined 1/2 of the gear distance and marked the cross lines for large gear placement
Taped the large gear on the outside with blue removable tape.
Wiped the center of gear with paper towel and water to remove the cross lines.
Using the paint pen in the small gear - I made the inner design.
putting blue tape in the inside of the large gear and removing the outer tape
cleaning the cross lines with paper towel and water.
Using the small gear and a new paint pen - run pattern around the outside.
Step 5: Layout Drill and Deburr


Mark hole location on pattern
Holes
1 center
7 inner
10 outer
Center punch holes
using hammer and scribe punch in holes for drill location
Drill holes
Using the Dremel and 1/8 drill bit
Drill all 18 locations
Deburr
Using the deburring tool and 1/2 drill bit
clean up the burrs in the holes
Do both sides
Step 6: Cut Framing / Walls


Cutting 4X pieces of 8 inch outside side of PVC stock
Using miter box and coarse backsaw
Cut 4 pieces so that that high 1/2 inch side is on the inside.
Need to cut apposing 45 degree angles on each piece.
Clean the cut edges with craft razor blade
Step 7: Glue the Framing / Walls to the Aluminum Sheet


Laying down some waste carboard
- This sheet really helps during glue up to rotate the maze with out lifting
Lay the aluminum down
put each of the 4 frame / wall pieces on the aluminum
clamp each piece in place with spring clamps and small ratchet clamps
Glue
using Gel supper glue
Pull one piece of at a time by removing the clamps
1st piece
run glue just on the surface between the PVC and the aluminum
Replace the clamps
Spin the cardboard
2nd and 3 third pieces
remove that piece only - one at a time
run glue just on the surface between the PVC and the aluminum
The apply glue to the left 45 degree joint
Replace the clamps
4th piece
remove that piece only
run glue just on the surface between the PVC and the aluminum
The apply glue to the left and right 45 degree joints
Replace the clamps
Let Dry
I waited 2 hours
Removed all clamps
Clean up any glue ooze with craft razor knife
Sign and date the back
Step 8: Thank You for Viewing My Instructable


I really enjoyed making this Maze puzzle
.
Thank You For Viewing My Instructable
