Introduction: CS291I Assignment 3


This Instructable documents my journey in creating a lamp shade for our third assignment. Through this assignment I familiarized myself with parametric surfaces and some more of the tools in Rhino and Grasshopper. This was also the first time I physically printed my model for this class.
Step 1: Testing for Fit


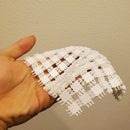
I started this project by measuring the size of my lamp post and printing a test ring to make sure the lampshade would fit properly. I checked various lamps in my house and decided on the lamp that would require the smallest lamp shade after some preliminary checks for print time.
I measured the lamp I chose with a ruler and found the diameter of the post to be about 32mm. I created a quick ring in Rhino, sliced it, and printed it. It was too small to fit, so I created a new one with a diameter of 33mm. The larger ring is on the right in the third picture. This one fit nicely on the post.
Step 2: Designing the Lamp Shade


I started off by building off of the example code provided by Jennifer. It creates a spherical parametric surface for a base lamp shade. I experimented with the parameters to create a lampshade that I liked.
u0 and u1 were set to represent a full rotation of 2*pi to surround the lightbulb. They are slightly shifted due to some complications explained later.
I chose to set v1 to pi because this essentially created a hemisphere, which allowed for a flat bottom and easier printing. v0 was set by trying to get close to the size of the ring to reduce the chance of complications in that area of the model.
The nv and nu parameters were set through experimentation. I set nv relatively low because I liked "geometric" look from the sharp corners and low number of faces. I set nu to 25 because I thought it looked nice.
The scale parameters were set based on the size of the light bulb. I found that around 97mm and 128mm would be sufficient to create a functional shade.
In Rhino, I placed the mounting ring in the correct place to unify the model.
Step 3: Tuning the Lamp Shade


One of the issues I ran into was related to the u parameters. Setting them to one full rotation left a crack in my model. I wasn't sure if this would be an issue or not when actually printing, so I sliced the model to check. There was definitely a noticeable crack so I went back to fix it.
I tried increased to more than one rotation, but this caused extra corners to stick out, so I tried something else.
My solution was to shift the parameters such that it still represented one full rotation, but started and ended at a concave point. Since the rotation defined the inner wall of the mesh, now the outer walls pointed towards each other and created a small overlap.
Step 4: Slicing and Printing


I exported the model and sliced in Cura. The print would take 10 hours. It could have been shorter, but I increased the width of the walls slightly because some experimentation saw models with holes after slicing. I just wanted to make sure it would work.
I started printing in the morning since the Ender printer is a little bit loud, so I didn't want to print overnight.
Step 5: Tragedy

Some time in the afternoon, about six hours in, I realized I made a mistake. I was using the sample filament that came with the printer and saw that it had already run out when I checked the print. D:
I didn't think about this potential issue before I started. I had never run into this issue before since I have a printer with a filament sensor. I knew I had no choice but to start over.
Step 6: Final Product


The next morning, I opened the filament that Jennifer provided and started printing again. This time the print completed! I tried attaching the shade to the lamp and it worked as expected.
I did notice that there were a few imperfections near the ring. Since I printed with the mounting ring at the top, there was a pretty sharp overhang which is what likely caused these artifacts. I am confident that this could have been avoided by using supports, but I didn't want to take the extra print time. I don't mind the imperfections since it is on the inside of the lamp.
