

Introduction: Creating a Basic Calculator in Java

Computers are becoming more and more prevalent in our world as time moves forward. It is becoming more and more important for someone to have at least some knowledge in code. A calculator coded in java should be an easy introduction.
There is no need for previous knowledge in coding for someone to complete these instructions. All that is needed is a working computer (Windows or Mac). As well as java installed as well as Eclipse, both of which will be covered in the instructions.
Supplies
https://www.eclipse.org/downloads/
Step 1: Installing Java


In order to begin, java must be installed onto your computer. Begin by visiting their website. Click on Java Download (See Figure 1) to be directed to the download page. The website will automatically detect your operating system which will allow you to install the correct version.
Once you have reached the download page, click on Agree and Start Free Download
Once the installer is downloaded, run the program and once you reach the first page, click Install at the bottom. Once clicked, you should see java installing onto your computer (Figure 2)
Once it states you have successfully installed java, click close.
Step 2: Installing Eclipse


In order to actually write the code for the calculator, you will need the software in order to do it. For this we will be using a program called Eclipse. This is the same program that students at ISU use for programming projects in java.
To install Eclipse, first go to the homepage HERE. Once there, click the orange download button. (See figure 3)
Eclipse download Once downloaded, run the program. When presented with a list of selections, choose Eclipse IDE for Java Developers. (See figure 4)
Then, select the destination for eclipse to be installed in if the default location does not work for you. Then, click install. (Figure 5) Once installed, click the green launch button. (See Figure 6)
Finally, once Eclipse is launched, select the destination you wish your work to be saved if the default location does not work for you. Once selected, click launch.(See Figure 7)
Step 3: Creating a Project

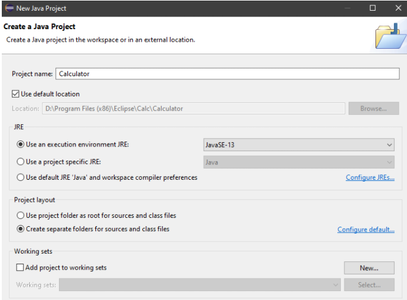
Now that eclipse is installed, we can now create a project to put our code into. To begin, click File - New - Java Project. (See Figure 8)
Name your project whatever you seem fit, in our case Calculator works. Once you named your project, click Finish in the bottom right. (See Figure 9)
Step 4: Creating a Class


Once your project is created, right click the project folder at the top left, then click New - Class. (See Figure 10)
A class is a user defined blueprint for the code to be written in. In this class we can write what is called a method. A method is a collection of statements or code that are grouped together to perform an operation.
Choose a name for the class, in this case I will be naming it Calculator. However any name works. Make sure that the box public static void main(String[ ] args) is checked. This will allow us to display the output for the calculator. (See figure 11)
Step 5: Creating Our Variables


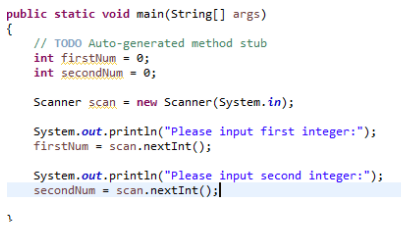
Before we define our variables, let's go over what we are looking at when we create our class. Each class is enclosed using brackets, anything written within those brackets will be a part of the class. The same goes for methods. All of our code will be written in the public static void main(String[ ] args) method, or the main method. (See figure 12)
First, we will define two variables. Variables can be a number of data types. Integers (1, 2, 3…), Doubles (1.2, 0.00004, 19.5…) or Strings (“Hello”, “Hi”, “Letters”) just to name the basics. In our case we will define 2 integers, defined using the phrase int. In our case we name them firstNum and secondNum and set them equal to 0. (See figure 13)
Step 6: Creating a Scanner

A scanner allows the user of the program to input something using the keyboard. In our case they will use the scanner to input the numbers and select the operation.
To create a scanner first you must import java.util. This can be done by typing import java.util.*; above the class. Next inside of the main method you must create a scanner object, this can be done by typing in Scanner scan = new Scanner(System.in); (See figure 14)
What this means is that you have created a new scanner object under the variable name scan. This is the name you will use to access the scanner later in the class.
Step 7: Setting Variables to User Input
For this step. We will be allowing the variables we created to be set to whatever the user inputs into the program, so long as the inputs are integers.
First, you must display a message to the user instructing them to input an integer. This can be done by typing System.out.println(); Within the parentheses, type in quotes “Please input first integer:”
After that line is complete. You must set the typed integer as firstNum. This can be done by typing firstNum = scan.nextInt();
Now do this process again, this time assigning the input as secondNum.(See figure 15)
Step 8: Creating Operations

It isn't a calculator if there are no operations it can perform. To start, you must create two more variables, an integer call operator. As well as a double called answer, which is set to 0.
Afterwards, create an output like before, this time asking the user which operation they would like to perform. The user will then choose an operator by typing in a number 1-4, each representing a different operation. After this, set the user’s input to the operator integer. (See figure 16)
Step 9: Switch Operation

Finally, we must set the operator variable to a certain calculator operation. This can be done by using what is called a Switch Statement. What this does is takes a certain set of cases and chooses one to run. In our case integers 1 through 4 were assigned to different operations. Depending on the number input by the user, the program will perform the desired operation.
First write out switch(operator) along with a set of brackets. Within these brackets are where the different cases will be written. Each case will be defined by the integer that has been input. Follow the code written below in Figure 17 for each specific operation.
Finally, write out one final output which will display the answer to the operation. This can be done by typing out the code listed at the bottom of figure 17.
Step 10: Testing the Program


Finally, run the program by clicking Run - Run at the top of Eclipse. The calculator is used in the console of eclipse and requires inputs from the user. Input 5 as the first integer and 4 as the second integer. Then select the multiply operation by typing in 3 when the prompt comes up. Your output should look like this: (See figure 18)
And with that you have completed a calculator program in Java. Hopefully this has taught you at least a small amount of Java coding information.
To see the final code, see figure 19.
