

Introduction: DIY Food Dispenser for All Pets Using Arduino


Hey pet lovers this instructables might be very much helpful for you! Indeed it is because it is the lifesaver if you are a pet owner!
The most common activity of a pet owner is to feed their pets on time and most of them have the habit of forgetting to feed your lovely pets.
Have you ever thought what will be the outcome of using a micro controller along with some electronics can lead to? I t will lead to one of the useful products that will definitely save time and keep every hungry stomach under control.
To begin with let me explain you how this project works if you are new to project making.
In this project we are using 2 hcsr04 sensors, the other name is ultrasonic sensor here it is known for emitting ultrasonic waves and receiving them, while on their path of transmission if it hits any objects then the time delay in receiving signals will be used to control the servo.
The servo is connected to pet food storage container that will tap out required amount of food as per the settings
Supplies


Keep all these materials handy so that you can build this project without any hassle
Arduino Uno from Amazon
Ultrasonic sensor(HC-SR04) x2
Jumper wires
Arduino programming cable
Small breadboard
Plastic bottle(recycle water bottle)
Cutter
Cardboard
Food grains(depends on your pet favorite food)
Hot glue
Pet(in my case I used my hand!!!)
Step 1: Arduino Code and Circuit


The first step is uploading the code, This is very easy task just open the Arduino IDE on your computer if you don't have IDE you can get it from their official arduino site
Open it and paste the below arduino code, Select proper board type and port type and click on upload button.
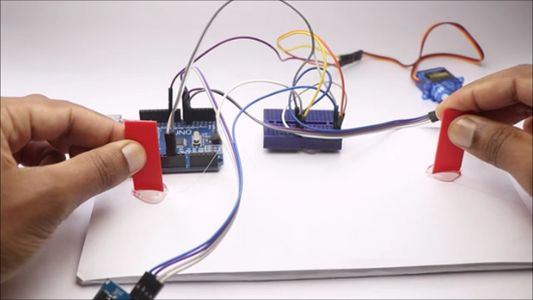
After you have that code on your board we can head over to connecting the components with jumper wires.
I will split the circuit into 2 parts
The HCSR04 part and the servo part
We are using 2 ultrasonic sensor and the role of both the sensor remain the same
The Gnd and Vcc of both is connected to Gnd and 5v power rail on the breadboard
Trig and Echo pin of first sensor is connected to Pin D9, D8 and the second sensor to pin D7 and D6 as per the given order
The servo comes with 3 pins
Signal, Gnd and Vcc
Here the signal pin is connected to D3 whereas the gnd to gnd and Vcc to 5v pin
The Gnd and 5v pin from the breadboard is connected to the uno board and this completes the circuit for this dispenser
Attachments

Step 2: Testing the Circuit


Like i mentioned earlier we are using the ultrasonic sensor as a switch, The circuit should work in this way.
whenever any obstacle is detected under the range of 8cm the servo horn shoud move to certain degree for a specific time
This parameter can be adjusted to control the flow of food dispensing and the distance at which the servo should dispense food.
You might be thinking why i have used 2 logic pins instead of one because 2 ultrasonic sensors perform the same action.
The reason is we are using independent signal from the sensor 1 and 2 so that the servo is controlled seamlessly
You also can simplify this circuit with a Simple small PCB, Complete your electronic projects in the best way from PCBWay
Why them? They have provided me with the best PCB and The quality is just amazing compared to other providers in the market, They also have Color PCB printing Try it out.
Don't have a 3d printer? You can get the best 3d printing service here
Check Here for Rigid-flex Pcbs with this your circuit becomes flexible! I have added the images to this step kindly check.
A revolutionary solution that combines the best of both rigid and flexible circuitry to elevate your electronic projects to new heights.
With their expertise in advanced manufacturing techniques, they offer a seamless integration of rigid and flexible components, ensuring enhanced reliability, durability, and space-saving benefits.
Step 3: Set Up the Hardware

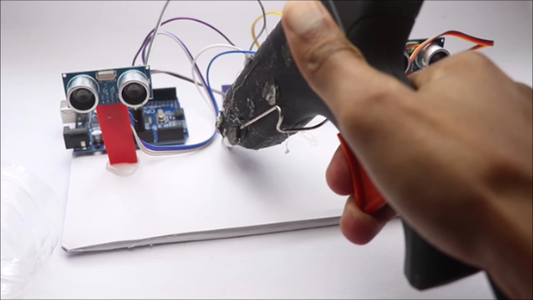

I will be placing all the electronics on a piece of cardboard, Use small amount of hot glue to stick all the components to the board, make sure there are no open wires, seal the joins using hot glue.
There is no one setup type for this dispenser, according to your requirements the sensor can be placed in my case this setup is best suited for pets like, cats and dogs along with chickens.
Use decent amount of hot glue to hold all the electronics in place, Make sure to use food grade plastic to fill the storage container with food and if needed cover the container.
After we have completed this we can head over to making the food dispensing mechanism.
Step 4: Making the Mechanism


The mechanism is run by the movement of servo horn, Whenever the servo horn moves it controls the small slider which in turn hold the storage behind it
This implies that the mechanism should be strong enough to hold as well as to allow the food to pass through
I used the lid of plastic container and the top of the bottle(inverted) to make the food passage area
Also you can add little sliders inside to allow the food to slide by the sides, Don't use too hot hot glue as we are dealing with plastic here.
See the mechanism i will be using in this project from the first image, Feel free to customize this as per your needs
Step 5: How to Use


Using this device is not a big task, Just fill the storage with type of food your pet likes, in my case i filled it with grains of uncleaned rice.
Tap on the dispensing area so that the food flow occurs without any lag.
Connect the board to usb power supply, I recommend to use large Mah power banks, Just place your hand in front of the sensor and the servo should make some movements dispensing the food,
If you feel if the amount of food that is being dispensed is large you can reduce the movement of servo horn by a few degrees in the code.
That is all about this food dispenser, if you have any questions ask in the comments, Thank you for reading
Step 6: Food Dispenser Working Video
Have a look at this working video of this dispenser, Since i don't have any pet to test this out i will be using my hands as a pet!
Well since it works taking account of the object movement there is no harm if you place any object too.
That is all for this project, if you made this project please post your pictures, Thank you and happy building:)
