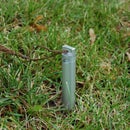
Introduction: Dead Drop Spike V.1
This is a project I made a little while ago as a birthday present for my friend Daniela who introduced me to geocaching. It is based on several designs I saw in a book on spy gadgets. They would have been used for passing stolen documents and film between an agent and their handler, storing money and documents as well as other tasks.
I've just completed an Instructable for version 2. It adds a locking lid and a D-ring to seal it.
Here's what you need to make your own:
Tools:
• Pipe cutter (optional)
• Hacksaw
• Metal working lathe with cross slide
• Drill or drill press (optional)
• 1/4 inch drill bit
• Mill and 1/4 inch milling bit (optional)
• Countersink (optional)
• Needle nosed pliers
• 1/8 inch diameter nail
• Applicator (and mixing dish if using 2 part epoxy)
Materials:
• 3/4 inch external diameter, 5/8 internal diameter, aluminum pipe, 3 1/2 inches long
• 3/4 inch internal diameter aluminum pipe, 1 1/8 inches long (The external diameter does not really matter. The piece I used was about 7/8.)
• Two sections of 3/4 inch diameter aluminum rod. One section 1 5/8 inches long, the other 1 1/8 inches long
• 8 inches of 1/16 of an inch diameter SS wire
• Epoxy intended for use with metal
• Strong string
Step 1: The Sidewall and Point (the Body)
On the lathe turn a 1/2 inch long section from the end of the 1 5/8 inches long section of 3/4 inch aluminum rod down to a 5/8 diameter.
On the lathe turn a point on the opposite end from the one you just turned down.
This piece will be the point.
These two parts make up the body.
Step 2: The Collar and Top (the Lid)
A. Take the 1 1/8 inches section of 3/4 inch rod and drill a 5/8 inch deep hole in one end.
B. (optional) Mill two 3/8 of an inch long, 1/4 inch wide, grooves on opposite sides of the undrilled end.
C. If you have milled the grooves, then drill a hole 1/4 of an inch from the end from one groove to the other. If you have not, then drill a 1/4 inch hole through the rod 1/4 of an inch from the undrilled end and countersink the holes. This piece will be the top.
These are two of the three parts that make up the lid.
Step 3: The Spindle
This is the third part of the lid.
Step 4: Gluing
It is easier to glue the spindle into the top before gluing the collar on.
At this point, you can put the lid in the lathe to round off the upper edge of the collar, however it is not necessary.
After the glue has dried, tie the string through the hole in the lid.


