

Introduction: ESP32 Soil Moisture Sensors - DIY Automatic Watering System


Hi, I'm Giovanni Aggiustatutto, and today we will see how we can avoid any waste of water when we water our plants by using home automation. In fact, I've been doing a small vegetable garden on my balcony for a few years now, and I've always been looking for a solution to automate watering. Generally water timers water the plants at a certain time of the day, no matter if it has rained or it has been colder than usual. So I wanted to build something that waters the plants based on how dry they are. This will greatly reduce water wastage because, for example, if it has rained or been less hot one day and therefore the plants are wetter, less water will be given. This project is divided into three parts: first we need a drip irrigation system controlled by home automation. Then we need sensors that can measure the soil moisture of the plants. Finally we will create an automation that takes the data from the moisture sensors and uses it to automatically calculate the watering time our plants need.
Today in particular we will build a system with some soil moisture sensors connected to WiFi and home automation. So we will be able to see the moisture of the plants from the app on the phone, and use this data to automate watering. The system is very cheap, and building it is pretty easy.
But now, let's get started!
To see more details about this project, watch the video on my YouTube channel (it has English subtitles).
Supplies


To make this project we will need:
- Capacitive soil moisture sensors
- ESP32 board
- JST connectors
- Perfboard
- 3 pin wire
- Silicone
- 5 LEDs
- 5 680 ohm resistors
- Jumper connectors
- Junction boxes
- Cable glands
Tools:
- Soldering iron
- 3D printer with white PLA filament
- Hot glue
- Drill with step bits
To make the automation to work we will also need to have a Home Assistant installation running on a Raspberry Pi or on a PC with a virtual machine. More about this later.
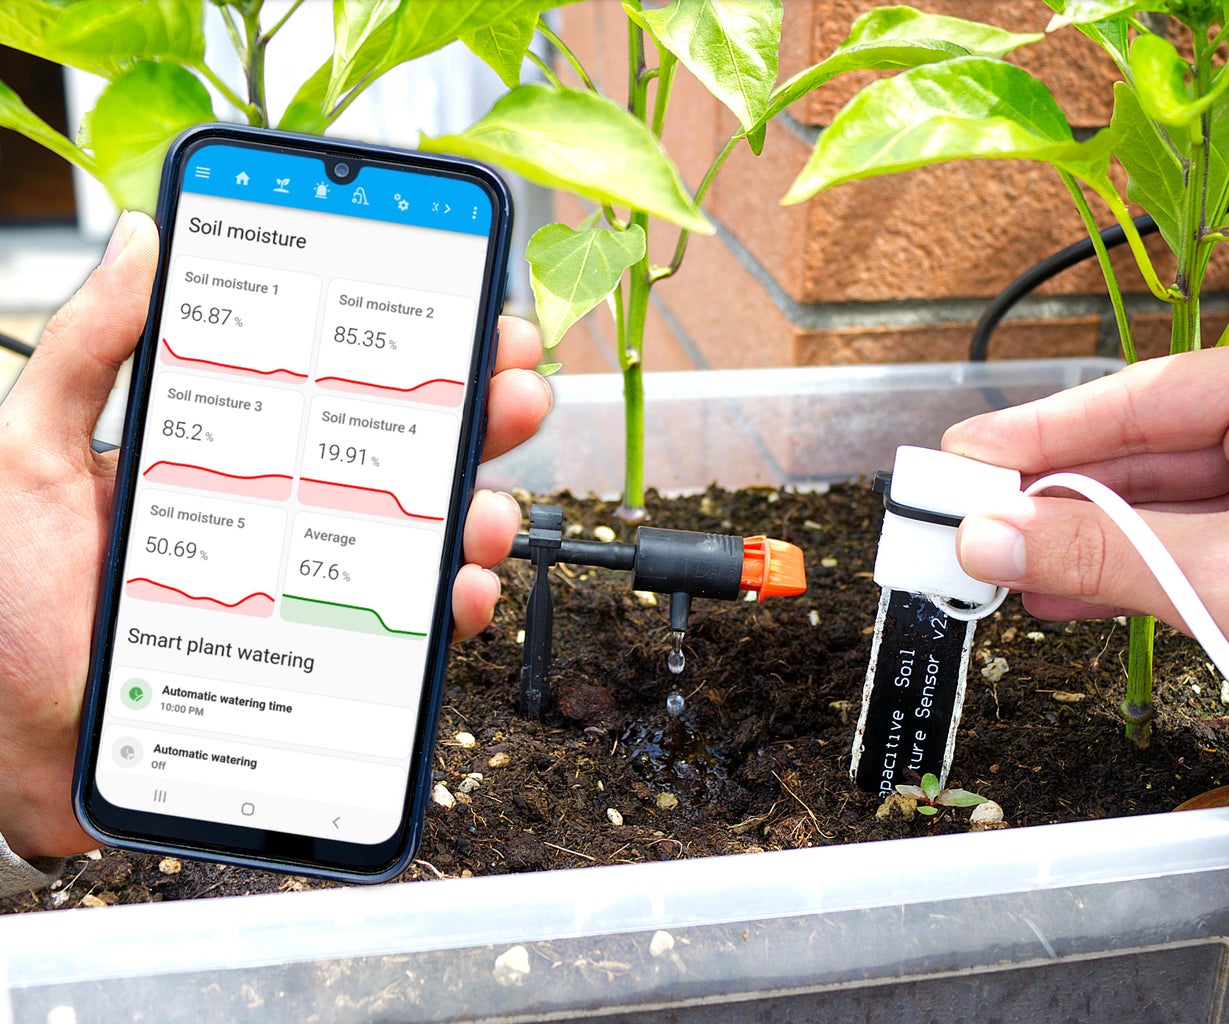
Step 1: Soil Moisture Sensors


To measure plant moisture we will use capacitive moisture sensors, like the ones in the picture. These sensors are made from a PCB that is inserted into the soil of the plants. On top of each sensor are three contacts, for the ground, the 3.3v power supply, and the for the analog signal output. I connected the sensor power supply to my bench power supply, and as you can see the voltage measured on the analog output varies if the sensor is dry or is wet. Then from this voltage we can get the humidity of the soil where we put the sensor.
To convert the voltage of the sensor into a percentage, I wrote the voltage measured with the sensor in the water and with the sensor dry, as we will use these values in the code later.
Step 2: Making the Sensors Water-tight


The sensors will be placed in plant soil, so they need to be protected to prevent the electronics from getting wet, while still leaving the bottom of the PCB in contact with the soil, because that is where the moisture is measured.
To protect the sensors, I have tried various ways over the past few years, and I think I have found one that works, because the sensors you see in the picture have already been in the ground for more than a year, and they are not damaged at all. To protect the part of the sensor that will be in the ground, I put silicone on the edge of the PCB. To connect the sensors to the ESP32 I used phone cable, but any cable with at least three wires should do. I soldered the cable to the three sensor pins. To protect the electronic circuit, I 3D printed this very simple part to put on the sensor. I filled the space inside with silicone, making the cable come out from the bottom. I prepared 5 sensors, to measure the moisture of 5 different plants.
To the other end of the wire of the sensors I soldered a JST connector, which allows them to be easily connected to the connectors that we will put on the board.
Soil moisture sensors
Attachments

Step 3: Connecting the Sensors to the ESP32


To connect the sensors to the ESP32, I cut a piece of perfboard, on which soldered the ESP32 using jumper connectors. I also soldered some JST connectors, to connect the sensors. LEDs will also be connected to the ESP32 to indicate the humidity detected by the sensors, similar to the vu meter on an audio mixer. So I mounted the LEDs on a piece of perfboard, and on the board I put a connector and some 680 ohm resistors to connect them to the ESP32 pins. Underneath the board I made the connections with a soldering iron using silicon-sheathed wires, that do not melt with the heat of the soldering iron.
Only two of the sensors will be connected directly to the ESP32, while the other three will be connected to a board placed on the other side of the balcony. A 10 meters cable will run from this board to carry the three analog signals to the ESP32, as well as the 3,3v power for the sensors. This board is very simple, and has only a few JST connectors on it.
In the file below you will find the schematic for all the connections.
Attachments

Step 4: ESP32 Software


To connect the ESP32 and sensors to my smart home I will use Home Assistant with the ESPhome add-on. With the Home Assistant app I will be able to see real time data from the sensors.
Home Assistant is a platform with which we can manage all our smart devices from a single interface. Home Assistant works in our local network, so we need a device to run it: we can use a Raspberry Pi or, like I do, an old Windows PC with Home Assistant running on a virtual machine. To see the data from your smartphone you can download the Home Assistant app. To connect from outside the local network I'm using the Nabu Casa Cloud, which is the simplest solution but it's not free. There are other solutions but they are not totally safe.
So from the Home Assistant app we will be able to see the data from the sensors, and configure the automation that will turn the watering system on when the plants are dry.
To connect the ESP32 to Home Assistant we will use ESPhome. ESPhome is an add-on that allows us to connect ESP boards to Home Assistant via WiFi. To connect the ESP32 to ESPhome you can follow these steps:
- Install the ESPhome plugin in Home Assistant
- On ESPhome's dashboard, click on New device and on Continue
- Give your device a name
- Select ESP32
- Copy the encryption key that is given, we will need it later
- Click on EDIT to see the device's code
- Under wifi, insert your wifi ssid and password
- To make the connection more stable, you can give the board a static IP address, with this code:
wifi:
  ssid: yourssid
  password: yourwifipassword


  manual_ip:
    # Set this to the IP of the ESP
    static_ip: 192.168.1.61
    # Set this to the IP address of the router. Often ends with .1
    gateway: 192.168.1.1
    # The subnet of the network. 255.255.255.0 works for most home networks.
    subnet: 255.255.255.0
- At the end of the code, paste this one:
sensor:
  - platform: adc
    pin: GPIO32
    name: "Soil moisture 1"
    id: soil1
    attenuation: auto
    update_interval: 30s
    unit_of_measurement: "%"
    icon: "mdi:water-percent"
    filters:
    - calibrate_linear:
      - 0.95 -> 100
      - 2.50 -> 0
    on_value_range:
      - below: 30
        then:
          - light.turn_off: light30
          - light.turn_off: light45
          - light.turn_off: light60
          - light.turn_off: light75
      - above: 30
        below: 45
        then:
          - light.turn_on: light30
          - light.turn_off: light45
          - light.turn_off: light60
          - light.turn_off: light75
      - above: 45
        below: 60
        then:
          - light.turn_on: light30
          - light.turn_on: light45
          - light.turn_off: light60
          - light.turn_off: light75
      - above: 60
        below: 75
        then:
          - light.turn_on: light30
          - light.turn_on: light45
          - light.turn_on: light60
          - light.turn_off: light75
      - above: 75
        then:
          - light.turn_on: light30
          - light.turn_on: light45
          - light.turn_on: light60
          - light.turn_on: light75


  - platform: adc
    pin: GPIO33
    name: "Soil moisture 2"
    attenuation: auto
    update_interval: 30s
    unit_of_measurement: "%"
    icon: "mdi:water-percent"
    filters:
    - calibrate_linear:
      - 0.95 -> 100
      - 2.50 -> 0


  - platform: adc
    pin: GPIO34
    name: "Soil moisture 3"
    attenuation: auto
    update_interval: 30s
    unit_of_measurement: "%"
    icon: "mdi:water-percent"
    filters:
    - calibrate_linear:
      - 0.95 -> 100
      - 2.50 -> 0


  - platform: adc
    pin: GPIO35
    name: "Soil moisture 4"
    attenuation: auto
    update_interval: 30s
    unit_of_measurement: "%"
    icon: "mdi:water-percent"
    filters:
    - calibrate_linear:
      - 0.95 -> 100
      - 2.50 -> 0


  - platform: adc
    pin: GPIO36
    name: "Soil moisture 5"
    attenuation: auto
    update_interval: 30s
    unit_of_measurement: "%"
    icon: "mdi:water-percent"
    filters:
    - calibrate_linear:
      - 0.95 -> 100
      - 2.50 -> 0

esp32_touch:
  setup_mode: True


binary_sensor:
  - platform: esp32_touch
    name: "Leak sensor"
    pin: GPIO27
    threshold: 50
    on_press:
      then:
        - light.turn_on: lightleak
    on_release:
      then:
        - light.turn_off: lightleak


light:
  - platform: status_led
    id: light30
    internal: true
    pin: GPIO18


  - platform: binary
    id: light45
    output: led45
    internal: true


  - platform: binary
    id: light60
    output: led60
    internal: true

  - platform: binary
    id: light75
    output: led75
    internal: true


  - platform: binary
    id: lightleak
    output: ledleak
    internal: true


output:
  - id: led45
    platform: gpio
    pin: GPIO5


  - id: led60
    platform: gpio
    pin: GPIO17


  - id: led75
    platform: gpio
    pin: GPIO16

  - id: ledleak
    platform: gpio
    pin: GPIO19
This code reads the data from the sensors every 30 seconds, and converts the voltage outputted from the sensors to a percentage, that is more intuitive to read. The values of the calibrate_linear: are the ones that we measured before, and vary between different brands of sensors (I don't know why). The percentage from the first sensor is displayed also with the 4 LEDs, even tough they are totally optional. The touch sensor that is configured on one pin of the ESP32 in going to be used for a leak sensor that I put under the watering system valves (more about this later).
The code should be easy to modify to remove or add sensors, or to include other functions that you need.
In the end the code should look like this, but not paste directly the code below, because to every device is given a different encryption key.
esphome:
  name: sensori-umidita-piante


esp32:
  board: esp32dev
  framework:
    type: arduino


# Enable logging
logger:


# Enable Home Assistant API
api:
  encryption:
    key: "xxx"


ota:
  password: "xxx"


wifi:
  ssid: yourssid
  password: yourpassword


  manual_ip:
    # Set this to the IP of the ESP
    static_ip: 192.168.1.116
    # Set this to the IP address of the router. Often ends with .1
    gateway: 192.168.1.1
    # The subnet of the network. 255.255.255.0 works for most home networks.
    subnet: 255.255.255.0


  # Enable fallback hotspot (captive portal) in case wifi connection fails
  ap:
    ssid: "xxx"
    password: "xxx"


captive_portal:

sensor:
  - platform: adc
    pin: GPIO32
    name: "Soil moisture 1"
    id: soil1
    attenuation: auto
    update_interval: 30s
    unit_of_measurement: "%"
    icon: "mdi:water-percent"
    filters:
    - calibrate_linear:
      - 0.95 -> 100
      - 2.50 -> 0
    on_value_range:
      - below: 30
        then:
          - light.turn_off: light30
          - light.turn_off: light45
          - light.turn_off: light60
          - light.turn_off: light75
      - above: 30
        below: 45
        then:
          - light.turn_on: light30
          - light.turn_off: light45
          - light.turn_off: light60
          - light.turn_off: light75
      - above: 45
        below: 60
        then:
          - light.turn_on: light30
          - light.turn_on: light45
          - light.turn_off: light60
          - light.turn_off: light75
      - above: 60
        below: 75
        then:
          - light.turn_on: light30
          - light.turn_on: light45
          - light.turn_on: light60
          - light.turn_off: light75
      - above: 75
        then:
          - light.turn_on: light30
          - light.turn_on: light45
          - light.turn_on: light60
          - light.turn_on: light75


  - platform: adc
    pin: GPIO33
    name: "Soil moisture 2"
    attenuation: auto
    update_interval: 30s
    unit_of_measurement: "%"
    icon: "mdi:water-percent"
    filters:
    - calibrate_linear:
      - 0.95 -> 100
      - 2.50 -> 0


  - platform: adc
    pin: GPIO34
    name: "Soil moisture 3"
    attenuation: auto
    update_interval: 30s
    unit_of_measurement: "%"
    icon: "mdi:water-percent"
    filters:
    - calibrate_linear:
      - 0.95 -> 100
      - 2.50 -> 0


  - platform: adc
    pin: GPIO35
    name: "Soil moisture 4"
    attenuation: auto
    update_interval: 30s
    unit_of_measurement: "%"
    icon: "mdi:water-percent"
    filters:
    - calibrate_linear:
      - 0.95 -> 100
      - 2.50 -> 0


  - platform: adc
    pin: GPIO36
    name: "Soil moisture 5"
    attenuation: auto
    update_interval: 30s
    unit_of_measurement: "%"
    icon: "mdi:water-percent"
    filters:
    - calibrate_linear:
      - 0.95 -> 100
      - 2.50 -> 0

esp32_touch:
  setup_mode: True


binary_sensor:
  - platform: esp32_touch
    name: "Leak sensor"
    pin: GPIO27
    threshold: 50
    on_press:
      then:
        - light.turn_on: lightleak
    on_release:
      then:
        - light.turn_off: lightleak


light:
  - platform: status_led
    id: light30
    internal: true
    pin: GPIO18


  - platform: binary
    id: light45
    output: led45
    internal: true


  - platform: binary
    id: light60
    output: led60
    internal: true

  - platform: binary
    id: light75
    output: led75
    internal: true


  - platform: binary
    id: lightleak
    output: ledleak
    internal: true


output:
  - id: led45
    platform: gpio
    pin: GPIO5


  - id: led60
    platform: gpio
    pin: GPIO17


  - id: led75
    platform: gpio
    pin: GPIO16

  - id: ledleak
    platform: gpio
    pin: GPIO19
- After the code is complete, we can click on Install, connect the ESP32 to our computer with an USB cable and follow the instructions on screen to upload the code
- When the ESP32 is connected to the WiFi, we can go to the Home Assistant settings, where we will probably see that Home Assistant has discovered the new device
- Click on configure and paste there the encryption key you have copied before.
Later we will see how to set up the automations and the interface to see the data from the sensors.
Step 5: Enclosure for the Circuit


To mount the board with the ESP32 board and the other board I will use two junction boxes and cable glands. On the first box I drilled a hole to mount the cable gland. Then I drilled a hole so that I could connect a cable to the USB port on the ESP32 to power the whole system. I mounted the board in the box with hot glue and a screw. On the box I also mounted the antenna for the ESP32 WiFi. On the lid of the box I mounted the LEDs, although I must admit that they serve practically no purpose, they are just nice to look at. On the other box I mounted only a cable gland, and secured the board inside with screws.
Step 6: Installing the System


Now we can mount everything on the balcony. The box with the ESP32 will be mounted in an attic, so I fixed it to the wall with wall anchors. To power the ESP32 I will use a USB wall charger.
I connected the first two sensors to the board. The other sensors will be connected to the other board, which will be placed on the other side of the balcony. To connect it to the ESP32 I already had from old projects a network cable running around the balcony, which has 8 wires inside, so is perfect for this application. At the two ends of the cable I connected two 6-pin JST connectors, and protected the soldering with heat shrink tubing. I connected the network cable to the ESP32 and to the other board, and I also connected the last 3 sensors.
At this point I finally put the sensors in the soil of the plants I wanted to measure the moisture of.
Step 7: Leak Alarm


I also connected a leak sensor to the ESP32 to put in the attic under the watering system valves. To do this I used a part of striped perfboard connected to two wires going to the ground and to a pin on the ESP32. As we have seen in the code part, I configured a touch sensor on the pin of the ESP32 to detect when water touches the wires. I also made an automation in Home Assistant that if water shorts the two wires sends me a notification on my phone so I can immediately come and fix the problem. An alarm like this would have been extremely useful when I had a leak in the watering system valve and the attic flooded because I noticed it after a few hours.
Step 8: Watering Automation


On the Home Assistant interface I created a page to see the humidity of the plants with graphs as well. So now on the app I can see the percentage of moisture in the plants, but the real problem is being able to use this data to automate watering so that I only water when the plants need it.
In the previous Instructable I showed the system that I use for controlling the watering system from my phone and from Home Assistant. That system works with a solenoid valve connected to a smart relay. However if you want to see more details of this project, check out the other guide.
After thinking about how to automate the watering system using the data from the sensors for a while, I came to a solution to make an automation in Home Assistant:
- Calculate the mean between the percentage from the 5 sensors
- Divide the interval 0-100% into steps (for example 40-50%...)
- In the interface, I put dropdown menus to set a watering time for every moisture step (for example: when soil moisture is 40-50%, water the plants for 10 minutes)
- From the interface I can set a specific time in the day to water the plants
- I also put a switch to manually avoid automatic watering
To do this, firstly I created a few dropdown helpers in Home Assistant, and put in the menu all the watering times I wanted to be able to choose. I made a dropdown helper for every humidity range that I wanted. I suggest dividing the range 0-100% into 10% steps, with maybe 20% ones from 0 to 40%. For the watering times, I set them from 0 minutes to 20 minutes, with steps of two minutes. Then I also created a boolean input helper to manually turn on or off the automated watering, and a time input helper to set the watering time from the UI.
However, if you want to set everything in the automation and not in the UI you can avoid using helpers.
At this point I created an automation that as a trigger checks whether the time set in the time input helper is equal to the current time. If so, it also checks if the watering is enabled (boolean helper = true). If also this condition is met, the automation uses different If-then conditions to water for the time that we have set in the helpers based on the value of the mean between the sensors.
This automation is very long but not too difficult, and maybe there are ways to reduce the size of the configuration. However, if you don't need to set the values from the UI, you can set all the values directly in the automation, that makes it much more simple to set up.
In the automation I used RESTful Commands calling the url of the Shelly relay with the watering time included. This makes the system more reliable, because it needs Home Assistant to be on only when the watering is activated, and then the watering is turned off directly by the relay no matter if the connection is lost. I talked about this more in the previous Instructable.
In the .txt file below I put the YAML code for the automation, hoping it is useful if you want to replicate this project.
Now we will have to figure out what is the right watering time for each plant moisture interval simply by looking at how wet the soil is.
Attachments

Step 9: Finished


With this system we should be able to reduce water waste a lot, since it irrigates based on how wet the plants are. Similar automation could be done to irrigate based on the average temperature of the day, which can be measured with a simple weather station.
I hope you found this guide useful of interesting. To see more details about this project, watch the video on my YouTube channel (it has English subtitles).

![Tim's Mechanical Spider Leg [LU9685-20CU]](https://content.instructables.com/FFB/5R4I/LVKZ6G6R/FFB5R4ILVKZ6G6R.png?auto=webp&crop=1.2%3A1&frame=1&width=306)


