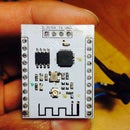
Introduction: ESP8266+Arduino+thingspeak.com Environment Monitors
I wanted to monitor my room temperature and able to post it to thingspeak.com
There are lots of good example and helps on instructables on how to set them up.
Many thanks to these folks for sharing their knowledge.
Step 1: Materials
Arduino Uno compatible
LCD 16x2 (i2C)
ESP8266
DHT22
Bidirectional Logic Level shifter
Breadboard and some jumpers
Access to a wifi connection.
The above are the basics and the code I posted will work with them.
In my final products I put them in an acrylic or plexiglass type panel and drill some mounting holes.
I also throw in some on/off and LED. You will notice that I built my own compatible ATMega328 using instruction from Arduino website on how to built Barebone Arduino.
Enjoy.
Step 2: Put the Wire Together
Thanks to Fritzing. You can see the connection circuit above. Let me know if they are not clear.
A couple things to point out here is that I have used Digital pin 10,11 for Software Serial to communicate to the ESP8266. You can use other pins, but not all the pins can be used with it.
The DHT22 is the humidity and temperature sensors.
The LCD use i2C communication.
The BMP180 is similar to the BMP085 shown in the diagram except that it has fewer pins but pretty much the same. Power it up with 5V-Gnd and connect the SCL and SDA.
Step 3: Programming You ESP8266
Bbefore you can use your ESP8266, you need to set it up to connect to your Wifi first. You can follow the instructions here to set it up or build it into your code. I did not since I found that once I set it up, it remembers it.
I just follow the instruction on how to set it up manually using AT command.
https://www.instructables.com/id/ESP8266-mini-Tutor...
Remember that you need a logic level shifter for your TX and RX of you ESP8266 if you are not using 3.3V based Microprocessor. I also power the ESP8266 using a separate power supply.
Step 4: Programming the Uno
Now it is time to load the .ino files to your Arduino Uno or compatible Arduino board.
The code basically read the sensors value,
then set the strings to be sent to thingspeak.com
There is an example/tutorial within thingspeak.com that shows you how to send temperature to the channels.
I pretty much follow that and modify the coding a bit so my program is a bit smaller since I am sending different informations.
I also did some comparison with previous sensor values and only send the data to thingspeak if the changes are significant.
Step 5: Build the Case
I use 2 plexiglass sandwiching the compatible Arduino board and the rest of the circuits. I saw some one else made their case like this and I like it.
I put a bit more extras into this final product as I want to be able to reuse the board somewhere else in the future.
I made the connectors removable. There are 2 voltage regulators in this board. One provide 5V and another one provide 3.3V.
Enjoy.
Thanks for checking my post.


