Introduction: Emergency Fall Notifier With Panic Button
Every year, one-third to one-half of the population aged 65 and over experience falls. Falls are the leading cause of injury in older adults and the leading cause of accidental death in those 75 years of age and older. For a human, experiencing a fall unobserved can be doubly dangerous. The obvious possibility of initial injury may be further aggravated by the possible consequences if treatment is not obtained within a short time. Statistics show that the majority of serious consequences are not the direct result of falling, but rather are due to a delay in assistance and treatment. Post-fall consequences can be greatly reduced if relief personnel can be alerted in time.
Many elderly live alone either in an apartment or a smaller house after their children have grown up and left home. It is not uncommon after a fall that an elderly person is unable to get up by themselves or summon help. There is therefore a need for an automatic fall detection system in which a patient can summon help even if they are unconscious or unable to get up after the fall.
Many algorithms have been developed but till now it is difficult to distinguish real falls from certain fall-like activities such as sitting down quickly and jumping, resulting in many false positives. Most of the algorithms use accelerometer to detect fall with body orientation, but it is not very useful when the ending position is not horizontal, e.g. falls happen on stairs.
I made a novel fall detection system using both accelerometers and gyroscopes and for that my algorithm reduces both false positives and false negatives, while improving fall detection accuracy. My system instantly notifies to a concern person with SMS and Email when fall occurred. It has also a panic button and an emergency notification can be sent by pressing it.
Step 1: List of Materials
1. MPU6050 Accelerometer & Gyroscope Breakout (Sparkfun)
2. ESP8266 WiFi Module (Sparkfun)
3. Lithium Battery Charging Module (Amazon)
4. Polymer Lithium Ion Battery (Sparkfun)
5. ATmega328 with Arduino Optiboot (Uno) (Sparkfun)
6. 16MHz Crystal
7. 15pf Disk Capacitor (2pcs)
7. 10K Resistor
8. Momentary Button
9. On-off switch
Tools:
1. Soldering Iron (Gearbest)
2. Hot Glue Gun (Gearbest)
3. Diagonal Cutting Pliers (Gearbest)
Step 2: Fall Detection Algorithm
With the prospect of commercialization that often surrounds health related issues, there is substantial research in the academic arena surrounding fall detection for the elderly. The majority of this research is focused on designing new more successful algorithms for distinguishing falls from non-falls. Researchers in this area typically use one or two sensors with which to extract data, develop, and test their algorithms. The first approach uses accelerometers to detect acceleration along a certain axis. When monitoring for a large acceleration from a tri-axis accelerometer, most often they look at the magnitude vector rather than at each of the axes separately. Another approach use both accelerometer & gyroscope to measure acceleration and orientation change and is more accurate compared with first one.
 My algorithm is based off the concept that during a fall, a person experiences a momentary freefall or reduction in acceleration, followed by a large spike in acceleration, then a change in orientation. The flowchart for Algorithm is given below. We see the algorithm checks to see if the acceleration magnitude (AM) breaks a set lower threshold. If this lower threshold is broken, the algorithm then checks to see if AM breaks a set upper threshold within 0.5s. If this upper threshold is broken, the algorithm then checks to see if the person’s orientation has changed in a set range within 0.5s, which would indicate a person has fallen or toppled over. If the person’s orientation has changed, the algorithm then examines to see if that orientation remains after 10s, which would indicate the person is immobilized in their fallen position on the ground. If this holds true, the algorithm recognizes this as a fall. A failure of any of the intermediate decision conditions would reset the triggers and send you back to the start. The strength of this algorithm is that it requires an activity to break two AM thresholds and have an orientation change. Ideally this additional lower threshold would reduce the number of false positives. The weakness of this algorithm is that it requires the fall to involve an orientation change.
Step 3: Implementing the Algorithm With Arduino (ATmega328 Microcontroller)
According to the algorithm following program was developed. For collecting data 6DOF MPU6050 accelerometer & gyroscope sensor is used. This sensor provide data through I2C serial bus. Arduino wire library was used to communicate with with the sensor using ATmega328 microcontroller. I used standalone ATmega chip instead of arduino board to keep the form factor small because form factor is a vital issue for wearable devices. You will get several tutorial on the Internet how to program standalone ATmega chip using Arduino board or if you buy bootloaded ATmega328 microcontroller then you can program it just replacing the chip from the Arduino Uno board. After replacement put your new chip into the Arduino board and program it. After programming detach it from the board and use it in your circuit.
Step 4: Programming ATmega328P Microcontroller With Arduino Uno
The complete Arduino program is attached herewith. You may need to calibrate the MPU sensor for getting accurate result. you may also required to adjust the threshold values used in the program. Make sure that Arduino wire library is installed.
// MPU-6050 Short Example Sketch
// Public Domain
#include
const int MPU_addr=0x68;  // I2C address of the MPU-6050
int16_t AcX,AcY,AcZ,Tmp,GyX,GyY,GyZ;
float ax=0, ay=0, az=0, gx=0, gy=0, gz=0;

//int data[STORE_SIZE][5]; //array for saving past data
//byte currentIndex=0; //stores current data array index (0-255)
boolean fall = false; //stores if a fall has occurred
boolean trigger1=false; //stores if first trigger (lower threshold) has occurred
boolean trigger2=false; //stores if second trigger (upper threshold) has occurred
boolean trigger3=false; //stores if third trigger (orientation change) has occurred

byte trigger1count=0; //stores the counts past since trigger 1 was set true
byte trigger2count=0; //stores the counts past since trigger 2 was set true
byte trigger3count=0; //stores the counts past since trigger 3 was set true
int angleChange=0;


void setup(){
  Wire.begin();
  Wire.beginTransmission(MPU_addr);
  Wire.write(0x6B);  // PWR_MGMT_1 register
  Wire.write(0);     // set to zero (wakes up the MPU-6050)
  Wire.endTransmission(true);
  Serial.begin(9600);

  pinMode(11, OUTPUT);
  digitalWrite(11, HIGH);
}
void loop(){

  mpu_read();
  //2050, 77, 1947 are values for calibration of accelerometer
  // values may be different for you
  ax = (AcX-2050)/16384.00;
  ay = (AcY-77)/16384.00;
  az = (AcZ-1947)/16384.00;

  //270, 351, 136 for gyroscope
  gx = (GyX+270)/131.07;
  gy = (GyY-351)/131.07;
  gz = (GyZ+136)/131.07;

  // calculating Amplitute vactor for 3 axis
  float Raw_AM = pow(pow(ax,2)+pow(ay,2)+pow(az,2),0.5);
  int AM = Raw_AM * 10;  // as values are within 0 to 1, I multiplied
                         // it by for using if else conditions

  Serial.println(AM);
  //Serial.println(PM);
  //delay(500);

  if (trigger3==true){
     trigger3count++;
     //Serial.println(trigger3count);
     if (trigger3count>=10){
        angleChange = pow(pow(gx,2)+pow(gy,2)+pow(gz,2),0.5);
        //delay(10);
        Serial.println(angleChange);
        if ((angleChange>=0) && (angleChange<=10)){ //if orientation changes remains between 0-10 degrees
            fall=true; trigger3=false; trigger3count=0;
            Serial.println(angleChange);
              }
        else{ //user regained normal orientation
           trigger3=false; trigger3count=0;
           Serial.println("TRIGGER 3 DEACTIVATED");
        }
      }
   }
  if (fall==true){ //in event of a fall detection
    Serial.println("FALL DETECTED");
    digitalWrite(11, LOW);
    delay(20);
    digitalWrite(11, HIGH);
    fall=false;
   // exit(1);
    }
  if (trigger2count>=6){ //allow 0.5s for orientation change
    trigger2=false; trigger2count=0;
    Serial.println("TRIGGER 2 DECACTIVATED");
    }
  if (trigger1count>=6){ //allow 0.5s for AM to break upper threshold
    trigger1=false; trigger1count=0;
    Serial.println("TRIGGER 1 DECACTIVATED");
    }
  if (trigger2==true){
    trigger2count++;
    //angleChange=acos(((double)x*(double)bx+(double)y*(double)by+(double)z*(double)bz)/(double)AM/(double)BM);
    angleChange = pow(pow(gx,2)+pow(gy,2)+pow(gz,2),0.5); Serial.println(angleChange);
    if (angleChange>=30 && angleChange<=400){ //if orientation changes by between 80-100 degrees
      trigger3=true; trigger2=false; trigger2count=0;
      Serial.println(angleChange);
      Serial.println("TRIGGER 3 ACTIVATED");
        }
    }
  if (trigger1==true){
    trigger1count++;
    if (AM>=12){ //if AM breaks upper threshold (3g)
      trigger2=true;
      Serial.println("TRIGGER 2 ACTIVATED");
      trigger1=false; trigger1count=0;
      }
    }
  if (AM<=2 && trigger2==false){ //if AM breaks lower threshold (0.4g)
    trigger1=true;
    Serial.println("TRIGGER 1 ACTIVATED");
    }
//It appears that delay is needed in order not to clog the port
  delay(100);
}

void mpu_read(){
  Wire.beginTransmission(MPU_addr);
  Wire.write(0x3B);  // starting with register 0x3B (ACCEL_XOUT_H)
  Wire.endTransmission(false);
  Wire.requestFrom(MPU_addr,14,true);  // request a total of 14 registers
  AcX=Wire.read()<<8|Wire.read();  // 0x3B (ACCEL_XOUT_H) & 0x3C (ACCEL_XOUT_L)
  AcY=Wire.read()<<8|Wire.read();  // 0x3D (ACCEL_YOUT_H) & 0x3E (ACCEL_YOUT_L)
  AcZ=Wire.read()<<8|Wire.read();  // 0x3F (ACCEL_ZOUT_H) & 0x40 (ACCEL_ZOUT_L)
  Tmp=Wire.read()<<8|Wire.read();  // 0x41 (TEMP_OUT_H) & 0x42 (TEMP_OUT_L)
  GyX=Wire.read()<<8|Wire.read();  // 0x43 (GYRO_XOUT_H) & 0x44 (GYRO_XOUT_L)
  GyY=Wire.read()<<8|Wire.read();  // 0x45 (GYRO_YOUT_H) & 0x46 (GYRO_YOUT_L)
  GyZ=Wire.read()<<8|Wire.read();  // 0x47 (GYRO_ZOUT_H) & 0x48 (GYRO_ZOUT_L)
  }
Attachments
Step 5: Making IFTTT Channel
If you’re not using IFTTT (If This Then That), you’re seriously missing out. If This Then That allows you to combine different services with your own custom logic. Channels are the fundamental building blocks of IFTTT. They represent web services that provide data sources or even physical devices like fitness wearables.
The Maker Channel allows you to connect IFTTT to your personal DIY projects. With Maker, you can connect a Recipe to any device or service that can make or receive a web request.
I will use Maker Channel to receive a GET request from ESP8266 Module when triggered by ATmega chip. Maker Channel then send a SMS to a predefined number using SMS Channel. So, let's explain how to work with IFTTT.
1. If you don't have one already, create an account on www.IFTTT.com.
 2. After sign in click to Channels to create a channel

3. Select Maker from DIY Electronics
4. Click to Connect button
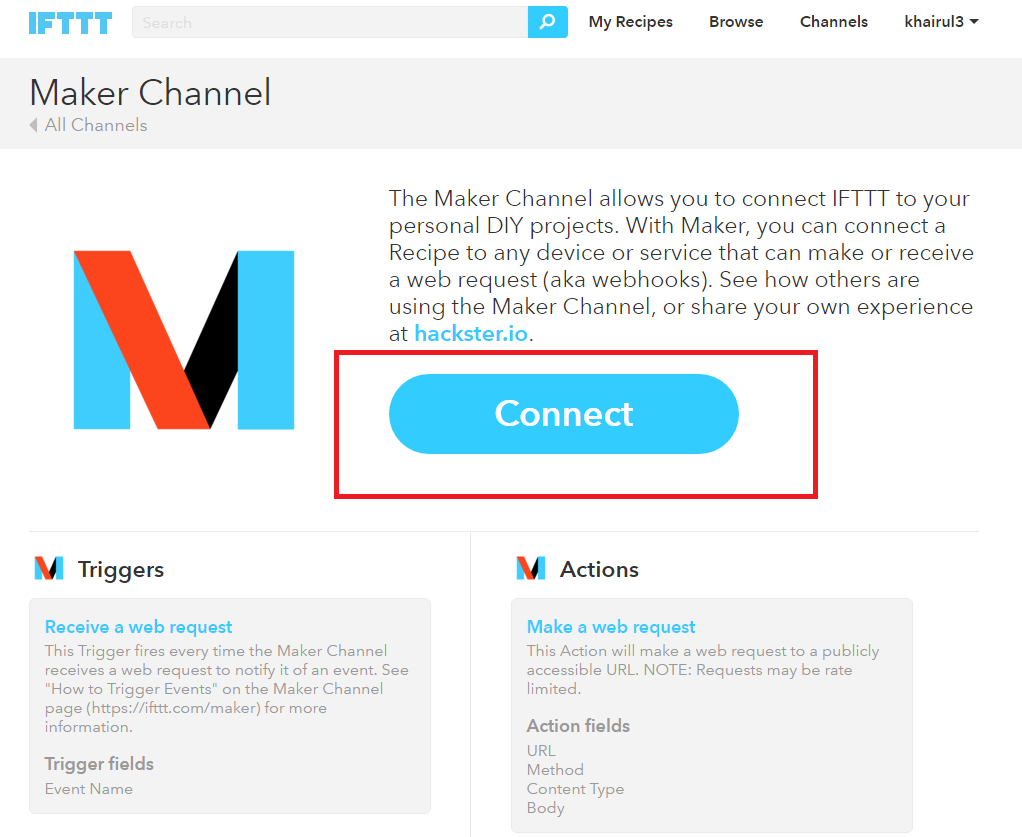
5. Note your key, it will be required at the time of programming the ESP8266 module. Then click to Create a New Recipe.
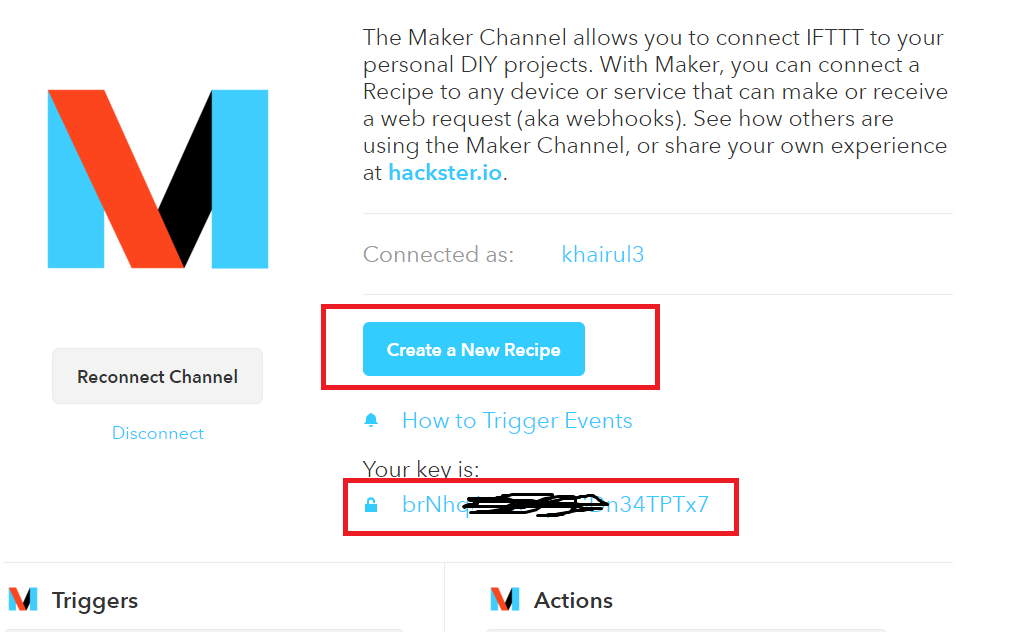
6. Click on this

7. Choose Maker as Trigger Channel

8. Choose Receive a web request

9. Make an event name, I used 'button'. Event name is important and you have to use same name in the program.

10. Then click to that

11. Choose Android SMS as Action Channel

12. Click Send an SMS as an Action

13. Enter a phone number to which you want to get the SMS
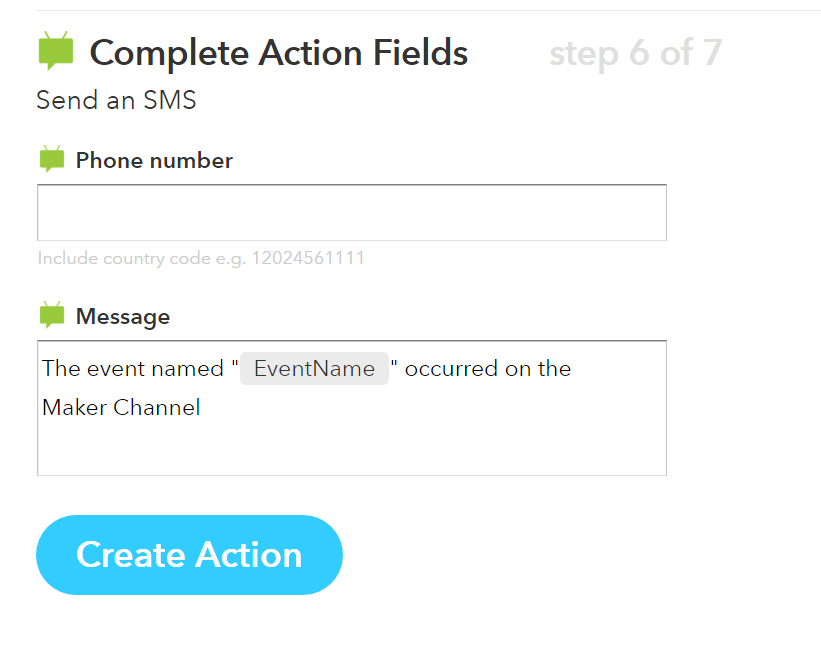
14. Finally, click to Create Recipe
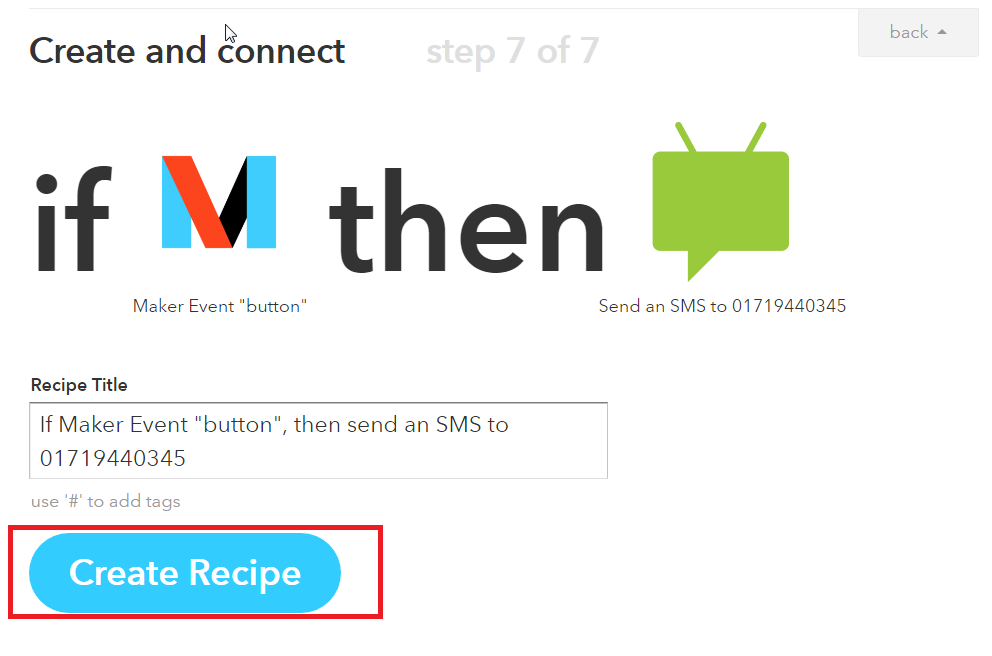
15. You will see the following response with Recipe ID.
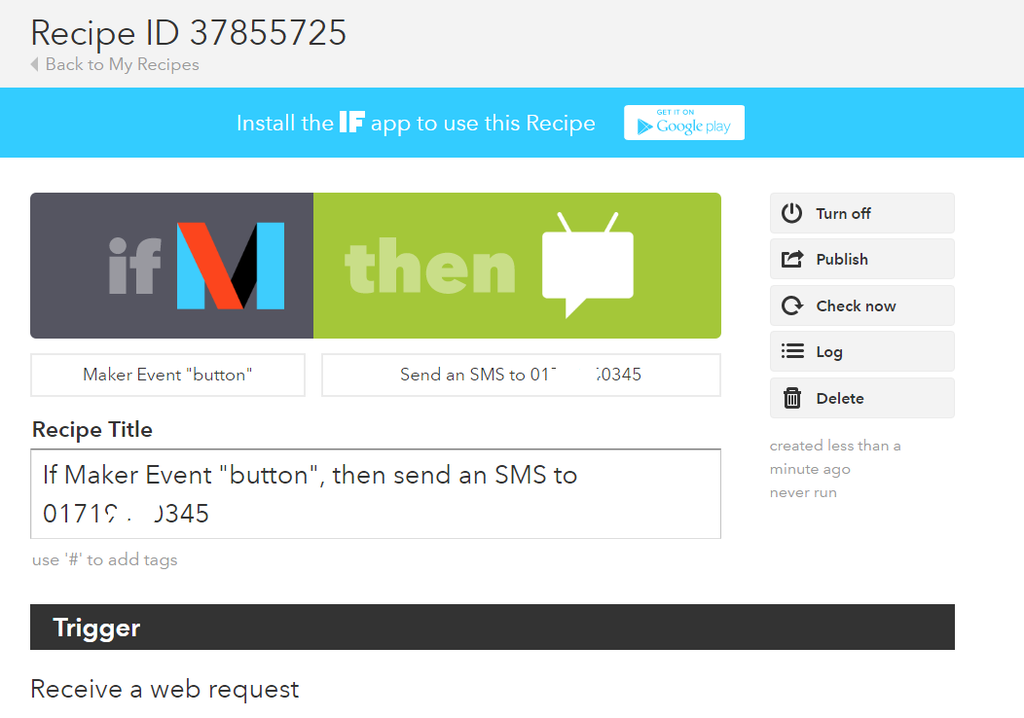
Congratulation! You successfully created your IFTTT Channel & Recipe.
Now, you have to install IFTTT app to your mobile phone. Install it to your mobile phone and signed in into your account.
Step 6: Programming ESP8266 Module
ESP8266 MCU is a wifi chip plus a programable micro-controller. There are several ESP8266 boards available, usually numbered ESP-01 through ESP-12. The prices vary from around $2 for a simple ESP-01 to $15 for a complete board with USB to serial and 3.3 volt regulator. Because the ESP8266 provides a cost-effective solution to the rapidly growing market of internet-connected projects and devices (Internet Of Things), it has become one of the most popular development platforms over the past year and a half. In consequence, a dedicated community has formed around the platform (http://esp8266.com), which has been focused on improving its functionality. For starters, different firmware options have been ported to run on the ESP8266, effectively taking it from a simple Serial to Wi-Fi adapter into a fully functional microcontroller with access to its GPIO and hardware-based functions like PWM, I2C, 1-Wire communication, and ADC; all this, of course, in addition to maintaining its Wi-Fi capabilities.
Before start programming you need to flash your ESP-01 with the latest NodeMCU firmware. Once you have uploaded the latest NodeMCU firmware. All yo need is to upload init.lua, button.lua and ifttt.lua. Don't forget to modify your SSID, password, IFTTT trigger and key. To upload all the Lua files you may use LuaLoader.
Special thanks to Noel Portugal who first developed the code snippets for his IFTTT Easy Button.
Step 7: Circuit Diagram
Circuit diagram was designed using Eagle schematic design software. As I mentioned earlier I used standalone Arduino chip for my project and for that I used ATmega328P in the schematic. A 16MHz crystal is used as clock source. Two 15pf ceramic capacitor is added for better stability. The rang can be 15pf to 22pf. You may used any value within the range. Microcontroller communicates MPU sensor through I2C bus and for that SCL and SDA pin is used to connect with MPU sensor. For receiving data correctly an interrupt signal is required and external hardware interrupt INT0 is used for the purpose. You see, I connect reset pin of microcontroller directly to the VCC. If you want reset facility you should use a 10K resistor between Vcc & Reset pin and add a button switch between Ground & reset pin. After detecting any fault microcontroller will trigger an I/O pin of ESP8266 wifi module and for that I connected Arduino pin 11 to ESP8266 GPIO2 pin. Arduino pin 11 is the pin 17 of ATmega328 IC. I used a momentary button to the PB5 of the microcontroller and the button will act as a panic button.
Attachments
Step 8: PCB Design
PCB was designed using Eagle Layout editor and the board file is attached below. I tried to keep form factor small but as I used toner transfer method to developing the PCB and for that I had to use wider trace size (24mil). One jumper was required and marked as red in the top layer. PDF file is attached. You may directly print it without any scaling. Any scaling will make the thing useless. If you want to know details about PCB design using Eagle you may follow the videos.
Step 9: Etching & Drilling
Etching is a "subtractive" method used for the production of printed circuit boards: acid is used to remove unwanted copper from a prefabricated laminate. This is done by applying a temporary mask that protects parts of the laminate from the acid and leaves the desired copper layer untouched. You can etch a PCB by yourself, in a lab or even at home, through a simple and inexpensive production process. Two Acid types that can be used for etching are ferric chloride (Eisen-3-Chlorid) and Sodium Persulfate (Natriumpersulfat - Feinätzkristall). Etching can be done in simple plastic boxes as I used here. For details about etching you can follow this nice instructables: Sponge + Ferric Chloride Method -- Etch PCBs in One Minute!.& this tutorial.
After successfully etching the PCB you need to drill it using any PCB drill. You can you mini drill or DIY drill using a simple DC motor. I used a 12V DC motor to make my drill and it's performance is very good.
Step 10: Solder ESP8266 Module to PCB
I think you made the PCB successfully. Now it is the time to soldering all the components. If you have no soldering experience I recommend you the tutorial How to Solder - Through-hole Soldering from sparkfun and a nice instructables How to Solder. I assumed you have now enough experience of soldering. So, we can start soldering now. First you should solder a 28 pin IC base for the microcontroller. It is good practice to use IC base without directly soldering the IC to the PCB board. It can protect your IC from damaging it during soldering. Then you need to solder ESP8266 module very carefully to the PCB board. Also solder crystal and disk capacitors.
Step 11: Solder MPU6050 Sensor Board to PCB
As you soldered IC base and ESP module in the previous step now it is the time to solder MPU sensor. Carefully solder it to the board. I attached some image from my case.
Step 12: Connect & Attached Power Switch & Charging Circuit
Now, connect a lipo battery charging module to the back side of the PCB. As you are attaching it in the back side you have to use hot glue to attached it with PCB. Be careful about short circuit. Make enough gap between soldered pad and the charging module when attaching hot glue. You should also attached a on-off switch with the module.
Step 13: Connect Battery
At this stage connect a li-ion battery to the charging circuit. You also have to attach it using hot glue. You may use some insulating tape at the bottom side of battery for better protection from short circuit. You may follow the photos.
Step 14: Testing
Connection is completed. Noe, it is the high time to test our invention. I think we should first check the charging of the battery. Connect a smart phone charging cable to the mini USB port. Red led should turn on means battery is charging. When battery get full charged then blue led will be on instead of red.
OK, our charging circuit is working good.
Now, turn on the on/off switch. Two leds, one from MPU sensor and another from ESP module will be turn on and it proves that our device is working correctly so far. At the beginning blue led from ESP module will be blink and indicate it is connecting to the wifi network.
Before farther testing we need to add a shock proof casing or box. You you have access to 3D printer definitely it will be a very good option to make a 3D printed casing for the device. Unfortunately I have no access to any 3D printer and for that I have to think how I can make a case for my device.
Let me some moment to think about the matter. See you again to the next step.
Step 15: Different View of Completed Device
I used some image of the completed device here from different view.
Step 16: Making a Case
OK guys I find a way to make the case. I used two instructable embroidery iron patch to make the case. Just use a needle and some thread to make a case I shown in the images.
Step 17: Putting the Device Into the Case
Now, put the device into the instructables case and attached a safety pin in the top side of the case. power on the device. Use a tweezers to power on the device. After successful powering leds will be glow. Now test it by throwing from the top into your bed. If you receive ad SMS into your mobile phone than Congratulation!!!
You successfully made a fall detector with emergency notification.
Now you can throw it, you can put it into your pocket or you can hang it on your shoulder using a ribbon or you can push the panic button if you are in trouble. Use it as you like.


