

Introduction: How to Make LAN/Ethernet Relay Switch Using Arduino UNO


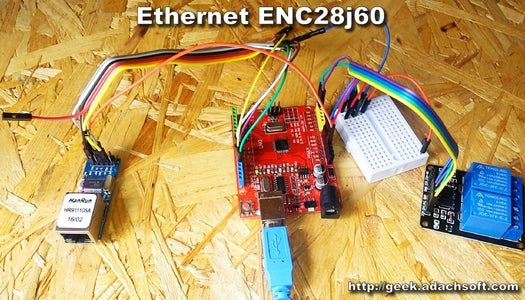
How to make LAN/Ethernet relay switch using Arduino UNO and ethernet shield ENC28j60. This is a simple tutorial, remote control over the LAN. To control it I uses HTTP and JSON. This electronic circuit can be used as part of a larger system, iot Internet of things.
This article can also see here:

Step 1: Components
Step 2: Schematic

Step 3: Ethernet Modules ENC28J60
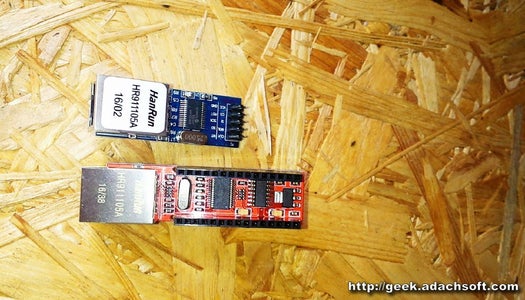

| Arduino UNO | Ethernet shield nano | Ethernet ENC28J60 |
|---|---|---|
| Pin 13 / SCK | D13 | SCK |
| Pin 12 / MISO | D12 | SO |
| Pin 11 / MOSI | D11 | SI |
| Pin 10 / SS | D10 | CS |
| GND | GND | GND |
| 3V3 | VCC | VCC |
Step 4: Software
This software supports two relays, but it's not a problem to increase their number. Ip device is permanently assigned to 192.168.0.101.If you had more devices working on the same network, you'd have to remember about unique IP and MAC addresses.
#include <UIPEthernet.h> // Used for Ethernet

#define PIN_LED 2

#define PIN_RELAY_0 A5
#define PIN_RELAY_1 A4


// **** ETHERNET SETTING ****
// Ethernet MAC address - must be unique on your network
byte mac[] = { 0x41, 0x44, 0x41, 0x43, 0x48, 0x41 };
//Ethernet interface IP address (unique in your network)
IPAddress ip(192, 168, 0, 101);
//ethernet interface IP port (80 = http)
EthernetServer server(80);
EthernetClient client;
String str = "";


void setup() {
  Serial.begin(115200);
  Serial.print("START");

  pinMode(PIN_RELAY_0, OUTPUT);
  pinMode(PIN_RELAY_1, OUTPUT);

  SW(0, LOW);
  SW(1, LOW);

  // start the Ethernet connection and the server:
  Ethernet.begin(mac, ip);
  server.begin();

  Serial.print("IP Address: ");
  Serial.println(Ethernet.localIP());
  Serial.println();
}

void loop() {
  client = server.available();

  if( client ){
    Serial.println("BEGIN-------------->\n");

    boolean currentLineIsBlank = true;
    String line = "";
    bool firstLine = true;

    while (client.connected()){

      if (client.available()) {
        char c = client.read();
        Serial.print(c);

        if (c == '\n' && currentLineIsBlank) {
          String html = "{";
          for(int i=0; i<2; i++){
            if( SW_state(i) ){
              html += "\"sw_"+String(i)+"\":1 ";
            }else{
              html += "\"sw_"+String(i)+"\":0 ";
            }

            if( i<1 ) html += ",";
          }
          html += "}";

          client.println(html);
          break;
        }

        if (c == '\n') {

          currentLineIsBlank = true;
          if( firstLine ) {
            firstLine = false;
            Serial.println("-------------------------------" + line);
            if( line.indexOf( "sw_on=0" ) >= 0 ){
              SW(0, HIGH);
            }else if( line.indexOf( "sw_on=1" ) >= 0 ){
              SW(1, HIGH);
            }else if( line.indexOf( "sw_off=0" ) >= 0 ) {
              SW(0, LOW);
            }else if( line.indexOf( "sw_off=1" ) >= 0 ){
              SW(1, LOW);
            }
          }
        }else if (c != '\r') {
          currentLineIsBlank = false;
          if( firstLine ) {
            line = line + c;
          }
        }
      }
    }

    delay(10);

    client.stop();
    Serial.println("END-------------->\n");
  }
}

bool SW_state(byte num){
  bool val;
  switch(num){
    case 0: val = digitalRead(PIN_RELAY_0); break;
    case 1: val = digitalRead(PIN_RELAY_1); break;
  }
  return !val;
}

void SW(byte num, bool val){
  val = !val;
  switch(num){
    case 0: digitalWrite(PIN_RELAY_0, val); break;
    case 1: digitalWrite(PIN_RELAY_1, val); break;
  }
}
Download source code: ArduinoUnoEthernet.inoStep 5: Testing


To turn on the relay, just enter the link in the browser http://192.168.0.101/sw_on=1, "1" is the relay number. To turn off the relay http://192.168.0.101/sw_on=1, In response we get a JSON relay state {"sw_0":0 ,"sw_1":0 }.
![]()
![]()
![]()
