Internet Photo Frame


Intro: Internet Photo Frame
Unlike most commercial frames, this digital picture frame connects to Flickr, allowing you to add and remove photos without a physical storage device, such as USB stick or SD card. A Raspberry Pi hidden inside the TV connects to the internet and automatically updates the pictures when the Flickr album is modified.
Materials:
- Raspberry Pi - RadioShack 277-196
- Wifi dongle (or ethernet cord) - RadioShack 55044156 (online only) or RadioShack 55066170 (online only)
- Small TV/monitor - RadioShack 55059573 (online only)
- HDMI cable (shortest you can find) - RadioShack 1500477
- Micro USB charger (for powering the Raspberry Pi) - RadioShack 2302182
- Open back picture frame
- Balsa wood
- Picture frame mat with a 6" x 8" cut out
- Styrofoam/craft foam
- Wood glue
- Small wood screws - #2, 3/8" long
- Hinge
STEP 1: Set Up the Raspberry Pi

Since there are already plenty of good guides for setting up a Raspberry Pi, I won't go into the details here. I followed this instructable, and made sure that I had auto-login working (wifi doesn't work well with my network, so I ended up plugging in to ethernet since I had the power cables showing anyway). I would also recommend setting up SSH so you can access the Pi without taking apart your picture frame.
STEP 2: Install Feh
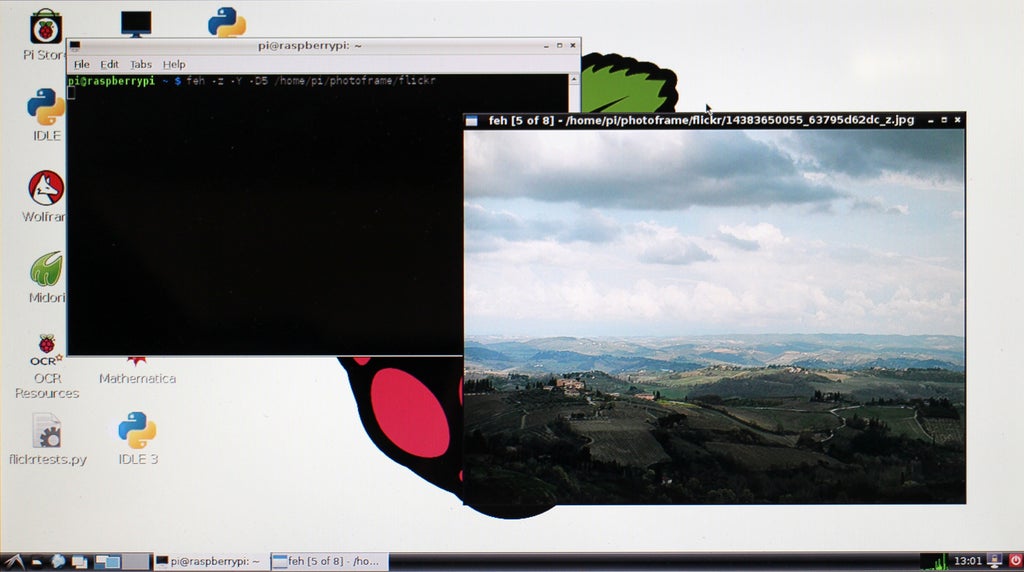
The Raspberry Pi is essentially running a full-screen slideshow and updating the folder it pulls the photos from. To run the slideshow, I used an image viewer called "feh". You can find documentation here. To actually install feh, type "sudo apt-get install feh" in the terminal window of the pi and hit ENTER. This should automatically download the library and install it in the proper location (if you are connected to the internet).
In the feh documentation, you can see the options available for the image viewer. I used the full screen, delay, full zoom, hidden cursor, and randomize options. This meant that my line of code looks like "feh -F -Z -z -Y -D5 /home/pi/photoframe/flickr" (the file path is the location where I store the photos I pull from Flickr). For testing, I used a delay of only five seconds so I can check that it works without waiting. The final frame will have a longer delay of five minutes or so. Feh is run directly from the terminal window, so you can test if it is working pretty easily.
STEP 3: Write Shell Scripts
Since feh is run in the terminal, the slideshow itself can't be directly run from within the python code. However, shell scripts (.sh files) containing terminal commands can be run from python code. I wrote two scripts - one for running the slideshow and one for closing it - and saved them both in the directory /home/pi/bin. More info on how to write a script can be found here.
Running the slideshow ("sudo nano /home/pi/bin/script_slideshow") :
#!/bin/bash
DISPLAY=:0.0 XAUTHORITY=/home/pi/.Xauthority feh -Z -F -z -Y -D 3 /home/pi/photoframe/flickr &
Killing the slideshow ("sudo nano /home/pi/bin/kill"):
#!/bin/bash
if [ ! -z "$1" ]; then
PROCESS=$1
PIDS= ps ax | grep $PROCESS | sed -e "s/.*killp.*//" -e "s/ *\ ([0-9]\{$.*/\1/" | grep -v "^$"
if [ ! -z "$PIDS" ]; then
echo Killing $PROCESS pid=$PIDS
kill -9 $PIDS
else
echo No process $PROCESS in process list
fi
else
echo Usage : $0 process_name
fi
STEP 4: Setup Flickr
Obviously, you need to sign up for a Flickr account in order to have a Flickr album to pull photos from. Once you do that, you also need to get an API code in order to run their API on your devices. Go here and follow their instructions for a non-commercial code.
The python code uses all of the photos in an album, so make an album with all the photos set to PUBLIC (otherwise you can't access them without account information). Go to the album page and write down the album id number (located at the end of the URL - see the photo) so you can use it in the python code to reference the album.
STEP 5: Main Python Code
The python code connects to the Flickr through its API and checks to see if it needs to add or remove photos from the folder on the Raspberry Pi. If there is a photo on Flickr that isn't in the folder, it downloads it and adds it to the folder. On the other hand, if the folder is bigger than the album, it figures out which photo doesn't have a match on Flickr and deletes it. If the code modifies the folder it restarts the slideshow so the changes can take effect.
To install the library for the API, type "pip install flickrapi" in the terminal window and hit enter. Documentation can be found here. Make sure you use the newest version (updated June 18th), because older versions won't work due to changes in the Flickr API.
STEP 6: Edit the Crontab
I wanted the Raspberry Pi to periodically check the Flickr album for updates, so I edited the crontab (internal timing script) to run the main python script every minute.
1) Open the crontab: crontab -e
2) At the bottom, type: */1 * * * * python /home/pi/photoframe/download_flickr_set.py (or wherever you saved the script)
3) Save and close the file
STEP 7: Setup Auto-start
To make the Raspberry Pi load directly into picture frame mode, I had to add the code to the start-up routine. I did this by adding a file to the autostart directory that contains the slideshow script.
I mostly followed the directions found on this project page, but I'll post exactly what I did here
1) Change directory: cd /etc/xdg/autostart
2) Create the new file: sudo nano slideshow_image_changer.desktop
3) Write the file:
[Desktop Entry]
Type = Application
Name=Slideshow Image Changer
Comment=Slideshow Image Changer
Exec=/home/pi/bin/script_slideshow.sh
Terminal=true
4) Save and close the file
STEP 8: Disable Sleep
Finally, I didn't want the screen to go black after 10 minutes (as the pi normally does after a period of inactivity) so I disabled its ability to go into sleep mode and to automatically turn off.
1) Open the kbd config file: sudo nano /etc/kbd/config
2) Inside the file, change the BLANK_TIME to 0 (so it never goes blank)
3) Still inside the file, change the POWERDOWN_TIME to 0 (so it never automatically shuts off)
4) Save and close the file
STEP 9: Open Up the Monitor
Once the code was setup and working I assembled the physical frame. I wanted to reduce the thickness of the frame as much as possible so I decided to hide the Pi inside of the TV.
The TV is held together with a bunch of screws, so simply unscrew them. Carefully pry apart the casing - I used a screwdriver to help. Be careful not to pull on the internal wires! There are cables running between the two halves of the casing (between the circuit board and the screen) that need to stay plugged in.
The vertical part of the TV stand is connected to the interior of the TV and should be removed. This will make the monitor a little smaller and easier to fit into a frame.
STEP 10: Move the Circuit Board
As is, there isn't a good place to put the Raspberry Pi. Undo the screws securing the circuit board, remove the tape securing the cables, and gently move it over to one side (the TV is unplugged so there isn't anything that should shock you, but to be safe try not to touch the capacitors). Make sure you will have enough space to plug in the power and HDMI cables. I used bits of foam to prop up the board and keep it level, and re-did some of the screws to help secure it.
I also entirely removed the cable sockets so I could use the space to run my own cables out of the TV. It's just a piece of bent sheet metal held in with a few more screws.
STEP 11: Install the Raspberry Pi
I attached the Raspberry Pi to the inside of the TV with a bit of velcro so I could remove it later if I wanted. A piece of double-stick tape would work as well. Once again, make sure you have enough space to plug in the cables.
STEP 12: Plug in the Cables
The HDMI cable goes between the TV and the Pi, so it can be housed entirely inside the monitor case. I bought the shortest cable I could find (3 feet) and wrapped it up tightly before plugging in the ends and securing it in place with tape. I also plugged in the power for the monitor, power for the pi, and an ethernet cable (or if you use wifi, the wifi dongle). I loosely taped all the cables in place and closed the casing.
STEP 13: Figure Out Your Frame and Mat Size
Although the screen of my TV is relatively large, the photos didn't take up the entire space even when displayed at full screen. Happily, they were just over 6" x 8", which is a standard picture size. I bought a deep frame big enough to go around my monitor (11" x 14") and a white mat of the same size with a 6" x 8" cutout. Since the photo also isn't quite centered, I put the frame over my TV and adjusted the position of the mat before taping it in place.
STEP 14: Extend the Frame
The frame I purchased wasn't deep enough to hide the sides of the TV, so I added balsa wood extensions to the back. Cut strips of the wood to fit around the TV and sit snugly inside the picture frame. Glue these in place with wood glue and clamps. (note that I covered the front of the picture frame with scrap paper to keep the white mat from getting dirty while I was in the shop)
STEP 15: Build the Stand
Rather than hanging the picture frame, I decided I wanted it to sit on my desk. Therefore, I needed to make a stand. I bought a simple hinge and screwed both sides into some scrap wood so it would lie properly against the frame. I then glued on a piece of balsa whose edge I had sanded down to make an angle of about forty five degrees (to match the angle of the hinge). Finally, I measured and cut a piece to go across the back of the picture frame and glued/screwed it to the hinge assembly.
STEP 16: Seal the Balsa
I found that the balsa looked a little cheap compared to the sealed wood of the picture frame. I decided to add a few coats of clear coat to make it look nicer. It only needed two coats, and I sanded the balsa lightly after the first coat. While doing this, I taped off the edges of the picture frame to protect it from drips.
STEP 17: Add Mounting Blocks
There wasn't enough room on the sides of my frame for me to mount the back panel, so I added small blocks that I could screw into. These I cut from some scrap 1/4" balsa and glued to the interior, with the top surface flush with the back edge of the frame.
STEP 18: Insert the Monitor
Once the frame was dry, I inserted the TV. I cut strips of styrofoam to hold it place within the frame, since it was a little too small.
STEP 19: Secure the Back
The back panel (with the stand attached) is screwed into the top edge of the frame and the two mounting blocks.
STEP 20: Done!
Turn over your frame, take off the covering, and admire it. When you plug in the Pi and turn on the TV (you will probably need to use the remote for this - the TV I used does not turn on when it is first plugged in) it should load directly into a slideshow of your Flickr album after boot-up. If you add or remove pictures from the album, within a minute the slideshow should close and restart to include your changes.
20 Comments
Dixioldie 6 years ago
Hi,
I need help for a similar, abit more complex project
My mother (90 years old) lives far away from me and my brothers and sisters,
She wants to participate on all, what we do.
So, we would like to build up a solution with actual pictures, shown on her TV.
R-Pi cna do this, if all pictures are stored local.
To do this, I can't solve the following tasks yet:
a) We have a folder on Dropbox for each of us children.
Each of us creates subfolders for actual things.
How can I detect, all folders, and actualize folders and contents time by time?
(Folders and images no longer available on Dropbox should be deleted on local device)
b) How can I show the folders like a TV program?
My mother should select a folder with the remote IR control, just pressing PR+ and PR-
(IR control is something I can realize with LIRC)
My coding knowledge with PYTHON3 is not good enough to solve this issue.
It would be great, if anyone would like to help me (and my mother).
tmv22 6 years ago
could you please update or create another tutorial on how to do this on a 4k TV/monitor? the rpi cannot handle 4k. only the Odroid C2 can but your tutorial doesnt work for the C2. thanks!
dannyk6 7 years ago
Take a look at DAKboard (https://dakboard.com) for the software side of this. It can sync with 10+ photo sources and adds calendars, news, weather and more! Works great with the Raspberry Pi too!
ajarvis5 8 years ago
It looks like your code is a little outdated/broken for download_flickr_set.py and script_slideshow.sh. Here's the fixed code that I whipped up: https://gist.github.com/Jarvl/3799acac27283f80641d...
It's important to note that in script_slideshow.sh, "DISPLAY=:0.0" doesn't work within a cron job because cron runs at a deeper layer than the X display. I replaced it with "export DISPLAY=:0.0", works just fine now.
Also to stop the display from going blank, I had to add this line into "/etc/lightdm/lightdm.conf" under [SeatDefaults]: xserver-command=X -s 0 -dpms
Great project though, I'm working on getting the frame together soon!
bdennis4 8 years ago
thank you for your time and community support :)
i inserted "export DISPLAY=:0.0" to replace "DISPLAY=:0.0"
per your recommendation i received the following errors.
pi@raspberrypi:~/bin $ /home/pi/bin/script_slideshow: line 3: export: `-Z': not a valid identifier /home/pi/bin/script_slideshow: line 3: export: `-F': not a valid identifier /home/pi/bin/script_slideshow: line 3: export: `-z': not a valid identifier /home/pi/bin/script_slideshow: line 3: export: `-Y': not a valid identifier /home/pi/bin/script_slideshow: line 3: export: `-D': not a valid identifier /home/pi/bin/script_slideshow: line 3: export: `3': not a valid identifier /home/pi/bin/script_slideshow: line 3: export: `/home/pi/photoframe/flickr': not a valid identifierhere are the contents of my script_slideshow:
#!/bin/bash export DISPLAY=:0.0 XAUTHORITY=/home/pi/.Xauthority feh -Z -F -z -Y -D 3 /home/pi/photoframe/flickr &ajarvis5 8 years ago
You need to put all of those commands on a different line. Refer to my gist https://gist.github.com/Jarvl/3799acac27283f80641d...
JesseG81 7 years ago
Hi Ajarvis5,
I know it's been a few months since there has been a reply on this board, but I used your knew code, but the script doesnt start up when I reset the pi. I'm new to script and coding so not sure if I need to something additional to get it to run and pull the images.
Thanks!
lorduncan 8 years ago
thanks for the update code :)
Runing in a Pi Zero like a charm
dannyk6 8 years ago
This is great, thanks for sharing! You may want to take a look at DAKboard (http://dakboard.com) for the software side of things. Works with popular photo sharing services (Flickr, Google Photos, Instagram etc.) and adds calendar, news and weather functionality!
lorduncan 8 years ago
Any idea/code about do this but usering a Facebook folder instead of Flickr?
HalvardS 9 years ago
Very nice guide, but would you happen to know how I can make this without having the photos public? I'm making a frame for my grandmother, and the plan is to make it possible for my uncles and aunts to add photos to it remotely (and easily). I first thought of Dropbox or GDrive, but none of those have sync clients supported in Raspbian.. And I obviously don't want family photos in a public Flickr album.
juan9999 10 years ago
awesome tutorial. Has anyone written scripts to do a live slideshow from an instagram user or hashtag?
wardelder 10 years ago
Found it! looks like the photo.__dict__['attrib'] item has been replaced with photo.attrib
So far the code is working.
wardelder 10 years ago
I made a typo, I am running FlickrAPI v2.0 not v1.4.
wardelder 10 years ago
I have tried you code but keep getting an error on one line:
url, filename = make_url(photo.__dict__['attrib'])
I get the following errror:
AttributeError: __dict__
I cannot figure this out except that my flickr API may be different than yours. I am running Flickrapi v1.4
I believe my version is the issue because the following line was wrong in your code for v1.4:
flickr = flickrapi.FlickrAPI (FLICKR_KEY)
I had to change it to:
flickr = flickrapi FlickrAPI (FLICKR_KEY,FLICKR_SECRET)
This worked but the __dict__ does not. I wish I knew more about Python as I am at a dead end...
aphanman 10 years ago
This is great. I actually started working on this too, but ran into an issue. I modified the steps a little bit and mounted a share on my Pi so it will display my own pictures from a network share. However, it seems that I get an error and based on my research it sounds like feh wasn't made to handle pictures bigger than 3MB. Have you ran into this issue?
Beaconsfield 10 years ago
I did not, but my images weren't particularly large. You should be able to reduce the picture size automatically in your code before displaying it with feh, although off the top of my head I can't tell you how.
bigbutbald 10 years ago
Is there a way to adjust this to pull from a certain flickr hashtag instead of from a flickr user?
Beaconsfield 10 years ago
Yes, there is. Take a look at the tutorial here: http://www.ofbrooklyn.com/2014/01/2/building-photo... There are instructions for downloading images by tag, although they may be outdated. If you look at the flickr api, there are a few calls that also seem promising - flickr.photos.search, flickr.tags.GetClusterPhotos, etc.
yugnats 10 years ago
awesome!!