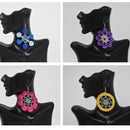
Introduction: Lace Inspired Earrings Designs
The goal of this project was to create lace-like jewelry that could be 3D printed, I inspired many of my designs in lace made by tatting. I also wanted to explore how these 3D printed pieces could be merged with crochet added by hand.
Two different approaches were taken for this:
(1) create lace-like patterns using a grasshopper extension called Parakeet.
(2) create 3D models from vectorized images of existing tatting projects.
The project was divided into 4 milestones:
(1) create a collection of earrings from patterns generated in Parakeet.
(2) create a collection of earrings from vectorized images.
(3) create a collection of bracelets exploring both approaches mentioned in (1) and (2).
(4) merge crochet and other types of crafting technique with the designs made.
Supplies
- Ender 3- 3D printer
- Rhino 6
- grasshopper
- Parakeet (grasshopper extension downloaded in Food4Rhinon)
- Vectorized (grasshopper extension downloaded in Food4Rhinon)
- Cura Slicer
- HatchBox Granite PLA filament
- jewelry materials
- cotton thin yarn
Step 1: 3D Printed Inspirations
I am interested in exploring the intersection between 3D printing and fiber & textiles crafts, particularly:
- How can we facilitate the exploration of fiber & textiles crafts through digital fabrication?
- How can we expand the design boundaries in fiber & textiles crafts by using computational design and digital fabrication tools?
- How can enable new interactions between materials and techniques by merging fabrication with traditional fiber & textile crafts?
All images are from Pinterest.
Step 2: Motivation
3D printing can allow beginners to interact and fabricate lace-like designs, that may not be possible to do by hand, without the need of mastering a lace-making crafting technique.
Computational design can allow the creation of simple to complex parametric designs, easy to visualize and iterate.
Step 3: Lace
What is Lace?
Lace is a light fabric known for its delicate and web-like features characterized by intricate and openwork patterns. Lace is rarely made into whole textile products and is often used decoratively to accentuate garments, especially female clothing, homewares, and other upholstery with botanical and geometric patterns. There are many techniques to create lace: embroidery, tatting, crochet, needle, and bobbin, among many others.
Visit here to learn more about lace.
Step 4: Tatting
Tatting is a method of using thread and tools to create intricate knotwork. There are actually several different types of tatting, the different types depend on the tools that you use. Like crochet or knitting, tatting allows you to create a wide variety of beautiful projects.
Learn more about tatting.
All images we retrieved from Pinterest (keyword tatting)
Step 5: Milestone 1
The goal of this milestone was to create a collection of earrings from patterns generated in grasshopper using the Parakeet extension. I explore the example provided by Parakeet and chose to dive deeper into those patterns with a higher probability of being a good match for 3D print.
Step 6: Genotype Pattern
I edited the Genotype example and was able to only generated one main printable pattern, most of the patterns created had many errors when offsetting the lines and extruding.
Step 7: Hyperbolic Tiling Pattern
I also edited the Hyperbolic Tiling example provided by Parakeet. With this example, I was able to create simple pieces (charmed-like).
Step 8: Challenges
Parakeet extension can enable the creation of beautiful patterns, yet many of the patterns that I created was not able to be used to create 3D printed pieces. Many of the pieces did not join together, had very small geometries or left small open spaces. As a result, the designs would not slice correctly or do Boolean union.
Main challenges:
- open geometries that did not allow models to union nor slice
- design patterns that not had intersecting geometries and could join well
Step 9: Results Milestone 1
A smaller extruder could help the design look more delicate and may avoid the marks left by the extruder.
Step 10: Milestone 2
The goal of my second milestone was to create a collection of earrings from vectorized images. I used an extension for grasshoppers called vectorize. After trying different images I learned that the program vectorized better images of actual tatting pieces instead of the tatting pattern. The best outcomes can be obtained when the yarn is white and the background is dark.
Step 11: Challenges
The main challenge in transforming images into vectorize designs that can then be edited in grasshopper are:
- the images need to have a high contrast for Vectorize to pick up the general outline.
- complexity of the pattern, too complex pattern creates too many intersecting lines, changing the pattern when the line is offset to become thicker.
Step 12: Results
By vectorizing existing tatting projects we can bring the tatting designs into a new medium and allow them to interact and integrate with different materials and practices. Smaller details were not well made by the printer, I plan to use a smaller extruder to be able to print in the necessary detail. The step by step for this process will be share later on.
Attachments
Step 13: Milestone 3
The goal of milestone 3 is to create a collection of bracelets exploring both approaches mentioned in (1) and (2). I am still in the process of exploring with more emphasis on this stage.
Step 14: Results
I used the same workflow to generate the bracelet as I did in the previous milestone (suing vectorize extension).
Attachments
Step 15: Crochet
Using a small crochet hook and cotton yarn, I improvise a design based on what the geometry allowed me. It felt like a nice collaboration between the design, the 3D printer, and my hook.


