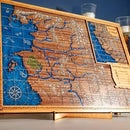
Introduction: Multi-layer Map of Hyrule - Laser Engraved and Painted
I have been working on and off on this project since I got my Glowforge in February. I got the inspiration for this build after seeing the work of Quinton McCain. He made a super high-resolution version of Hyrule from Breath of the Wild and it blew me away. I knew I needed one for myself.
This project took around 8 hours to cut/engrave and about 4 days to hand paint.
Go support him and his amazing work here. He also posted his work on Reddit if anyone is interested- He has high-resolution files available
- Head over to https://whengeekscraft.com for more of what we do!
- Follow us on Instagram
- Follow us on Facebook
Supplies
Below are Amazon Affiliate Links to tools used in this build. Using these links don't cost you any extra, they just help us feed the cats and leave the lights on:
- iPad Pro -https://amzn.to/2VkfhQo
- Apple Pencil- https://amzn.to/3a7UVyh
- Glowforge - https://amzn.to/3a7UVyh on amazon or https://amzn.to/3a7UVyh through Glowforge themselves. Maple and Walnut plywood - https://amzn.to/3a7UVyh
- Insta-Cure Gap Filling 2oz Bob Smith Ind. - https://amzn.to/3a7UVyh
- E6000 Glue - https://amzn.to/3a7UVyh
- Fine Tip Paint Markers - https://amzn.to/3a7UVyh
- Masking Tape - https://amzn.to/3a7UVyh
- Vallejo Paint - https://amzn.to/2SYmVyC
- Glowforge Laser Cutter - If you have ever considered a Glowforge, I cannot recommend mine enough. Here is my Glowforge Referral Link so you can save up to $500: https://glowforge.us/r/DSKCNJZL
- Glowforge Proofgrade Materials - 1 Sheet of Walnut Plywood and 1 Sheet of Maple Plywood
- Gimp (Photoshop)
- Inkscape (Illustrator)
- Sketching Software (iPad - Sketchbook) with an Apple pencil or any alternative
Step 1: Find a Reference Photo and Isolate Your Layers
While I am experienced in Photoshop and Illustrator, sometimes it's just easier to trace things out, especially when you want to Identify many different layers.
For this project, I took my reference piece into Sketchbook on my iPad and traced out the following layers. By doing this, I was able to make a sandwich of Isolated engraves/cuts:
- Main Ground layer
- Top Layer Details
- Top Layer Cut Specific Outline
- Water
- Locations
- Roads
After drawing them out in Sketchbook on my iPad, I saved the document as a .PSD (Photoshop Document), and I brought it into Gimp and isolated each layer before bringing it into Inkscape.
- For more directions on how I move files from Gimp to Inkscape and convert to high-resolution BitMap layers, Check out our instructable on the Breath of the Wild - Calamity Ganon Tapestry. We have step by step instructions for making your file as clean as possible for laser cutting!
Step 2: Prepare Your Files, Grab Your Ear Protection, and Start the Up the Laser
By using the same selection box on each layer, I copied and pasted the files over to Inkscape and converted them to BitMap.
- For more directions on how I move files from Gimp to Inkscape and convert to high-resolution BitMap layers, Check out our instructable on the Breath of the Wild - Calamity Ganon Tapestry. We have step by step instructions for making your file as clean as possible for laser cutting!
Once I had all the layers converted to bitmap, I made them all of different colors (for my laser to understand they were separate steps) and placed them in their order on top of each other.
- Typically, I prefer to line up all my individual pieces and move them in the Glowforge software as needed but for this build, I needed complete alignment accuracy.
- The best way to guarantee alignment on a Glowforge is to pre-align all the layers in Inkscape.
Laser Settings:
- Base Layer - Water Engrave
- Power: 80%
- Focus Height: .125
- Base Layer - Roads, Words, and Detail Engrave
- Power: 100%
- Focus Height: .125
- Top Layer - Roads, Words, and Detail Engrave
- Power: 100%
- Focus Height: .125
Step 3: Paint a Bunch of Sections
Clean out the engraves with a soft bristle brush.
- Start painting on all the water sections using blue paint.
- Dry brush the edges where the water meets the land with a light dusting of white paint.
- Using Gold paint, paint in all the writing on the map.
- Use Tan paint to outline all the edge banding around the areas near water.
- Using watered down black paint, lightly tint the caverns sections to show depth.
Step 4: Peel and Glue Everything
- Removed the masking tape from the areas where the second layer needs to be glued down too.
- Use the remnant of the top layer as a guide to glue the top layer pieces down in the correct spots.
- Almost like a puzzle piece
- Glue the second layer pieces down
- Remove all the tape on the piece
Step 5: Finish Painting All Those Happy Little Trees
- Using either paint and a brush or fine tip paint pens, start painting in all the tree details.
- Make note of the coloring on the map.
- There are different color trees in different areas. Noting these seasonal changes can help add more dimension to your piece.
Step 6: Show It Off to Your Friends
After 8 hours of laser cutting and 4 days of painting, hang this bad boy on your wall and enjoy!
If you have access to a laser and the ability to do this project, I cannot recommend it enough. This piece is beautiful and I am so happy I took the time and effort to make it happen,
Have fun and go make something awesome!
Nicole C. - WhenGeeksCraft


