

Introduction: Neopixel Ring, Brass Circuit Sculpture Lamp


I'm fond of circuit sculptures and often get inspired by others' to build mine.
This was the case for this one.
I got inspired by this very nice LED cube
I enjoyed the software side too, the various color animation modes, and only did some minor changes in my version:
- I slowed-down the animations (I like slow moving color transitions)
- I added a persistent memory of the current animation mode (stored in EEProm).
- I refactored and cleaned-up the code.
My code, is, of-course, opensource, available on my Github.
Supplies
What you will need to build this thing:
- an ATTiny 85 (or whatever you want that can drive WS1812 LED).
- 2 diodes (any type, they're not functionnal anyway).
- a 100nF capacitor (not really needed but that's a good practice)
- 1mm-thick brass rod
- a few cm of uninsulated copper cable
- an 8 LED Neopixel ring
- an old HDD platter
- an ILS switch (if you choose to use the HDD magnet to switch the lamp on)
Step 1: Programming the ATTiny85

There are plenty of tutorials online on how to program an ATTiny85 with the Arduino IDE.
Something you must take care of with this build:
- Select the board config ATTiny85 with Internal Clock @ 8 MHz
- Use the "Burn Bootloader" command, in order to set the internal fuses for the ATTiny to run at 8MHz. Otherwise the sketch won't run (well, it will run but the LED won't light-up).
I'm using an USBAsp programmer, cheap and efficient, but you may also use an Arduino as ISP.
Step 2: Hard Drive Platter Preparation and Base Ring


I have plenty of hard disk drives laying around, and a spare 8-Neopixel ring.
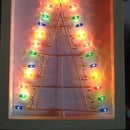
I thought it would be cool to have the leds using the hard drive platter as a mirror.
I imagined the lamp looking like a swirling cone.
So I started by 3D printing a cone, that was going to serve as a wire bending rig.
I used a bit of string to try-out the shape and ended-up with something I found both good looking and easy to build.
I also wanted to use the hard drive's arm magnet to power the lamp on, and had an ILS switch laying around.
So, time to build the thing.
This was not a piece of cake, and a game of patience!
First, drill two 2mm holes in the center piece of the HDD platter, for the power supply cables.
Then machine a groove on the opposite side of the center piece to pass the cables through.
The base ring was formed around the platter, maintained in position by bits of adhesive tape, soldered to the other extremity, and stuck to the platter with super-glue.
Step 3: The Swirling Cone


The 3D printed cone and string were used as a rig to form each piece.
There are 2 pieces of brass forming the "swirling cone".
Each piece is formed along the rig (half a piece), then its symetrical part is formed along the same rig.
Care must be taken to form two identical pieces.
I marked the diameters on the platter, this is where the swirling cone pieces must be soldered to the base ring.
I didn't use any special rig to maintain the piece for soldering. I did it by hand, making sure that the center of the cone is at the center of the platter.
This may take some adjustents.
Once the first piece of the swirling cone is soldered and symetrical, it's time to solder the second one.
The two pieces are then soldered togegher at the top of the cone.
We now have the scaffolding of the lamp.
Step 4: Connecting the Attiny


I wanted the ATTiny to be "mid-air" at the center of the lamp, attached to the swirling cone.
The schematic was sketched on paper and used as a soldering guide.
I wanted it to be attached to the swirling cone at each end. But the cone is connected to ground, so some pins needed to be isolated.
I used 2 reverse-biased diodes to provide the mechanical connection and electrical isolation.
I used a piece of 5mm-thick plywood to set the ATTiny at the desired height.
I flattened the pins of the ATTiny and cut the tips of the pins.
I started by forming the leads connected to pin 1 and 4.
For now the location where they should be soldered to the swirling cone are marked with a pen, they'll be adjusted and cut later-on.
Then the diodes on pins 4 and 8.
Pin 8 is VCC so there will be quite a lot of soldering to do here, between the pin and the diode body.
I placed the decoupling capacitor on top of the ATTiny, formed its leads and soldered them to pins 4 and 8.
Then I soldered the power supply cables. I've used a scavenged USB charging cable.
The cables are glued with hot glue to the underside of the platter.
Step 5: Test and Soldering of the Attiny to the Swirling Cone


The ATTIny is now fully wired, time for a power-up test with a temporarily attached Neopixel strip!
In order to solder the various leads to the swirling cone, I used a little bit of 5mm-thick plywood for vertical spacing, maintained the ATTiny centered with a finger and used the remaining finger and hand to precisely cut and solder the leads.
Then I shaped and cut the light mode selection touch contact, to be soldered later-on.
It needs to go near a ground line. I made it run parallel to a swirling cone branch for a few cm.
Step 6: The Neopixel Ring

I thought I hade done the hardest part, but I was wrong...or too eager.
Inded while desoldering a connector on the Neopixel ring, I tore-off the soldering pads...
Silly me...so I had to get creative and solder the Data In and Ground wires directly on the LED.
I chose to use copper wire (old telephone wire), since it's softer, easier to work with than brass.
It actually looks good too, giving some kind of "airy" touch to the neopixel ring.
Step 7: Final Steps

The last thing to solder is the light mode selector touch contact.
Then I made sparks!...
The ILS leads were touching the magnet, touching the ground plane and ring...shorting the power supply.
I tweaked the leads orientation and isolated the junction to the glass tube with a bit of super-glue.
A little cleaning with cotton and acetone to remove finger marks on the platter and that's it, enjoy!
All in all, the ILS and magnet thing may not be very usefull, nor very practical, you're warned :)

Participated in the
Anything Goes Contest 2021


