Introduction: Never Again Weld a Crooked Bead
When I use my wire feed welder I have great difficulty making a straight bead that does not wander off of the seam. I know practice is the key, but I am a hobby welder with no reason to weld everyday for several hours. This Instructable will show how to make a simple guide from an old automobile license plate. It will enable you to produce a straight bead on the joint seam every time.
The photo shows the first weld I did with my new guide. It is the straightest bead I have ever made with my wire feed welder, and it was very easy. This weld bead is about three inches long.
UPDATE: My 2004 Lincoln auto-darkening helmet uses 2 AAA batteries. Because the helmet always darkened as it should, I had not replaced them. I did replace them recently, even though they were far from "dead" and now the lens in my helmet darkens, but not as much as it has until now. I can now see the weld area much better. Many helmets use solar cells and lithium-ion batteries. Check your manual and see if it is possible to replace the batteries in your helmet. That and replacing stained and pitted plastic lenses my make it much easier to see what you are welding. Protective clear lenses that are not stained or pitted can be dirty. A good dust removal can help, too.
Step 1: Tools and Materials
Tools
I am using aluminum for this welding guide because weld spatter will not stick to it.
- Hammer
- Concrete floor
- Vise
- Round rod about 3/8 inch in diameter
- Punch
- An old automobile license plate made of aluminum
I am using aluminum for this welding guide because weld spatter will not stick to it.
Step 2: Bend and Roll
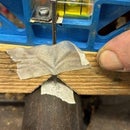
Make a nearly right angle bend across the license plate about 2 inches plus from the flattened end. Then clamp the edge of the license plate and the 3/8 inch rod in a vise and begin to roll the end of the license plate around the rod. Unless your vise is as wide as the license plate, you will need to curl the outer edges of the license plate around the rod with a hammer and a punch so the rolled portion extends the full width of the license plate. Make the roll almost a full circle.
Step 3: Cut the License Plate and Add a Crease
I left the portion of the license plate where you see the numerals "623" in the photo wide enough for my hand to rest there so I can hold the guide in place while it is in use. At the left edge of the photo you can see a 1/2 inch lip I bent in the guide to help hold the area for my hand flat. This will make it easier to keep the guide stable in use so it does not rock while resting on what I am welding.
Step 4: How to Use This Guide
To use the guide, place the electrode wire over the seam to be welded. Slide the guide toward the welder's gun so it rests against part of the nozzle. Check to be sure the roll on the guide is aligned so it is exactly parallel to the joint seam. Place the hand not holding the gun on the guide with enough pressure to keep the guide and the other half of the joint from moving. Flip your welding hood down and pull the trigger on the welding gun. Advance the gun in a smooth motion slowly enough to produce a good weld. Your results will look like the photo in the Introduction, maybe better. And, it will be almost effortless.
If the roll on the license plate does not ride against a good place on the nozzle, making the bend in the license more oblique rather than a right angle will lower the roll so it is closer to the joint surface. Or, you could also straighten the license plate and bend again.
If the roll on the license plate does not ride against a good place on the nozzle, making the bend in the license more oblique rather than a right angle will lower the roll so it is closer to the joint surface. Or, you could also straighten the license plate and bend again.


