Introduction: Simple Bots: Skitter
Skitter Bot came into this world as result of a chain reaction of exploded of cosmic energy. By current estimates, this chain reaction took roughly 13.7 billion years to complete. When put into such context, it becomes quite clear just how long it takes for near-perfect walking scrub brush bot to come into being.
Do not be fooled. Scrub Bot was not the simple sort of bot that materializes overnight when I zip tie a bunch of scrub brushes together. No! There was an ineffable cosmic plan that led up to this bot's creation, going back well beyond the day when man, through genetic mutation, first evolved the ability to manufacture zip ties and scrub brushes. This bot is a bona fide cosmic child.
|
Step 1: Materials
To build this project you will need:
(x1) continuous rotation servo modified for direct drive**
(x1) 3 x AA battery holder
(x1) DPDT toggle switch
(x4) scrub brushes
(x1) small plastic container
(x1) ballpoint pen
(x1) 1-1/2" x 3/8" corner brace
(x1) assorted zip ties
**The modification of the motor is covered in this instructable.
(Please note that some of the links on this page contain affiliate links. This does not change the cost of the item for you. I reinvest whatever proceeds I receive into making new projects.)
Step 2: Types of Switches
However, before we get into the build, let's take a moment to understand switches. This is crucial knowledge for creating the H-bridge used to move this bot's brush legs back and forth.
There are many types of switches. You can find switches with levers, buttons, arms, keys, dials, and numerous other mechanisms. In this class we will be largely using lever switches. This type of switch has a little knob that can be toggled back and forth. You likely have encountered these before numerous times.
While toggle switches all more or less look the same, and have roughly the same functionality, their capabilities do differ. Switches have what are called "poles" and "throws."
You can think of poles as inputs into the switch. A switch with a single pole has one input. A switch with a double pole has two inputs. At that, each input is its own seperate circuit. The poles never connect with one another inside the switch.
Throws, on the other hand, are outputs. They are the terminals the pole (input) gets connected to when the switch lever is toggled. For instance, in a switch with a single pole and single throw (SPST), there is only one connection that can be made. When the switch is toggled, a connection is made or a connection is broken. Basically, it is either on or off.
On the other hand, a single pole switch with a double throw (SPDT) has no off position. When one connection isn't being made, a different one is. It basically toggles between two different connections.
Given all of that, a switch with double poles and double throws (DPDT) is basically two seperate pairs of SPDT switches in a single package. When the switch is toggled, the connections switch between two sets of different connections.
Step 3: H-Bridge Basics
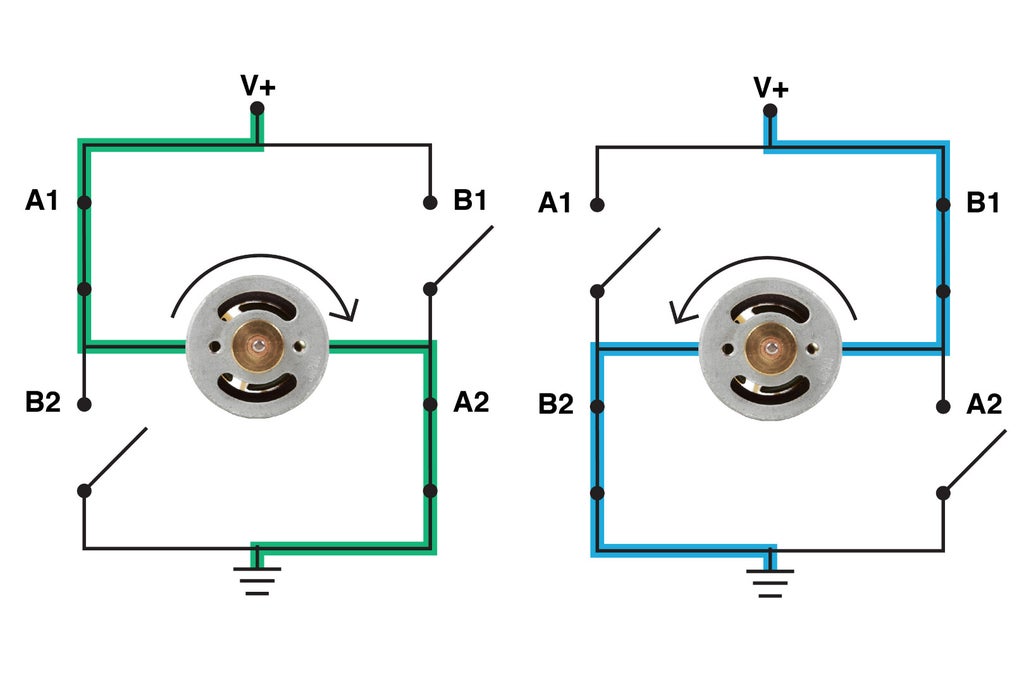
An H-bridge is a circuit that allows a motor's direction to be reversed. More advanced H-bridges - like the kind found inside of servo motors - also allow you to control the speed of the motor.
Essentially, an H-bridge consists of four switches. There is a switch between each pole of the motor and ground. There is also another set of switches between each pole of the motor and power.
When these switches are drawn out in a diagram, they look kind of like an “H”. That is how the circuit gets the name H-bridge.

The H-bridge consists of two sets of switches. When the set of switches labeled with “A” is closed, power flows through the motor in such a way that it spins clockwise.
When the other “B” set is closed, power flows the opposite direction and the motor spins counterclockwise.

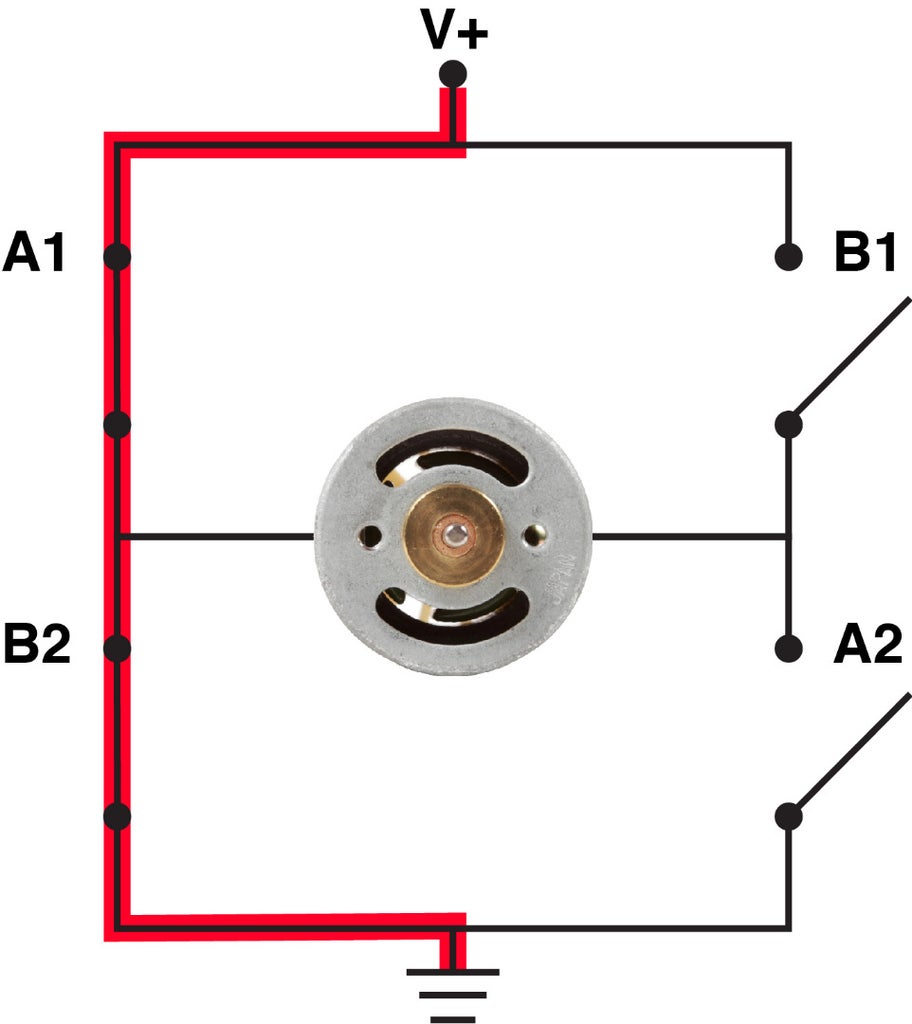
However, both sets cannot be closed at the same time, or power and ground will be directly connected, and you will have a short circuit.
As well, if you mix and match the switches such as closing A1 and B2, you will also create a short circuit. It is important that either the “A” switches get closed or the “B” switches. Never both or some combination thereof.
Step 4: Wiring an H-Bridge Switch
WIth a DPDT switch you can make the most basic H-bridge imaginable.
Basically, if wired correctly, a motor connected to the switch will spin in one direction when toggled one way, and the opposite direction when toggled the other.
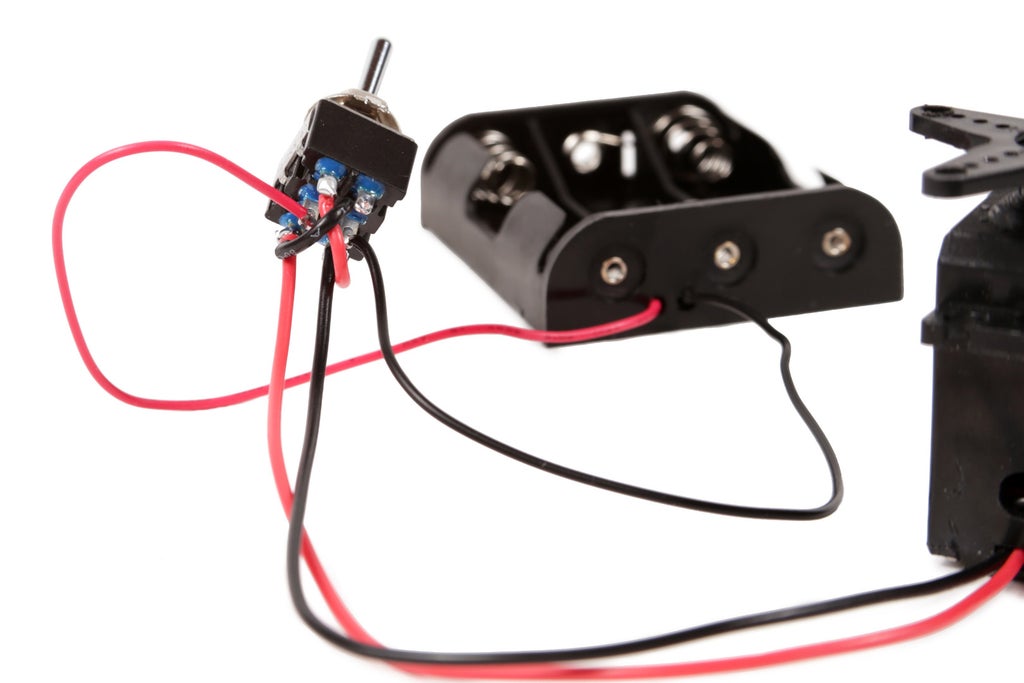
To begin wiring this, solder the red wire from a 3 X AA battery holder to one of the center pins on the DPDT switch and the black wire to the other center pin.

Select one of the pairs of outer pins. Solder a red motor wire to the switch terminal in line with the center pin with the red wire already attached. Next, solder a black motor wire to the other outer pin.
Now, when the switch is toggled, the motor is either powered by the battery pack and spinning clockwise or doing nothing at all. We are halfway there. All we need to do is have the motor change direction when it is in what is currently the 'off' position.

To accomplish this, we need to wire it in such a way as to reverse the power to the motor. This may seem complicated, but is really easy. All we need to do is connect criss cross wires from the unused set of switch terminals to the terminals connected to the motor.
Basically, when the switch is toggled to make this connection, the black wire from the the battery pack is connected to the red wire from the motor, and the red wire from the battery pack gets connected to the black wire from the motor. By crisscrossing the wires, we have effectively reversed the power supply to the motor.

In this configuration, the H-bridge A1 and A2 connections are the first set of terminals connected directly to the motor. The B1 and B2 connections on the H-bridge are the other outer terminals where the crisscross wires are connected when the switch is flipped.
Step 5: Drill
Step 6: Attach
Next, pass them through the two adjacent center-most holes in the corner bracket.
Then, pass the zip ties through the hanging holes in the brush handle.
Finally, zip tie everything firmly together.
Step 7: Drill
Step 8: Secure
For extra support, zip tie the brush handle mounting ring to the unused back holes of the servo horn.
Step 9: Cut
Trace the outline of the back of the servo and then cut out the shape with a razor blade.
Finally, pass the motor wires through the hole and slide the plastic container lid down over the servo.
Step 10: Drill and Fasten
Zip tie the motor firmly in place.
Trim away the excess zip tie ends if you haven't done so already.
Step 11: Center and Drill
Drill two 1/8" holes.
Step 12: Attach
Step 13: Measure and Drill
Drill a 1/8" hole down through the handle where you made this mark.
Step 14: Attach the Legs
In other words, make two even-length front legs for your bot.
Step 15: Switch
Pass the DPDT switch through so that the shaft is pointing at the scrubber legs and then fasten it on with a nut.
Step 16: Wire It Up
Solder the red battery wire to one of the center DPDT switch pins and the black battery wire to the other.
Turn the switch so that there are only two pins facing you (as opposed to three). Solder the black motor wire to the DPDT pin closest to you on the right. Solder the red motor wire to the other pin on the left.
Note: If, when you power it up, the switch isn't making the motor move back and forth, remove the batteries. Next, detach the motor wires and reverse the switch pins they were connected to.
Step 17: Extender
Step 18: Glue
Fill the pen cap with hot glue and quickly slide it onto the switch's shaft. Be careful not to get any hot glue inside the switch. This could prevent it from working.
Hold the tube in place until it begins to set.
Step 19: Power
Step 20: Case Closed
Quickly close the plastic container and let the bot go free.
Get the Simple Bots eBook for more projects! |

Did you find this useful, fun, or entertaining?
Follow @madeineuphoria to see my latest projects.


