Introduction: TinkerCAD Christmas Tree With CodeBlocks
This instructable is to show you how to create a Christmas Tree using TinkerCAD Codeblocks.
My favorite thing about TinkerCAD codeblocks is watching your creations be built before your eyes.

Supplies
A computer like the one you are using now.
Just go to Tinkercad.com, login or signup and click on the codeblocks section.
Step 1: Designing a Tree
This Christmas tree is made of cones. The bottom code is wider than the one above it. All the sections of the tree the same height. The values are stored in variables you can modify them and play around.
To start with Drag out "Create Variable" then rename the variable. You need to take out and rename each variable one at a time.

You can change the values of the variables.
- MaxTree is the Tree Height.
- MinTree is the height of the last Section
- Section height is the height of a section.
- Radius and counter are used in the program later.
In order to build the sections we will do a loop. Since we want the width or Diameter of the tree to be bigger at the bottom and smaller at the top we will create a loop that counts backwards. We will start at MaxTree and count down by 10 until we get to MinTree.

In the loop we set the Radius of a cone as half the diameter. We use the radius for other calculations like adding bulbs.
The counter is incremented each level and is used to tell the cone how high it needs to move to be at the right height.
Next add a Star to the top of the tree. Set the H=1 since we want the star flat, and the inner radius to 5 to make it smaller. Since we know the max tree height we know the MaxTree and Section heights we can create a star and move it in the Z direction (MaxTree - size of the star). Right on the top. We also need to rotate the star because the original start is flat, so we rotate 270 or -90 degrees.

While we are at it we can add a trunk.
the cylinder makes a good trunk and we can make it brown, and as tall as a section. Once we add the trunk half will be below the plane the tree is on, so we group all the parts and lift everything (SectionHeight/2).

So here we have the finished but not decorated tree:

Step 2: Now to Add the Bulbs.
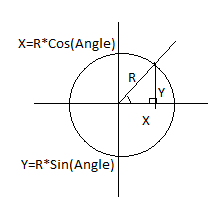
Once I had the base tree I figured I would add the bulbs. (Spoil alert - Math ahead). I decided I wanted to put them around the bottom of the branch(cone) which is shaped like a circle. Since we know the radius and pick and angle we can determine (x,y) location to place the bulb using the formula. x=radius * COS(angle) and y=radius*SIN(angle). The height of the branches are stored in the variable SectionHeight, so I know how high each section is I can add all the bulbs.

I tried using random function to put down the bulbs but I decided that putting 18 bulbs per level so one every 20 degrees. if you want to try placing the bulbs randomly, change the Angle to Random 1 to 360.
You may wonder why I would build all the bulbs before then add the tree, it is because I could!


Here is a link to my TinkerCAD Codeblocks. Enjoy!!
https://www.tinkercad.com/codeblocks/eSr3aslRVaW
Merry Christmas


