Introduction: Automatic Plant Watering System Using Arduino Based Embedded Platform
Going out on vacation poses a daunting question in your face: who in the world is going to water the plants at home while you’re out?! If your neighbors are the kind type, then you might not have to worry much; if not, well, you need to arrange something then. This ‘something’ is what this project is going to be about! The something that you’re going to make in this project is the DIY Automatic Plant Watering System. Yes, you heard it right. With the help of the DIY Automatic Plant Watering System, you don’t need to worry about your plants going dry while you’re out holidaying; it will make sure that the lush and green all by its own! And it ain’t that difficult to make! Sounds kind of a ‘shut up and take my money’ project, right?
Then jump right in before your plants go dry!
Step 1: Things You'll Need
- evive
- Soil Moisture Sensor
- Drip Irrigation Kit
- 12C 2A DC Adapter
- 12V 3W Water Pump
- Glue Gun and Glue Sticks
- Male to Female Jumper Cable
You can buy an Agritech Kit for this as well, which includes all the essential components. You can make a number of projects with this kit. The Kit that can make your garden automatic.
Step 2: The Secret Component
We already have made the drip irrigation system, where the plant watering system is manual.
The making of the whole system is the same. You can make one by clicking here.
The difference arises here:
The secret device that we use for making the water pump system automatic is the Soil Moisture Sensor.
The Soil Moisture Sensor is used to detect the water level content of the soil. It has two electrodes that are inserted in the soil whose moisture is to be checked. You must be wondering how the electrodes are used to check the moisture content. Basically, they check the conductivity of the soil. The more conductive the soil, the more moisture the soil contains. Less conductive soil points out to less moisture sign.
Insert this Soil Moisture Sensor in the soil.

Step 3: What’s Next:
Once you have inserted Soil Moisture Sensor, you must be wondering what’s next.
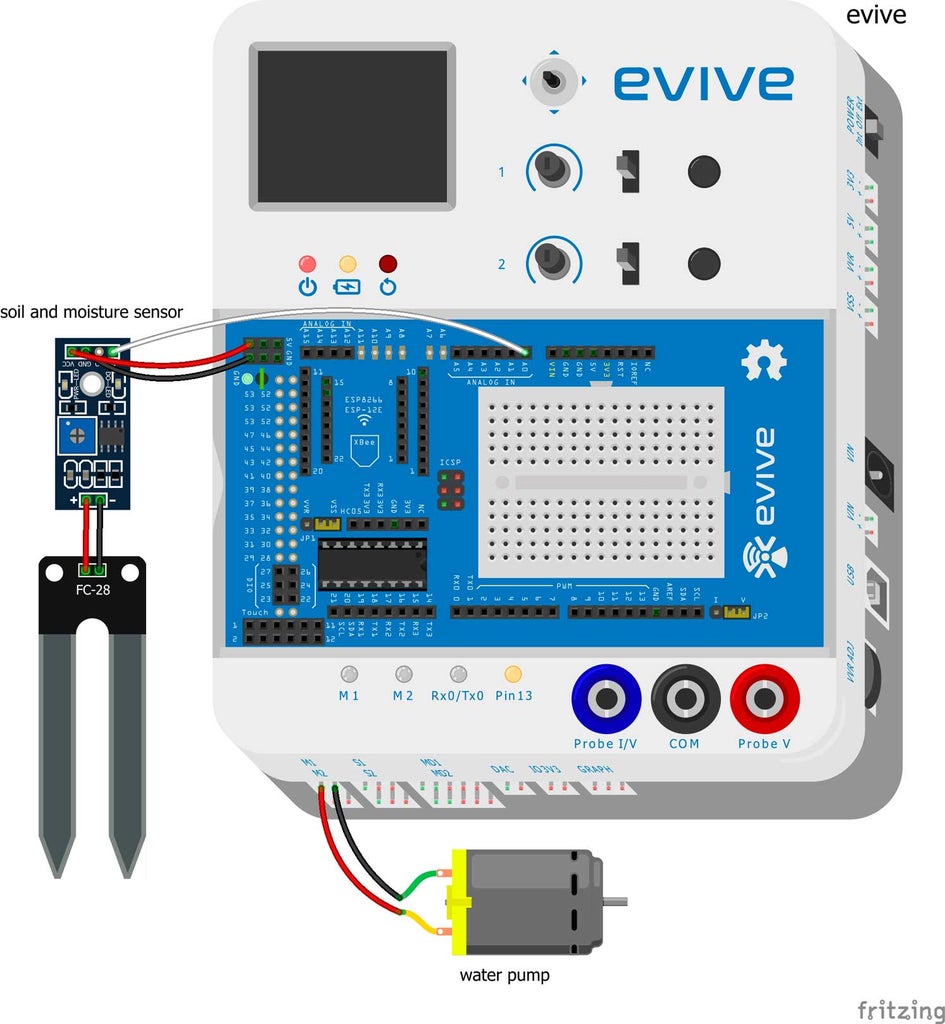
The connection of the sensor is made to the evive.
The water pump is also connected to evive as shown in the given schematics:

As we know, the Sensor will check the moisture content in the soil. Thus, we have set a Threshold in the code, which indicated that if the moisture level is low, the water pump will start supplying the water. If not, then the pump will remain OFF.
The following code shows the same:
To know more about Arduino, visit: https://thestempedia.com/tutorials/arduino-ide/
You can download evive library by clicking the link: https://thestempedia.com/wp-content/uploa...
Thus, we have successfully created our automatic water pump system, which will need no human help to water the plants
For more detailed Instruction visit: https://thestempedia.com/project/diy-automat...
Step 4: Conclusion
With this, your DIY Automatic Plant Watering System is all set to take care of your plants while you’re out having the time of your life. Happy holidaying!
To explore more projects, visit: http://thestempedia.com/projects


