Introduction: Color Detecting Robot Using Smartphone and Evive (Arduino Based Embedded Platform)
Using evive, we’ve made the line follower - a robot that follows a black colored line, and we’ve made the fruit piano. How about we combine the two features and make something that plays different sounds on detecting different colors? That is going to be our project of the day; we’re going to show you how to make a Smartphone-controlled robot that plays different sounds as it moves over and detects different colors. For making it, you’ll need evive and components from the evive Starter Kit, for programming it, you’ll need PictoBlox - our Scratch 3.0-based graphical programming interface, and Dabble - our ingeniously developed Smartphone app.
You can download PictoBlox from HERE and get Dabble on Google Play. Ready for making colors musical? Let’s get started!
Step 1: List of Components Needed
Step 2: Making the Base of the Robot
Let's start by making the base robot:
Take the base plate or the chassis and fix two motor mounts on it using bolts and nuts.
Attach Dual shaft DC Motors to it.
To one of its shafts attach wheels.
Finally, to generate the third support attach the caster wheel.
Step 3: Connection
Connect the Motors to Motor Channel 1 and Motor Channel 2 respectively.
Also, attach the Bluetooth Module to evive.
Once done with the connection, keep the robot aside.
Step 4: Writing the Script
Here we are writing the script in PictoBlox, which is based on Scratch 3.0.
You need to make your robot move forward and stop when the color is detected. Write the following script for the same.


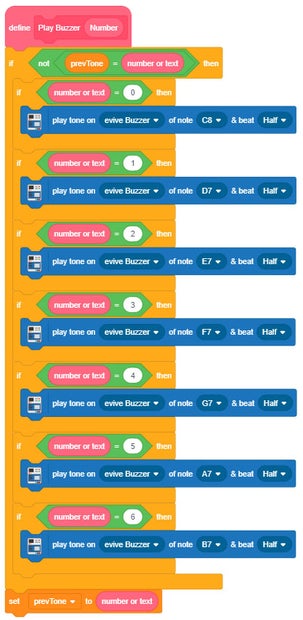
We need our Smartphone should detect the color and play the tune accordingly.


Finally, upload the main block to evive:

Or download the code given below.
Attachments
Step 5: Completing the Assembly
Take evive and attach the spacers to it.
Once done, attach evive onto the base assembly of the robot.
Open Dabble App on your Smartphone and choose the Camera Module. Then select Color Detection Module.
Place your phone between evive and the base plate.
Now, to see the robot in action.
Make a xylophone out of different color papers and fix them together using the glue. Finally, place your robot onto this.
Step 6: Working
Sliding the slideswitch1 UP will make the robot move forward.
As robot moves, it will detect different color strips below it and will produce different notes depending upon the color it detects. The robot will stop moving forward when it detects the same color twice.
Step 7: Conclusion
With this, your color detection robot is set to dance to the colorful rhythm!


