Introduction: Quilt Making in Three Dimensions
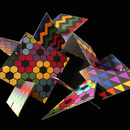
This project investigates the geometry embedded in visual art and quilt making, through the creation of a rhombic dodecahedron, which is a convex polyhedron or three-dimensional shape with flat polygonal (fractal) faces, straight edges and sharp corners or vertices. The project is inspired by the quilt-based art of Sanford Biggers and Adam Savage's "Tested" episode with mathematician Matt Parker:
In the "Tested" tutorial, Savage and Parker work with laser cut acrylic rhombus shapes and create their own rhombic dodecahedron. Savage and his team also add other elements to their objects (see optional steps).
Sanford Biggers' paintings and sculptures are done directly on or made from pre-1900 antique quilts. Many of the quilts are created using geometric shapes. The tradition of quilt-making holds a significant place in American culture and has special resonance in African American communities as witnessed in the quilts by the Gee’s Bend — a small, insulated community in Alabama — that has produced quilts from the 19th century to the present.
Students will learn about geometric shapes and polyhedra, find and identify the shapes in the quilts and art, and use found materials such as cardboard, old plastic CD cases, or anything that can be cut into shapes of the same size and thickness.
Laser cutting is optional.
Supplies
Base material such as stiff cardboard, wood or thin plastic (ex. CD cases)
Scissors and a hobby knife and/or x-acto cutter
Pencil and ruler for measuring
Clear or transparent tape
Two-way infinity mirror film (optional)
Laser cutter (optional)
Step 1: Learn More About Shapes & Polyhedra
Explore the four shapes and five polyhedra in the photo. Use the "Illuminations" handout (attached) from the National Council of Teachers of Mathematics to determine the number of faces, edges, and vertices (corners) for each shape. Answer the following questions:
- Find the sum of the number of faces and the number of vertices. How does this sum compare with the number of edges?
- Do you think this may be a rule for the other shapes?
- Add the number of faces and the number of corners for the other shapes. Compare the sum of faces and corners to the number of edges. What did you find out? Is there a rule for all of the shapes?
For this project we will focus on the 2D rhombus and 3D dodecahedron shapes.
Ex. A rhombic dodecahedron has 12 congruent rhombic faces, 24 edges and 14 vertices.
Step 2: Find the Shapes in Quilts and Art
Quilts are often pieced in a patchwork pattern of basic shapes or blocks, with the blocks being made individually and assembled into the finished work. The fundamental geometries of the quilts include single repeating patches: triangles, squares, diamonds, and hexagons. See if you can identify the shapes in the quilt on the left (courtesy of Eli Leon). How do these shapes relate to the previous step?
Artist Sanford Biggers remixes these quilts by extruding or expanding the 2D shapes to create the flat polygonal faces. The polygons are covered with real quilt patterns. Many of the quilts Biggers uses come from the African American quilting tradition that is linked to West and Central African textile design that often juxtaposes unlike motifs or interrupts orderly repetition by shifts in texture, direction, pattern or scale.
Can you identify shapes and polyhedra in Biggers' artwork?
Use the Decoding the Cypher handout (PDF) to explore this question.
The Bronx Museum of the Arts catalog includes a comic by John Jennings with David Brame and Esperanza Bey.
Step 3: Collect Your Materials
For this project you will need at least 12 rhombuses cut from cardboard or other stiff materials. All of the rhombuses should be the same size and thickness.
Position two of the shape together like in the photo and tape both sides. Make sure you can flex or bend the taped joints to 120 degrees.
SVG files are included if you have access to a laser cutter (to cut out the shapes).
Step 4: Connect the Shapes and Joints
Keep connecting the shapes and joints using the tape until you complete the 3D object (see photo).
You can also follow along with Adam Savage and Matt Parker in the introduction video.
Step 5: Optional: Add Mirror Film and LEDs to the Shapes
As an additional step you can add infinity mirror film to the inside shapes before you tape them together, to create additional effects. In the "Tested" video they add LED strips and black tape to the edges of the object.
The LED strips can be attached to the inside or outside edges. Black tape is used on the outside edges to hide this work.
Step 6: Optional: Create Special Effects
In this example, two opposite sides of the rhombic dodecahedron were left clear and the object was placed against a computer screen displaying a sound-generated animation such as what is created by Magic Music Visuals, a music visualizer and VJ software program. To simulate the style of improvisational quilts, a kaleidoscope effect was applied to a GLSL shader, which was created using OpenGL Shading Language (code).
You can add colorful beads or other tiny objects (colored tissue paper) to the inside of the mirrored object to create effects.
You can also use a projector to map and project images inside of the 3D object.
This work is made possible by support from STAR, a Biogen Foundation Initiative. The team at Lesley supporting this initiative includes faculty and staff in the Lesley STEAM Learning Lab, Science in Education, the Center for Mathematics Achievement, and other related Lesley University departments and programs.


