Introduction: Treasure Chest From Reclaimed Mystery Wood (Hand Tools Only)
Ever wanted a treasure chest for a treasure hunt or for storing your precious items? Then look no further, you came to the right spot! We'll be making one from reclaimed wood, using nothing but hand tools. And I don't mean handheld power tools, but the kind of tools that are cordless and are powered by human energy :-) Hand tools are so much more enjoyable to work with, because you don't have the noise, dust and safety hazards associated with power tools. And you don't need as much space and money to start woodworking. I owe all of my hand tool skills to Paul Sellers, and I'll be referring to some of his videos throughout these instructions.
Projects from reclaimed wood often leave the wood rough, to create that rustic look. I like that look and have made lots of projects that way, for example this Pallet Wood Nightstand. But this time, I wanted to clean up the wood, to show you it's possible to make more refined projects from reclaimed wood. It's also much easier to make your construction square if you start out with wood that is square on all sides.
I've entered this project in the 'Hand tools only' contest, the 'Homemade gifts' contest and the 'Reclaimed contest'. If you like this Instructable, please give me a vote in these contests.
Step 1: Dismantle Your Reclaimed Wood of Choice
My dad had a wooden cage in his yard, which he used for storing firewood. He got 2 of those for free from a company selling bricks for pools. I think these cages originated from somewhere in Asia. They are very heavy, so the wood is quite dense and very much worth reclaiming. I have absolutely no idea what species this is, hence the term 'Mystery Wood' in the title. Feel free to leave your guesses in the comments.
To dismantle the cage, I used brute force. I whacked it with a hammer in strategic places, and I sometimes used a hand saw to cut through slats to weaken the structure. I didn't take photos of the cage I dismantled, but the cage in picture 1 is a very similar one. After dismantling, I got a wheelbarrow full of wood (pic 2). Some pieces where still attached to each other, and all of the pieces still contained nails. The equipment necessary for denailing can be seen in this picture: gloves, pliers, 2 hammers, a saw and a small container to put the nails in. Just hit the nail from the pointy side until the head pokes through on the other side, and then remove it with pliers. This doesn't always work though, and sometimes I just cut the piece of wood with the stubborn nail off and discard it. Why 2 hammers you might ask? Whenever there is a bent nail, I find it helpful to put one hammer against it (like a small anvil), and use the other hammer to tap it straight again. Then you can proceed to hit it through the wood until you can pull it out.
After some hard work, I ended up with a nice pile of usable wood (pic 3). I also discarded a couple of slats which contained too much nails, or had wormholes in it. My advice: pick your battles. It's not worth spending 10 minutes on a slat full of nails, that you might not even use anyway because it contains too much nail holes.
Before you go and make something, it's best to leave the wood in your shop a while to acclimatize to a drier environment. I waited about a month before starting.
Step 2: Gluing Up the Sides
Decide what length and width you want your treasure chest to be. Then roughly cut your slats a bit over-sized (more or less 1 inch or 2.5 cm extra), as seen in picture 1. No need to be accurate here. To get the appropriate height for the box, we'll need to glue 2 slats together. Mark how they go together with a triangle (pic 2) and flip them so the markings are on the outside (pic 3). We'll plane both edges together, to ensure a seamless fit. Because the edges are so rough, first plane them with a scrub plane (pic 4). This is a Stanley no.5 jack plane that has been converted to a scrub plane. It has a cambered blade in it, that produces nice thick shavings (pic 5) that get you to a clean surface quickly. After the scrub plane, plane the edges with a smoothing plane (pic 6) until you get continuous shavings from both edges.
Test the 2 boards for gaps by holding them together. Avoid gaps near the ends, because that means your edges are higher in the middle and the glue up will eventually fail. A slight gap in the middle (meaning the edges are slightly hollow) is not a big deal because it puts extra pressure on the ends, so that they never come apart. Once you have a seamless fit, put some wood glue on 1 edge and rub it back and forth against the other edge:

Put some clamps on, and leave to dry for at least a couple of hours:

Do the same for the other panels, and you should end up with two long sides and two narrow sides (presuming your box is rectangular, like mine):

Step 3: Planing and Dimensioning the Sides
Now that we have 4 panels, we need to get them smooth and the same thickness. If you haven't done this before, I suggest you watch this video first. We start off with a scrub plane (pic 1) to get the roughness out of the board quickly. Then we come in with a smoothing plane to get a flat and smooth surface (pic 2). Don't forget to check this surface for twist with winding sticks (not shown). This flat surface is called our reference surface, and we mark it with a cursive letter f (stands for 'face'). Plane one edge square to our reference surface (pic 3), using a square to check. Next, measure the width of your panel from both ends, draw a line and plane to that line (pic 4). Now that we have 1 flat surface and 2 square edges, we can simply use a marking gauge to mark the thickness (pic 5). Lastly, we can just plane towards our gauge lines. If the reference surface was flat, this surface should be perfectly parallel to it and flat as well.
To ensure the other panels have the same width, you can use the first panel to mark them (pic 6). If there is too much wood left to plane away, use a rip saw (pic 7).
Leave a millimeter extra, so you can plane exactly to the line. When all panels are planed exactly the same thickness and width, you can cross cut them to length (pic 8).
To ensure the edges are square, you can use a shooting board (pic 9).
This shooting board was made from some leftover plywood, and is very easy to make. After a lot of sweat (and perhaps even tears) you will have 4 panels like this:

Step 4: Joining the Sides With Dovetails
Now that we have our 4 sides, we can join them together. The simplest way would be to nail or screw them together (so called butt joints) but I decided to go for a fancier and sturdier construction with dovetails. If you're new to dovetailing by hand, watch this video first. I decided to make the tails on the long sides (the front and back) of this treasure chest, so that they are easily seen. If the pins were on the long sides, you wouldn't see the angled cuts and it would look more like a box joint.
I won't explain the dovetail method in detail, because the above video does this better. I will however give a brief overview of the process. I laid out the dovetails using a homemade dovetail template with a 1:7 pitch (pic 1). There are people that use compasses to lay out the distances, but you can pretty much choose whatever distances you want. Just pick something that is pleasing to the eye, and stick with it. However, on the ends of the tail pieces, leave enough space for a groove that will accept the bottom (see later). If you don't, the groove will run through the tails, and you'll have to plug them up.
Use a back saw to cut out the tails (pic 2) and make sure to cut on the waste side of the pencil lines. The corners can be removed with the saw, and the middle piece has to be chopped out from both sides (pic 3). Transfer your tails onto the pin piece with a sharp pencil (pic 4) and cut out the pins as well (pic 5). Notice the X's to indicate waste wood, so you know which side of the line to cut to. Chop out the waste (pic 6). Then test fit your joint:

The pins are slightly protruding, but that's what we want. We'll trim them flush later. If the joint won't fit, you'll have to find the problem areas and trim them slightly with a chisel. Usually, the problem areas appear as shiny spots because the wood has been burnished by the friction.
Now do this entire process three more times, and you should end up with something like this:

It's a very good idea to mark all your joints with letters, so you know how everything goes together.
Step 5: Plowing Groove and Making Bottom
Assemble the sides and make sure they fit well. Plane the edges of both bottom and top (pic 1) to ensure that all sides are level. Try to skew your plane so that it registers on two edges. It's important to do this planing step now, because we will make a groove to accept the bottom, and we'll be using the edges as reference.
With a box this size, you can not simply glue the bottom on. Wood expands and contracts because of differences in air humidity, and this wood movement can not simply be ignored or your box might not stand the test of time. To solve this issue, the bottom panel floats in a groove, with a little bit of play. To make the groove, I used a Record 044 plow plane (pic 2) with a 5/16 inch cutter (about 8 mm) and a depth setting of 6 mm. It's a fantastic tool that makes grooves in no time. Notice the cutter is guided by a fence, so that's why we had to plane the edges flush first. Otherwise, our groove might not be aligned on all 4 sides. The resulting groove can be seen in picture 3. In determining the position of the groove, make sure you don't plane into the tail of your dovetails. That's why it was important when laying out the dovetails (step 4) to give yourself enough room here.
Now it's time to glue up a panel to fit into this groove (pic 4). This is the same procedure as in step 2, only with four boards instead of two. When the glue is dry, plane everything flat with a scrub plane (pic 5), followed by a smoothing plane. With this particular panel, I had trouble getting it nice and smooth without tear-out because of the way the grain runs. Planing across the grain seemed to work wonders, with both scrub plane and smoothing plane. This left a slightly rougher surface than you would normally get from planing with the grain, so I followed up with a card scraper (pic 6) to smooth it out. Notice the wispy shavings. If you're not getting those, it's time to sharpen up. Set your marking gauge just slightly less than the width of the groove (in my case 7.5 mm or so), mark the edges of your panel and plane to that line.
Now that our panel is the right thickness, we need to cut it to size. To do this, set the box onto the panel and trace the inside with a pencil:

Now add the depth of the groove (6 mm in my case) on the end grain sides (left and right on this picture):

Wood doesn't move in this direction, so that's why it can and should be a tight fit. For the long grain sides (top and bottom on above picture), subtract 1 mm from your groove depth (so add 5 mm instead of 6 mm in my case). This will allow a total of 2 mm play, in case the wood expands. It's difficult to predict wood movement, but let's hope this is enough wiggle room. Once it's cut to size, test fit the bottom, making sure all joints close up nicely:
At this point, you'll notice that the pins of your dovetails have holes in them from planing the groove. That's unavoidable, but we will fix that up in a later step.
Step 6: Making the Curved Part of the Lid
Now that the box is more or less finished, apart from the glue-up, we can start with the lid. To make the curved form, we start by sawing a bunch of strips about 30 mm wide (pic 1) and we plane them all flat and to the same thickness (pic 2). The method for making curved parts is exactly the same as for making panels, except for the fact that you need to plane the edges at an angle. The steeper that angle, the more curvature you get. This is an ancient method that was once used to make buckets and barrels. I chose an angle about 3° off from 90°. If you want, you can set your sliding bevel to that angle (pic 3), but it's not totally necessary to get the exact same angle on every strip. Just tilt your plane a little when planing the edges. If you choose to plane 2 edges together like in picture 3, you need to flip one strip 180°, to avoid that both angles compensate. So if you marked all strips to know how they go together, the marking should be on the outside for one strip, and on the inside for the other, when both are planed together. If you have opposite grain directions, you might find it easier to just plane one edge at a time.
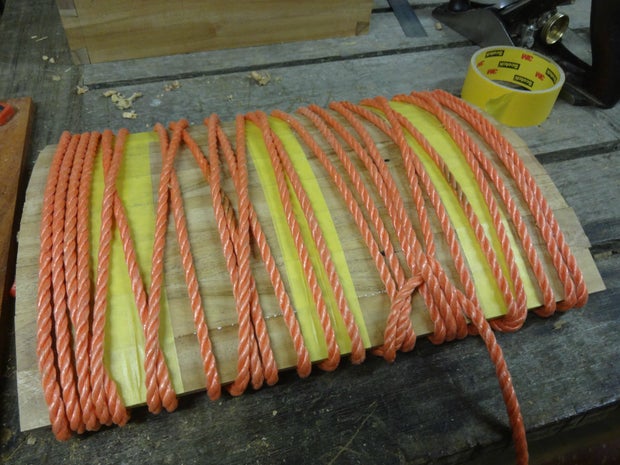
Once all your edges are planed at an angle, put some painters tape on to hold them together (pic 4). Now flip it over and put glue between the strips on the bottom side (pic 5). Put some more tape all around the lid, nice and tight so you get a good glue squeeze-out (pic 6). There's no good way to clamp such curved surfaces, so to be on the safe side, wrap it in rope to add some extra pressure:
Step 7: Filling in the Nail Holes
This step can be done at any stage, but I decided to do this now before everything is assembled. To fill in the nail holes, start by sanding the inside of the curved lid and collect the dust (pic 1). Mix some of that dust with 5 minute epoxy (pic 2) and start filling all nail holes. It's best to apply generously to make sure all holes are completely filled in one application (pic 3). Once the epoxy has fully cured (give it an hour or so) you can remove the excess with a sharp chisel (pic 4) and some light sanding.
Step 8: Cutting the Lid to Size and Adding Vertical Strips
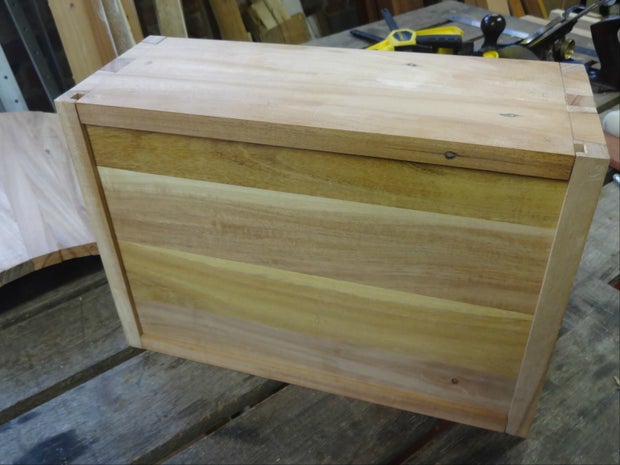
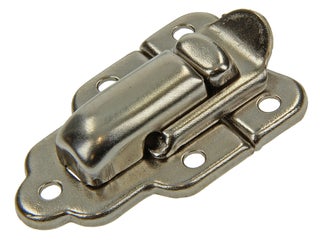
Now go ahead and cut the curved lid to size. Place it on top of the box and trace around with a pencil (pic 1). Leave 1 mm extra on all sides, so you can plane everything flush once the treasure chest is fully assembled. To draw a straight line across a curved surface, use a piece of cardboard (pic 2). Clamping the curved part in the vise is almost impossible, so use a bench hook for sawing (pic 3). This is basically just a piece of plywood with a stop block on both top and bottom. This particular bench hook is actually the opposite side of the shooting board in step 3. It also comes in handy to plane the edges level with the rim of the box (pics 4 and 5). At this point, you could probably go to the next step already, but I decided to add 2 vertical strips to the lid (pic 6), so I would have space to mount a clasp like this one:
Step 9: Making Sides for the Curved Lid
Our curved lid is coming together nicely, but it's still missing two sides. Just like in step 2, glue two slats together and do this two times. Trace the outside curve of the lid onto these pieces, and cut along the line with a coping saw (pic 1), leaving a little bit of extra wood beyond your line. Clean up the curve with a wood rasp.
To join these pieces to the curved lid, we'll be using dovetails again. Roughly mark the position of the tails freehand (pic 2). Try to mark them so they end up in the middle of every slat. Now trace the inside of the curve with a knife (pic 3) and transfer your tail marks to the inside. Use your dovetail template again for a consistent angle, and make sure all tails have the same width (I chose 17 mm). Cut them out with a back saw and remove the waste (marked with an X) with a coping saw (pic 4). I find it best to orient the saw blade so you cut on the push stroke. Stay away from your knife line, and then trim to your line with a sharp chisel (pic 5). Make sure you trim those edges square, so check regularly.
Now carefully position the tail piece onto the lid and trace the tail positions with a sharp pencil (pic 6). Take your time to position it exactly right, to minimize gaps. Also put a base line on the curved part, so you know how deep your recesses should be. This can be done by transferring the thickness of the tail piece onto the locations where the pins will be. Cut out the pins, remove the waste with a coping saw and trim to the base line:

Now test your fit and trim where necessary. Be careful while tapping and try not to tap directly onto the tails. They could snap off because of the way the grain runs. Once you're happy with the fit, you can glue up. I added glue on both pin and tail recesses:
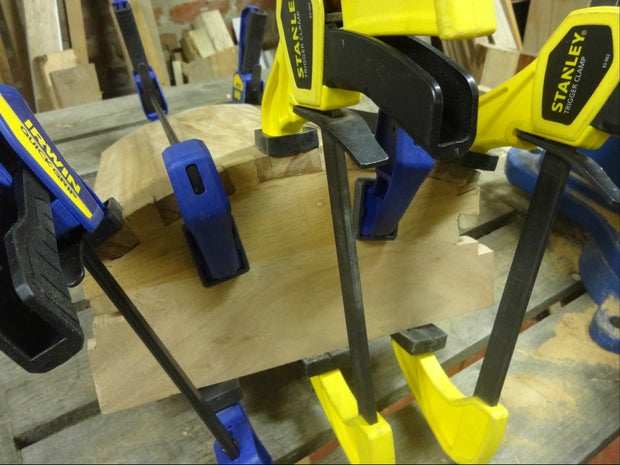
Repeat the entire process for the other side. Finally, clamp everything up:
Step 10: Gluing Up the Box and Plugging Pin Holes
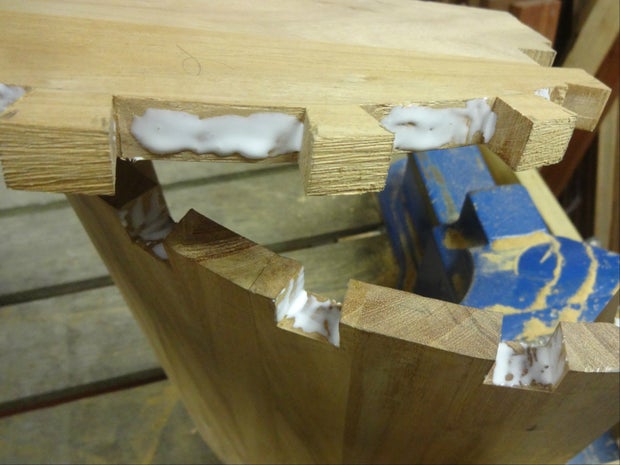
While you're gluing, it's time to permanently join all sides of the box together as well. Make sure you rehearse this glue-up without glue because it's possible to make a mistake while assembling. If your final piece is a pin piece, there's no way you can fit it in. So always leave a tail piece for last. For the gluing itself, I find it best to put a glob of glue on a scrap piece, and then use a thin strip of wood to apply it to the tail recesses (pic 1). Don't forget to put in the bottom before you glue in the last piece. Don't put any glue in the groove, so the bottom can move freely. Them clamp everything up from all sides (pic 2). Both diagonals should be the same if your box is square. If not, adjust this with hand force and then tighten all clamps.
To fill the holes left by the plow plane in the pins of the dovetails, find a piece of scrap and try to match the grain pattern (pic 3). Saw this piece out, and shape it further with a chisel. It should be wedge-shaped on all sides (pic 4). Put some glue on it and tap it in. Once you sawed off the protruding part and planed everything flush (pic 5), it should be hardly noticeable, unless you know what to look for (pic 6).
Step 11: Planing Rim of Lid Flush, Trimming Dovetail Joints
Now that we have both box and lid glued up, it's almost time to marry the two with hinges. But before we can do that, we need to plane the rim of the lid. I first used a rip saw to cut off most of the excess, then switched to a scrub plane to get me close to flush (pic 1). Next, use a smoothing plane to get the rim perfectly level (pic 2). Notice the clamp setup to easily hold this curved lid in place. Once you get a continuous shaving all along the rim, put it on top of the box to test the fit. Mine had a slight wobble in it because two opposite corners where higher. This was easily fixed by taking off a couple more shavings from those high corners, followed by a continuous shaving along the rim.
At this point, you can also chisel the protruding pins and tails flush (pic 3). Also plane the backside of the lid flat, so we can install the hinges in the next step (see note on pic 2). Resist the temptation to plane the other sides of the lid already. It's best to do that when box and lid are together, to ensure they are flush (see step 13).
Step 12: Installing Hinges, Clasp and Chain
Installing hinges can be a bit tricky if you've never done it before. But luckily, Paul Sellers comes to the rescue again with an excellent video explaining the entire process. I won't explain it in detail, so I suggest you watch the video. It's far easier to start with the lid first. Use a knife to trace the hinge, to ensure accuracy (pic 1). Next, set your marking gauge a little bit more than the thickness of your hinge plate. This will allow space for the screw heads. Paul doesn't talk about that in his video, but I found that the lid doesn't fully close when you take the exact hinge thickness. Use your chisel with the bevel down to chop out the waste (pic 2). Mark the screw locations with an awl (pic 3) and screw the hinges in place with a screwdriver. Drilling pilot holes wasn't necessary in my case. But I should mention that I used steel screws that can take some force. Brass screws are more fragile, so if you use those, I would recommend drilling pilot holes first. Let the lid rest upside down onto the box to mark the position of the hinges on the box (pic 4). This method does require the hinges to be the same size, so check this first. Once you chopped out those hinge recesses as well, it's just a matter of marking the screw positions and screwing it all together.
Installing the clasp is pretty straightforward. Position the bottom part of the clasp in the middle of your box, mark the screw locations with an awl, and screw it in place (pic 5). Fit the top part into the bottom part and apply downward pressure. Then mark the screw positions and screw it in place. If this part were mounted slightly too high, the clasp wouldn't shut easily.
Finally, we'll install a chain on the inside, to prevent the lid from opening too far. Otherwise, the fully opened lid would strain the hinges too much. The chain is simply installed with two screws (pic 6). Just make sure the screw heads are wide enough so the chain cannot slip over the screws.
Step 13: Finishing Touches
Now that all the hardware is installed, go ahead and plane the lid flush with the box on all sides (pic 1). Then add a chamfer on all outside edges by holding your plane at an angle (pic 2 and 3). The inside edges can be sanded so they're not sharp anymore.
If you want, you can scrape everything super smooth one last time before applying finish (pic 4). I chose a tung oil finish (pic 5) because it brings out the natural beauty of the wood and you can't really mess it up. Moreover, it preserves the natural touch of the wood, whereas varnishes leave a 'plastic' feel to the wood. Just apply it liberally with a rag (pic 6), let it soak in for half an hour and then remove the excess. Apply a second coat the next day. Apply as many coats as you want, really. Tung oil is a slowly drying oil, so count on a few weeks drying time. This doesn't mean you can't use your treasure chest yet, it just means it takes a while before it stops feeling greasy.
Caution: the rags can catch fire spontaneously if bunched up. Either let them dry flat, or just toss them in the wood stove as I do.
Step 14: Admire Your Work!
That's it! You made it! Take a step back and admire your work. Then go ahead and fill your treasure chest with gold coins or other treasures. Either use chocolate coins like I did, or use real ones if you can afford it :-)
If you liked this Instructable, don't forget to give me a vote in the 'Hand tools only' contest, the 'Reclaimed contest' and the 'Homemade Gifts Contest'. I entered this last contest because this treasure chest is a gift for my 3.5-year old nephew.


