

Introduction: 3D Printer Enclosure Ender 5


A simple to build wood and Perspex 3D printer enclosure built onto an IKEA "Alex" drawer unit.
Designed to house my Ender 5 Pro and all my modifications it can be used for any printer of a similar size.
The IKEA "Alex" base has 6 deep drawers with plenty of space for printer filament storage etc.
It aslo has large castors that make it very easy to move around for access.
I have kept the enclosure very simply and can be built with a few hand tools if power tools are not available.
The joints are very basic and are fixed by glue and screws.
The enclosure is glazed in Perspex sheet that is easy to buy custom cut and in different thickneses online.
Again to keep the build simple I have used a framless door design.
My printer stands against an outside wall so I have vented it out the back using a 4" bathroom extractor fan.
The Enclosure helps keep fumes out of the room and also keeps printing sounds(mainly fan noise) to a much lower level.
Step 1: Enclosure Details


fig.1 The enclosure has an open back and is designed to sit against a wall.
Dust seals are fitted around the door opening at the front and at the rear of the enclosure that fits against the wall.
Self closing hinges hold the doors against the front dust seals and also allow the doors to open over 180° for easy access to the printer.
fig.2 Rear view showing the dust seal on the back of the printer.
fig.3 front view showing the printer positioned over an extractor fan.
Step 2: IKEA Alex Base


fig.1 The drawer base from IKEA
fig.2 Enclosure showing the ventilation overlap at the rear of the IKEA Alex drawers.
The IKEA quoted dimensions in mm are W670xD480xH660
My IKEA cabinet is W667xD480xH665 so best to check the dimesions especially the width before constructing the enclosure. I built my enclosure 665mm wide so the the base is 1mm wider both sides.
Note since I built this enclosure the Alex has been discontinued but is being replaced with a new model in April 2021. There should be stocks in store for now or 2nd hand on Ebay etc.
Step 3: Enclosure Build Overview

fig.1 Exploded view of the enclosure frame.The top and bottom sections are screwed and glued first then the four uprights are screwed and glued between the top and bottom sections.
Note the lower rear section is screwed only as it is removed later.
The lower rear section of timber is removed once construction is complete to allow the enclosure to be slid off the drawer stand.
Step 4: Enclosure Build Hardware


fig.1 Releasing the four side catches allows the Enclosure to be slid off for easy access to the 3D printer.
fig.2 Four pairs of Stainless Spring Loaded Toggle Clips are used to hold the enclosure to the base.
fig.3 The Perspex door are mounted on 2 pairs of Self Closing Cabinet Door Hinges .
fig.4 Show the hinge dimensions in mm.
Also required are 12 x 3mm nuts and bolts for the hinges.
2 x door knobs and 2 x penny washers (can use 3D printed washers instead)
Panel pins for fixing outer beading
Small screws for inner beading
Step 5: Enclosure Build Door Hinges


fig.1 Front of hinge showing front bolt washers and front hinge washer
fig.2 Hinge opened to show rear bolt washer and hinge between front and back washers.
fig.3 The rear mounting surface of the hinges has a raised area that will damage the
Perspex sheet even with a flat washer over it.
I have added a cutout to the rear washer to accommodate the raised area.
fig.4 Make sure the rear hinge washers with the cutout are fitted on the rear of the
hinge as shown.
Step 6: Enclosure Build Filament Reel


fig.1 When testing out the enclosure build using the IKEA Alex base I found the width
of the base made access to the filament reel awkward.
As the height of the enclosure was not set by the dimensions of the Alex drawers I increased the enclosure height to allow for the filament reel to be mounted on top of the printer.
I modified the printer by moving the extruder and modified reel roller to the rear top rail.
The filament tubing was cut down to fit.
Modified Spool Reel
I have used 3 different parts to make this Spool Reel
fig.2 Filament Spool Roller by mistertech
fig.3 Creality (Ender 3) Filament holder 80mm spools by mjoaris
The 3rd part is the original metal bracket that comes with the Ender 5
fig.4 The 3 parts are all bolted to a plywood base plate.
fig.5 Rear view of filament roller, load bar & extruder mount location and fixings.
Note load bar spacers to keep reel and reel rollers weight onto left end of load bar only.
Full details of the filament reel and filament scale build can be found on my site http://www.brettoliver.org.uk/3D_Printer_Projects/3D_Printer_Projects.htm
Step 7: Enclosure Build Plans


Plans
All joints are glued and screwed except the lower rear brace that is screwed
only so it can be removed after construction.
See full size plans here
Frame Sections
fig.1 Front Frame Section
fig.2 Other Frame Sections (bar front)
Step 8: Creality Logo


fig.1 The Logo can be downloaded from
here and is simply screwed to the top rail.
To print a 2 colour LOGO in Cura you can pause the printer just as it starts printing the LOGO letters and then change filament colour.
I set a script in Cura to automatically pause the printer at a set layer.
fig.2 To do this first slice your object.
fig.3 n the Cura menu select "Extensions" then "Post Processing" and then "Modify
G-Code"
fig.4 In the popup select "Add a script" then "Pause at height"
fig.5 These are the settings I used
fig.6 To find the correct layer to pause at drag the layer slider on the right down
until the letters start printing.
The layer number will be shown on the slider.
When the printer pauses I have left the extruder hot so the old filament can be
pulled out.
Insert the new filament and push it through the hot end until the colour runs true.
Pull back a little bit of filament then start the printer off again.
Step 9: Fixing Perspex Sheets


fig.1 & 2 showing beading detail and Perspex sheet locations.
The enclosure is "glazed" in Perspex sheet and to cut down on cost I have used different thicknesses depending on the location.
The 2 sides use 3mm Perspex as this is thick enough to give some rigidity. The top uses 4mm Perspex to prevent it sagging under it's own weight. The front doors use 5mm Perspex to give rigidity to the frameless doors. Once the enclosure frame had been built I measured the exact dimensions (-5mm) and ordered Perspex sheet using an online company who cut Perspex sheet to size. The front doors were ordered with a polished edge as they are a frameless design.
The outer beading length are fitted fist leaving a 2mm gat at the front edge.
This beading is nailed in place with panel pins. The pins are set below the surface using a punch.
The pin holes are then filled and rubbed down before the whole enclosure is painted.
The inner bead is cut to size and painted seperatly.
The sections of Perspex are then fitted from the inside with the inner prepainted bead screwed into place.
The front doors have holes drilled for the hinge bolts and also for the door knob.
The front door stop bead is screwed to the door frame once the doors are in place. Space is allowed for the dust seals to just touch the door Perspex.
Step 10: 3D Printed Parts


3D printer files for washers and hinge supports.
Hinge support washers have no holes. Just use your hinge as a template and drill 4.5mm holes.
I used 3mm bolts so the larger holes allow for a bit of door adjustment and Perspex expansion.


Step 11: Ongoing 3D Printer Projects
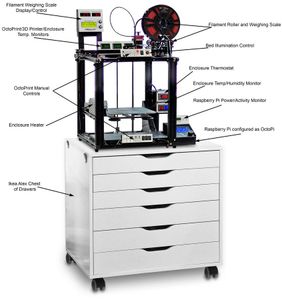


This printer enclosure is part of my ongoing 3D Printer Project.
fig.1 shows details of the completed project.
Full details will be available on my 3D Printer Project once I finished building it.
fig.2 My modified Ender 5 Pro
fig.3 Standard Ender 5 Pro.


