

Introduction: Arduino Control Via a Web Service With Teleduino


Convert your Arduino into a sofisticated web control platform using Teleduino.
Teleduino is both a product and a service. Once the Teleduino sketch has been loaded on your Arduino (the 'product'), it then connects to the Teleduino server awaiting your instruction from anywhere in the world via the internet (the 'service').
Typically there are no firewall changes required, and if your network supports DHCP then no network configuration is needed on the device. Easy!
The Teleduino platform allows you to perform the following with your Arduino, all via the internet:
- Reset, ping, get version, get uptime, get free memory.
- Define pin modes, set digital outputs, set analog outputs, read digital inputs, read analog inputs, or read all inputs with a single API call.
- Define up to 2 'banks' (4 for the Mega) of shift registers. Each 'bank' can contain up to 32 cascaded shift registers, giving a total of 512 digital outputs (1024 for the Mega).
- Shift register outputs can be set, or merged, and expire times can be set on merges (you could set an output(s) high for X number of milliseconds).
- Define, and read and write from serial port (4 for the Mega).
- Read and write from EEPROM.
- Define and position up to 6 servos (48 for the Mega).
- Set preset values for the above functions, which get set during boot. Preset values are stored in the first 178 bytes of the EEPROM (413 for the Mega).
Just imagine what you can do. The possibilities are endless. What makes it even better? The process is quick and easy.
This tutorial will guide you through creating a Status LED for your device, then obtaining and uploading the Teleduino library/sketch to your ethernet enabled Arduino Uno (or equivalent).
To complete this tutorial you need:
- Arduino Uno / Mega (or equivalent)
- Ethernet Sheild (Wiznet based)
- LED
- 1K Resistor (or similar)
This is our first tutorial and will be adding neat project tutorials for achieving specific tasks.
If you get stuck on any of the steps, or if you feel that there is a step that could be explained better, please leave a comment so that we can improve things.
Enjoy!
Step 1: Obtain Unique API Key
In order to uniquely identify your device on the Teleduino server, you need to obtain a unique API key.
This API key needs to be loaded into the Arduino sketch (explained in Step 4).
Your key will be sent to you by email within a few minutes of being requested.
To request a key, hop over to https://www.teleduino.org/tools/request_key.php (please bear with us while the nice looking site is being built!)
Cheers!
Step 2: Add Status LED to Arduino


While your Teleduino device is booting, it flashes codes out the Status LED. This is so that you can keep an eye on what's happening, and it also makes troubleshooting easier if you're having trouble getting connected.
The different status codes are:
1 flash - Initialising
2 flashes - Starting network
3 flashes - Connecting to server
4 flashes - Authenticated
5 flashes - Session already exists for supplied key (sometimes happens after a quick restart - will work on next auto-restart)
6 flashes - Invalid or unauthorised key
10 flashes - Connection dropped
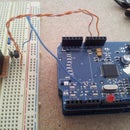
The Status LED is preconfigured on digital pin 8 of the Arduino board. In order to see status codes being flashed, we need an LED connected.
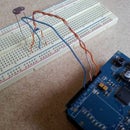
Solder the 1K resistor onto the flat-edge side of the LED. You may wish to shorten the leads (as per image) .
Bend the leads for the resistor / LED so that they are spaced far enough apart for the resistor lead to fit in the GND port, and the LED lead to fit in the pin 8 port (as per image). Trim any excess lead so that it looks nice and tidy.
Connect your masterpiece to your Arduino.
Nice work!
Step 3: Download Teleduino Library

Teleduino comes in the form of a library for your Arduino IDE (the software that you use to write/upload sketches to your Arduino). The library is written for versions 1.0 and 1.0.1 of the IDE (the latest versions at the time of writing).
Download the library from https://www.teleduino.org/downloads/arduino/teleduino328_328-0.6.9.zip for the Uno version, or https://www.teleduino.org/downloads/arduino/teleduino2560_2560-0.1.2.zip for the Mega version.
Once downloaded, open up the archive and you'll see a folder called 'Teleduino328' ('Teleduino2560' for the Mega). Copy this folder to the 'libraries' folder of your Arduino IDE installation.
Important Note: If you have the Arduino software open at this point, you will need to close it and restart it. If you don't, the library will not be available and you'll get compilation errors!
Good job!
Step 4: Upload Sketch to the Arduino

Now for the moment we've all been waiting for. Time to make some magic happen and upload the Teleduino sketch to your Arduino.
Please note that the unique API key from Step 1 is required to proceed.
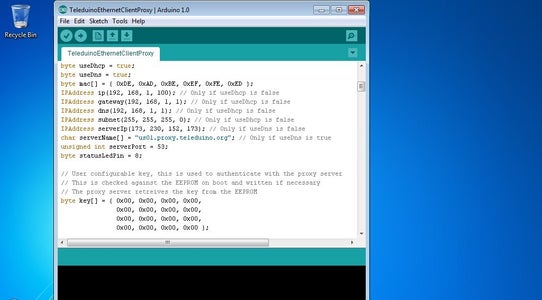
Open up the Arduino IDE. Click 'File' -> 'Examples' -> 'Teleduino328' -> 'TeleduinoEthernetClientProxy'. This will open up the sketch that we'll be using.
Near the top of the file you'll see some network configuration variables. If you're feeling adventurous you can play with these, but the default should work fine. The only thing we recommend changing is the MAC address declaration, even if it's just a matter of changing the last byte to something like 0x01. MAC addresses must be unique on your network (which is why we recommend you change it from the default). If you are setting up two or more Teleduino devices, you must ensure their MAC addresses are different.
The one thing that must be set is the unique key. See the attached image as a reference. By default they are set to a bunch of zeros. To make it easier, when you receive your unique API key, you'll also receive a URL to a tool which outputs your key in a format that can be copied and pasted into the sketch.
Once your key is set, connect your Arduino (if you haven't already), ensure the correct serial port is selected, and click 'Upload'. All going well the sketch will compile and upload.
Viola!
Step 5: Sample API Calls and Further Reading

During normal operation, the Status LED will do a quick pulse every 5 seconds of inactivity. This is the server checking in on the device to make sure everything is happy.
So, you've got a connected Teleduino. Now what? I bet you want to do some cool stuff with it, right? Let's start with a couple of really simple API calls. These API calls will tell you what version of the Teleduino firmware you're running, and the uptime of your device (in milliseconds).
Try out the following URLs (replace {key} with your unique API key):
For the Uno:
https://us01.proxy.teleduino.org/api/1.0/328.php?k={key}&r=getVersion
https://us01.proxy.teleduino.org/api/1.0/328.php?k={key}&r=getUptime
For the Mega:
https://us01.proxy.teleduino.org/api/1.0/2560.php?k={key}&r=getVersion
https://us01.proxy.teleduino.org/api/1.0/2560.php?k={key}&r=getUptime
Pretty neat, huh?
This is where we end the tutorial. We are continuing to add further tutorials which explain how to achieve specific tasks using the Teleduino platform. These tutorials are:
- Control an LED over the Internet via Arduino with Teleduino
- Control a Relay over the Internet via Arduino with Teleduino
- Read Light Level over the Internet via Arduino with Teleduino
- Control Servos over the Internet via Arduino with Teleduino
If you want to dive right in yourself, you can view the full API reference manual at https://www.teleduino.org/documentation/api.
Your comments and questions are welcome and appreciated.
Have fun!

Participated in the
Arduino Challenge

![Tim's Mechanical Spider Leg [LU9685-20CU]](https://content.instructables.com/FFB/5R4I/LVKZ6G6R/FFB5R4ILVKZ6G6R.png?auto=webp&crop=1.2%3A1&frame=1&width=306)


