

Introduction: Read Light Level Over the Internet Via Arduino With Teleduino


We've all done it. You leave the house for work in the morning and you wonder if you left the garage light on. You decide not to worry about it, and then get in trouble with your wife/husband/girlfriend/boyfriend/roommate for clocking up the energy bill. Sound familiar? Well have no fear! With a couple of components, and your Teleduino enabled Arduino device, you can check the light level from anywhere via the internet. Suave!
This process is made really simple using the Teleduino sketch for your ethernet enabled Arduino. Haven't heard of Teleduino? That's cool, you may want to take a look at Arduino Control via a Web Service with Teleduino to get yourself started.
This tutorial will guide you through the process of attaching a LDR (Light Dependant Resistor) to your Arduino, and provide some example Teleduino API calls to:
- Fetch the value of an analog input
- Fetch all inputs with a single API call
If you get stuck on any of the steps, or if you feel that there is a step that could be explained better, please leave a comment so that we can improve things.
Let's get cracking!
Step 1: Parts Needed and Circuit Diagram


The need the following parts to complete this tutorial:
- Breadboard (optional, but makes prototyping much easier)
- 10K Resistor
- LDR (Light Dependant Resistor)
- Some hookup wire
Take a peak at the attached circuit diagram. It shows how the components need to be connected. Pretty simple!
Let's get it all together!
Step 2: Put Circuit Together


Image 1
Add the components to your breadboard as shown. You may want to reference the circuit diagram from Step 1 to double check.
Image 2
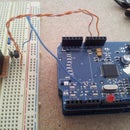
Add the Hookup Wire. There are three wires that need to be connected to your Arduino (5V, GND and Analog Pin 0).
Image 3
Shows the correct way to connect the circuit to your Arduino board.
Time to get some readings!
Step 3: Fetch Values Via the Teleduino API
Here are some example API calls that you can use to get readings from your LDR circuit. You need to replace {key} with the unique API key you obtained when you completed the instructable Arduino Control via a Web Service with Teleduino. Just chuck the URLs into your browser's address bar to fetch the values.
Analog Pin Addressing via Teleduino
The analog pins on the Arduino can also be used as digital pins. To keep things simple when using the Teleduino, the analog pin numbering is different to the native Arduino.
The following shows the pin value to be used for addressing the analog pins:
A0 = 14
A1 = 15
A2 = 16
A3 = 17
A4 = 18
A5 = 19
A6* = 20
A7* = 21
* Some alternate brand Arduino boards support two extra analog pins.
Fetch the value of Analog Pin 0, Teleduino pin 14 (pin=14):
http://us01.proxy.teleduino.org/api/1.0/328.php?k={key}&r=getAnalogInput&pin=14
Fetch all input values in a single API call:
http://us01.proxy.teleduino.org/api/1.0/328.php?k={key}&r=getAllInputs
What to Expect
What you should find is that the darker the room, the lower the value. If it's pitch black then you should expect approximately 0, if direct sunlight then a value of approximately 1023. Perform some tests to see what values you can expect for your particular environment.
Step 4: Further Reading
Reading light levels is just a very simple example of what can be achieved by using the Teleduino Arduino library/sketch.
To view the full API reference manual, take a look at http://www.teleduino.org/rtfm/api/328.php.
Have fun!


