

Introduction: Blimpduino. the Indoor Drone


BlimpDuino 2 is a low cost open source autonomous blimp. It consists of an Arduino-based blimp controller board with on-board WIFI and laser sensors. Two vectoring differential thrusters and one lifting propeller. Check this video to watch it flying controlled from a smartphone (control APPs for iOS and Android are freely available. Links below)
Blimpduino 2.0 features:
- ATMEL ARM M0 processor
- Co-operative piloting
- 2 servo outputs
- Up to 4 motors
- WIFI controlled (via APP or gamepad)
- Altitude hold
- Internal accelerometer/gyros for a smooth navigation
- Arduino coded
- Suitable for small to huge helium balloons
- OPENMV camera compatible
You can attach any balloon to the gondola and make it flyable. The only condition: the balloon should be able to lift 32 grams (the weight of the gondola).
The control board has sensors that will make the navigation possible: a powerful gyroscope/accelerometers module and an altitude sensor: a LIDAR laser. You just need to set the altitude and heading and the blimpduino will make the rest.
You can attach a FPV camera, flag, modify the frame... the blimpduino is completely open to hacks and addons.
The control board has two servo outputs for any additional purposes
Simple but exciting ;-)
You can create your own control board: schematics here
Step 1: What You Need to Create Your Blimpduino

Step 2: Getting Ready to Fly the Balloon (any)!

The sensors onboard the blimpduino makes almost any balloon flyable. No matter its shape or size* from 80 meters away
*The balloon should be capable of lifting the weight of the blimpduino gondola (32 grams/ 1.13 Oz)
Step 3: 3D Printing the Gondola

Printing the gondola by yourself
The gondola has been designed to be sturdy and light at the same time and do not vibrate even when the motors are delivering their maximum power. If you are printing the gondola and arms by yourself (download the latest version from here), set a printing infill of 10% and walls thickness to 0.8mm. Increasing the infill will not improve the sturdiness of the frame but will drastically increase the total weight. As the wings have been created as different parts, you can use different colors for them. Print it slowly trying to avoid stringing. If your parts are curling in the print, you can try including a brim or a raft.PLA or PETG filaments do the job perfectly.
Once the different parts have been printed, remove them gently from the heatbed and clean them up using a knife. Keep in mind that the frame is fragile.

Assembling the gondola and placing the motors
- Gently push the wings into the lateral channels of the main frame. If you are having difficulties inserting it or feeling to much resistance, do not force it. Take it take out and use a knife to remove any burr.
 Note: you can use small zip ties (100x2mm) to firmly keep the motors inside the holders in the case they are a little bit loose
 - Insert the motors (3.7 V drone motors, size 0614) inside their holders. Both wing motors are the same type (blue and red cables). The two wings motors will spin in opposite directions in order to compensate the torque (the Arduino code will determine that). Insert the motors very carefully inside the holes and never pull from the cables, they are very fragile. If you need to take them out, just push the botton of the motor with a pen or similar. The front motor (Elevation) is the one with black/white cables.


3. To attach the propellers to the motor axis, place the propeller on the table and push (gently!) the axis of the motor into the propeller shaft. As the motor is already inserted in the wing, place your thumb on the back of the motor, align the axis and insert it into the propeller. With the kit, it comes a set of 4 propellers (2 clockwise + 2 anti-clockwise units). The anti-clockwise propellers have a A letter close to the axis. The blimpduino uses 2 anti-clockwise and 1 clockwise propellers. Check where every propeller has to be placed observing the photos below. If they are misplaced the blimp will misbehave. If the motors are still a little bit loose, use the zip ties provided to "close the clamp" around them
Tolerances: 3D printing with PLA/ ABS or PETG, using different brands of 3D printers or extrusion temperature will cause a slightly, but noticeable, wall thickness variation. You may need to insert the motors pushing with a pliers but never touching the cables.

The blimpduino will move with the lifting motor forward. It is extremely important to place the right propellers in the correct motors, otherwise the blimp will misbehave.
Step 4: Placing the Lipo Battery and Control Board
Either you have a 1 cell 300 mAh or the 500 mAh battery they both have to be fixed in the same place: between the gondola frame and the control board. Use double sided sticky pads to attach it to the frame. Two fixing point will be enough. Once the battery is set, put the control board on top of if (you can place another sticky pad on top of the WIFI module and attach it to the battery in order to fix a little bit better the Lipo). If you are using another battery (different capacity -larger o smaller-): try to place it as close as possible to the imaginary line created by the two lateral motors. Check the orientation of the battery cable, you can place it as indicated in the photos or rotated 180º, whatever suits you best. If you are planing to swap batteries often, the connector should be reachable. The blimpduino board has a Lipo charger module, so to re-charge the battery you just have to connect it to any USB port. Depending of the current delivered by the USB port, the charging time will vary from 20 minutes to up to 60.
The control board has a power cable already soldered. The connector is the most widely used in small/drone Lipo batteries, so feel free to get any other compatible battery if you want to increase the flying time (but keep in mind that you will possibly need a bigger ballon!)
Use M2 10mm bolts (x3) to attach the control board to the gondola. But first, plug the motors to the connectors as indicated below.
 The Gondola has four lateral channels/ indents so you can use a rubber band to fit the Lipo battery to the frame easily. If you need a stronger fixing,use a zip tie as indicated below.


Double check the propellers! They have to be placed as above.
The Blimpduino control board is in charge of facilitating the fly of the blimp no matter the size / shape of the balloon. It has a LIDAR sensor to precisely measure the distance from the bottom of the board to the floor or any other obstacle. Do not cover the board with any object blocking the LIDAR view. If you want to create a cover for the gondola, keep in mind that the LIDAR sensor needs an aperture!
Two servos can be connected to the servos ports adding to the blimp two actuators. The board can handle up to 1000 mAh 3.7 V lipo. Every motor driver can handle up to 1 Ampere and the Lidar sensor can detect an obstacle 5 meters away (optimal conditions). Check the Blimpduino control board schematic for more info.

Step 5: Checking Things

A video showing how the blimpduino is capable to return to its initial position after suffering an external disturbance. The PID loop took control of the motors and using the data provided by the onboard accelerometers and gyros, the PID send the proper commands to the motors correcting the heading. This assisted navigation will make the blimp controllable no matter the size of shape of the balloon (there are some restrictions imposed by the power limitations of the motors)
Remote Control APP freely available for iOS and Android devices
![]()
![]()
Attaching the blimpduino gondola to the balloon
To attach the blimpduino gondola to the balloon use the sticky pads provided. If you are planning to remove the gondola often, do not use too many pads. The propellers need clearance from the balloon to drag enough clean air (and not touching the foil!)
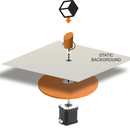
 Above: the shape and size of the balloon will strongly determine the way the blimpduino flies. In the render above a "lentil" shaped balloons makes the job of a rudder making the turns slow but stabilizing the straight lines movements
The balloon shape can work as an "aerodynamic" rudder, making sudden turns more difficult to happen and facilitating a smooth navigation (check this video). Always keep the propellers away from the balloon surface
counterweight
The buoyancy of the blimpduino is extremely important. Too much buoyancy (positive) will force the Z motor (located on the front of the gondola) to work to much trying to keep the balloon close to the floor. You will lose your blimpduino once the battery runs out.
On the other hand, too much negative buoyancy will empty the battery soon as the lifting motor has to work all the time to keep the blimp floating. There is sweet point, where the buoyancy is slightly negative (so if you ran out of battery the blimp will slowly fall). You can achieve this attaching one of the zip-lock bags provided with the KIT to the balloon (place it close to the blimpduino gondola) and inserting small coins in it.


Use one of the zip-lock bags provided + coins (or nuts, or tiny bolts...) to set the proper buoyancy. Attach the zip bag to the balloon close to the gondola using the sticky pads.

Above: how much weight can the official balloons can lift and the weight of the different blimpduino elements
NOTE: Any balloon capable of lifting 32 grams can be used to carry the bllimpduino gondola (300 mAh battery). In volume: a 0.06 m3 balloon
Turning the Blimpduino ON:
Before attaching the blimpduino gondola to the balloon, some previous test should be carried out.
- Place the gondola on top of an object so the propellers do not touch anything when spinning
- Check the battery is connected and charged.
- Turn the blimduino ON (on/off switch)
- Let the Blimpduino to calibrate its sensors for 10 seconds. Do not move it in the meantime. If the gondola is already attached to the balloon hold the balloon still against a wall/ceiling or any other static object. After successful calibration you will hear this sound coming from the motors[audio mp3="http://www.jjrobots.com/wp-content/uploads/2018/10/blimduino-calibrated.mp3"][/audio]
- Now the blimpduino is ready to fly. Connect your smartphone to the blimpduino network ("JJRobots_XX") and launch the control APP. The motors will not spin until you tap on any slider of the control app screen. If you want to stop the motors at any time,just exit the APP.
Charging the LIPO battery:
To charge the Lipo battery, just connect the control board to a USB port/ smartphone charger using a micro USB. A red led will stay ON while the battery is charging. Once the battery reaches the 100% of its capacity, the led will go OFF. The control board can charge ANY one cell (1S 3.7V) Lipo battery. The charging time will depend on the current delivered by the USB.


NOTES:
- Flying in manual mode (not using the assisted navigation) requires strong control skills. Try first to fly the blimpduino using the YAW (corrected heading) and ALT (altitude hold) modes turned ON.
- The battery will last way more if you fly the blimp smoothly. Aggressive maneuvers will reduce the flying time considerably. Keep in mind that a blimp has inertia and needs time to complete any movement.
- Remember that you can recharge the LIPO battery already plugged to the control board just connecting a micro USB cable to the control board. "Full charge" time will depend on the output current capacity of the USB port / Power supply
- Turn ON and OFF the YAW assistance to stop the motors and facilitate fast turns if needed.
- The maximum indoor range is about 60-80 meters under good conditions. Keep that in mind. To know where the blimp is heading to when you are 30 meters away is not easy to notice!
- Be gentle/smooth while you are learning how to fly your blimp. It will take some time before getting use to its inertia and response time.
- If you do not like how your balloon flies, remember that you can modify its flying parameters in the Arduino Code. Needing help? go to the community
- Are we missing an important point here? You would add some info to the assembly guide? let us know at: info@jjrobots.com
Step 6: TROUBLESHOOTING

I can not see the WIFI network created by the blimpduino or I want to upload again the Blimpduino CODE
Upload the blimpduino CODE again to the Control Board following these steps:
a) Install the Arduino IDE (v 1.6.5 and above) in your PC from here (skip this step if you have the Arduino IDE already installed)
b)Get the main CODE (from here https://github.com/mRoboticsIO/Blimpduino2 or here -zip file-) and extract the files into a folder named “blimpduino”
c) Install the LIDAR sensor library "SparkFun_VL53L1X_Arduino_Library": In the Arduino IDE , go to Sketch menu -> Include Library -> Manage Libraries and find the Sparkfun VL53L1X library (you can type the first letters of its name "vl53..." -> Then, install it


d) Compile and send the code to the control board
Open the main code in ../blimpduino/blimpduino.ino Connect your control board with the USB cable to the PC Note: If this is the first time you connect the board to your PC maybe you will need to install the driver. -Select the board Arduino/ Genuino Zero (native USB port) (tools->board)

- Select the serial port that appears on the tools->Serial port. It will appear as "Port: "COMX (Arduino Genuino Zero (Native USB Port))" The Xvalue may vary depending on your computer USB ports
Send the code to the board (click on the arrow pointing to the right): 
You will see the uploading process messages and a "Done uploading" once the code has been uploaded properly

Done! You have updated the Arduino CODE. This is the process you will have to follow if you have modified the blimpduino code and want to upload it to the Arduino Zero
Debugging / Listening to the SERIAL PORT
It will help you to open the Arduino SERIAL MONITOR (a magnifying glass icon in the upper right corner of the Arduino IDE) and see what the blimpduino control board is sending. To do this, just select the proper Arduino board and COM Port and then click on the SERIAL Monitor icon. You will see something like this:
 Arduino IDE Serial Monitor connected to the Blimpduino control board
Parameters displayed:
Batt: the current voltage of the "Lipo Battery". If there is not any battery connected to the control board, this value will move within 45-47 (4.5-4.7 volts) Units: volts x 10
Yaw: the real time Yaw value. If you move the blimpduino control board this value will change consequently. Unit: degrees
SetP: once the control APP is connected to the blimpduino, you will set a YAW Set point using the slider (only after turning on YAW ON button. See control APP guide for details). This SetP will show the final value of YAW that the blimpduino will try to achieve activating the wing´s motors.
LIDAR: the altitude value detected by the Lidar sensor (distance from the sensor to any object in front of it). Units: millimeters
M0, M1, M2: value of the command sent to the motors. You will only see numbers here if the control APP is connected the sending commands (using the Sliders).
CH5: this channel will let you know if you have activated the ALT OFF and/or YAW OFF buttons in the control APP. 00 -> no assisted navigation 01-> Altitude hold activated 02-> Altitude hold and Yaw assistance activated
I think my blimp is not behaving as it should
Check the propellers. Maybe one (at least) has been not properly placed. Check the type of propeller (is there an "A" on it or not?) and the orientation of the blades.
My blimp oscillates when flying/ hovering
The gondola has to be placed as close as possible to the lowest point of the balloon. Depending on its shape, that location may vary. Try, just using small pieces of double side tape, stick the gondola to the spot you think is the most adequate and fly the blimpduino. If the blimp still oscillates, shift the gondola location a little and try again. Once you have found it, use more sticky pads to firmly fix the gondola to the balloon. Another thing you can do is to separate the counterweights you are using (coins, bolts...) into two different plastic bags and attach them to symmetrical points around the gondola (equally spaced). That is an easy way to shift a little bit the center of gravity of the balloon. If the blimp still oscillates a lot while navigating, you may need to reduce the power of the motors via arduino code: PID Controls (less P value) or limiting the maximum thrust command for the motors
I was flying the blimpduino and after rebooting it I can not control it from the control APP
Completely close the control APP. You might need to re-launch it again so it can re-establish the connection to the blimpuino
Step 7: USEFUL LINKS
Blimpduino KIT (save the hassle of getting everything separately and support jjRobots)
Blimpduino COMMs protocol details
Blimpduino control board SCHEMATIC (v 0.1)
Blimpduino community (for questions, Mods, add-ons, Code...)


![Tim's Mechanical Spider Leg [LU9685-20CU]](https://content.instructables.com/FFB/5R4I/LVKZ6G6R/FFB5R4ILVKZ6G6R.png?auto=webp&crop=1.2%3A1&frame=1&width=306)


