

Introduction: Cardboard Pens


I have had the idea of a cardboard pen in my head for a while.
I like the idea of the pen I use at the office giving a nod to me being a geeky maker.
The cardboard competition here on Instructables encouraged me to take the idea which was kicking about in the back of my head and push it into reality.
I also wanted to see how beautiful I could make cardboard using only the tools I have.
At the end, I will give a few reflections on things I could and would do differently if I was to make this project again and if I had access to things like a vacuum chamber.
Step 1: Tools and Consumables
For this project, I used Taylors Mirfield Omega pen kits because they are high quality, easy to upgrade and adapt and their parts are interchangeable. Meaning I can make a rollerball pen and change it to a fountain pen just by screwing in a fountain pen nib, or I can upgrade the nib to something like a Bock nib or a left-hand nib very easily.
I used foam core and cardboard which are easily accessible as well as hot glue to make the mold.
I used a lathe and lathe accessories. The nonstandard lathe tools were a pen mandrel and a chuck with small jaws.
I used West System epoxy which is my go-to resin however due to improper storage my catalyst has been contaminated, this only affected the color.
To finish the pen I used some consumables including lacquer, burnishing cream and sandpaper.
Step 2: Making the Mould


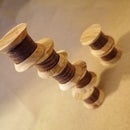
The main part of this make is the "pen blank" in this case its made from resin and cardboard but you could make your blank out of anything. It's the most interesting part of the pen to look at.
There is a growing market for pen blanks and some really interesting ones are now available to buy. Though to my knowledge, none of them are made out of cardboard.
I used a bandsaw to cut 1-inch strips of foam core then cut these strips at a 90-degree angle resulting in 2 strips measuring 1 x approximately 7 inch and 2 strips measuring 1 x 2 inch as well as a base which was over 8 x 3 inches.
I used hot glue to fix the 1-inch strips together creating a cavity of around 1 x 7 inch which could be filled with cardboard and resin without the risk of the resin seeping out of any cracks.
Step 3: Cutting the Cardboard- Mixing the Resin and Then Drowning the Cardboard


I chose an old box with a nice looking cross section. I cut the box into 1-inch strips and then cut these 1-inch strips to just less than the internal length of the internal cavity of my foam core mold.
I mixed 10 squirts of west system 105 and 10 of the 205 into a mixing cup and mixed them together.
I had a problem- my 205 has been stored in a cold damp location and seems to have become contaminated with possible oxidization. This didn't affect the resin hardness but resulted in a slightly amber color. This wasn't predicted but isn't a bad thing.
I poured the resin into my mold before submerging the cardboard and encouraging bubbles to the top.
The cure time for West System is around 24 hours to hard with the ideal time to ensure optimum hardness being up to a week.
I returned not knowing if my cast would be successful the next day and found what appeared to be resin foam.
Step 4: Cut It Out


At this point, I have to admit... I thought I had made a mistake and created an unusable foam.
But with hope in my heart and a cup of tea in my belly, I decided to have a look under the foam to see if there was anything laying under the foamy mess that could be salvageable.
I was delighted to uncover something more pretty than I had hoped for.. With a few bubbled.
My pen blank was looking good though admittedly it had areas which were less successful. These areas were at each end, luckily I had planned to have some waste material and these could be cut off without any negative effects to the pen.
I used the tubes from the TM Omega kit to identify where on the bank I should cut to make the best use of my blank.
Step 5: Make Some Holes and Glue Some Tubes


I tend to drill my pen blanks on the lathe. You don't have to. But this is how I do it.
I changed my chuck jaws to pen jaws, long thin ones and ensured they were put on in order. (if you don't match the numbers 1 to 4 your jaws will be off center- which can have its uses when doing off-center turning, just not for these pens)
I held the pen blank part in the chuck jaws and used corresponding drill bits held in a Jacobs chuck to drill these parts. I took care to ensure the lathe speed was reduced to avoid overheating the blank.
Once the blanks were drilled I scuffed the pen kit tubes to give the glue something to grip onto and glued the tubes into the blanks.
I then used my disk sander to sand the blanks flush to the tubes.
Step 6: Shape Up


So, for anyone who kinda likes having a peek at things as there developing this is the best bit.
I had an idea of what the finished product would look like but not entirely. As I turned I impatiently wanted to see what the blank would look like once finished, to do this I sprayed some fast drying finish and I was very happy with what I saw.
I mounted the blanks onto my pen mandrel with there appropriate bushings. (bushings hold the parts in place and give me a good mark to aim for when turning resulting in more accurate pen parts)
Though you can turn the hole pen at once I find that mandrels develop inaccuracies over time and the further from the live center you turn the greater the chances of error occurring are. this is why I personally reduce the length of my mandrels and only turn one part at a time. In fact, I tend to do one half before turning the part and finishing the other half. (this is potentially odd behavior for a pen maker as others could prioritize speed - I prioritize a good product)
I used a very shart gouge to turn these blanks and still got a small tear out I fixed this by using super glue and some of the swarth previously taken off the blank to create fresh plastic which turned with similar properties to the resin.
My technique when turning these parts is to "rub the bevel" meaning I approach a cut with the part of the tool that doesn't cut and slowly introduces the cutting surface. this results in the finest possible cut and a much-reduced possibility of tear out.
once I was as close as I could be to my final shape I sanded through grits. (there is a myth that if you are using an aggressive grit as the sandpaper starts to clog that it acts as a less aggressive grit sandpaper. This is false. it is much easier to have a selection of different sandpapers and work your way up to higher numbers. You will get much better results with a lot less effort)
Once I was happy I added a coat of melamine lacquer and burnished to a highish gloss.
I also cleaned the inside of the tubes, No one wants a mucky pen.
Step 7: Pull It Together


There are pen presses on the market. And I own one. The problem for me is I can get the same results with my desk vice and I don't have to pull out a special tool to do the job.
The first thing I like to do when putting a pen together is nole the parts out (place the parts in order) so I can see what goes where.
This kit is fairly idiot proof being you cannot go too far wrong. I pressed the cap parts together and the body parts before screwing in the fountain pen nib or adding the spring and rollerball cartridge and screwing in the grip.
Step 8: Reflections
with most projects, makers learn new things whilst they are making, or they reflect on things they would have done differently.
For this project, I think a vacuum chamber would have been useful to eliminate bubbles.
I would have probably used a thinner resin with a longer open time.
My pen does have a barcode sticker in it- though I like this I think I would have avoided this sticker as it was an area of weakness in the blank and resulted in a snag which required super glue fixing.
I think I would like to try this pen again with the cardboard being set at different orientations.
It might be nice to see mika added to the resin to create a shimmery fun look.
Other than that I really like this pen. It is honest to the materials its made from. It does have bubbles, but they are true to it.
Step 9: Do You Have Any Comments?
I would love to see versions of the Cardboard pen if you make one for yourself.
Pen making is fun and rewarding, there is a whole world of stuff going on and different crafts come together to make some really impressive instruments which cannot be bought on the high street.
I hope you like this Instructable, please leave a comment if you have any questions, I will try to keep an eye out and do my best to answer.

Runner Up in the
Cardboard Challenge


