

Introduction: Unlimited Dice Goblins


Dice are fun, interesting dice more so. interesting dice that you have made yourself and each one is a character, and you can make lots of them... Thats really fun.
I have had the idea for some time to make a set of game dice which were also characters.
In my head, these dice could be part of their own game where depending on the orientation of the dice- if it's facing another dice or away, etc, then a game could be formed where the dice by themselves could be used to battle each other.
I have also played with the idea of packaging them as though they were museum specimens and have somewhat created a head cannon where the dice could be associated with the fates of the places where they were found and could play a role in a role-playing campaign as a sort of functional lesser god.
The problem with things that are headcanons is I spend a lot more time thinking about them than making them.
So this is the story of how I made the first Dice Goblins- this one is sort of a dice litch but eventually, I will have a collection with a lot of variation so the specific classification won't matter as much.
My ultimate goal for this concept is to develop it into a kickstarter where a set of really interesting dice characters can be created alongside booklets explaining each characters backstory in a set of presentation boxes. (im not there yet but I have made a start, and I think it's not a bad start.
Supplies
To make your own dice goblins - or essentially anything you can think of and sculpt in resin.
You will need
Modeling clay or something to make the master for the thing you are casting - I used Medium Monster clay
Moldmakers silicone (here im using Polycraft T-20, it sets quick)
Casting resin (different resins have different properties, I looked for a resin that would cure at around 5mm)
Accurate weighing scales (or a method of dispencing the resin and hardner +silicone A and B parts in their apropriate ratioes) here im using Polycraft Clear Top 5 Epoxy
Consumables =
mixing cups
Stirring sticks
pippets (for transfering resin to the molds and ensuring the resin gets to the places it needs to get to)
Acrilic paint or your prefered "inking" method to make details pop.
Paper towel to rub off acrilic paint or your prefered inking solution.
Alcohol ink
Mica pouders
Tools that are nice to have (and result in a better product) but not strictly needed
Modeling tools (you can probably get away with household items)
A pressure pot (its great for getting rid of bubbles, but you could easily work with a very thin resin or work extreamly carefully
Health and safety equipment
A respirator rated to filter vapor (resin can be very dangerouse)
Gloves to keep the liquid resin off your skin
Step 1: Modelling


One of the most important things to bear in mind when starting a sculpt or carve is to have an idea of what you are about to sculpt. I like to sketch ideas out in sketchbooks or anything I have to hand. This isn't strictly the best way to organize a project as fragments of ideas will be scattered, but for me, it allows for a rapid idea generation where I don't become fixated on a particular aspect.
For this make I sketched out a net and drew on the details to get a better pre visualisation of the make and help anticapate potential problems.
Once I had a good idea of what I wanted to sculpt I set to work using Monster Clay.
Monster clay is a really interesting medium as it can be worked easily for general shape when warm and when it's cold it takes very fine detail.
I created shims to the height I wanted my dice to be and rolled the dice to this dimension before indenting the pips of the dice. (this is a similar technique used by bakers to ensure their pastry is uniform thickness) and allowd me to get a relativly accurate cube.
From this point, I freehand carved the details I had previously sketched out using a variety of sculpting tools.
I finished the sculpt by adding a mock wood texture thinking it would add a little extra to the finished product.
Also pictured is a version I carved in wood and wasnt as happy with before moveing to a different modeling material.
Step 2: Making the Mold


There are a few ways to make molds. The method I prefer for this type of dice with rough textures and details is a sprue mold. A sprue mold is essentially a mold where the resin travels through a funnel shape before filling the mold, The funnel has an extra benifit as it acts as a reserve for the resin in case you have bubbles within the cavety which requier more resin to fill as they escape or are reduiced under pressure.
I created my sprue by squishing some monster clay into a cone shape and attaching it to a corner of the sculpt which didnt have much detail.
I then attached this cone to the bottom of a plastic cup.
(An alternative to a plastic cup is making a waterproof box from plastics or lego)
I follow the instructions on the mold making silicone mixing the apropriate ratioes and poor this mixture into the cup with the dice and sprue.
(Shown is a method to recycle old molds by cutting them up and using them to pad out new molds. This has the added benefit of keeping my dice away from the mold walls)
Once the silicone is mixed I tend to poor a long stream into the mold. this removes a lot of small bubbels as they pop as they travel down the the long thin stream.
I like to put molds like this into a pressure chamber at c 4 bar to reduce the impact of possible bubbles within the mix. Previously I have used a degassing chamber to pull bubbles from this mixture but the silicone I currently work with have a very short open time meaning I have to work very quickly.
Though the silicone I currently use cures within 2 hours I tend to leave it for longer, In this case I came back to it after a brake of c 12 hours.
The silicone I currenlty use is semi translucent which helps me to identify a space to cut into the mold and relece the master dice sculpt.
I use a sharp scalple to cut a wiggely relece on each side of the dice and remove it. This wiggely line will be usefull later when putting the mold back together as it creates a key for the mold to return to an ideal place to avoid non alignment in the cast.
Once the master sculpt is removed the dice mold is ready for resin.
For added security I use selotape to hold the mold together- this isnt really nessasery and I would advise against adding pressure to the mold as it could easily destort.
Step 3: Casting the Part


It is important to remember that resin can be very toxic, its fumes are toxic and it should be used with caution and respect.
I recommend using a respirator rated to filter vapor as well as using gloves if you have access to them.
I approximate each of my dice to take around 40g of resin including the sprue which I overfill for safety. Here I mix more than 40g of resin as I have a number of molds to fill due to a product that I am currently prototyping.
I measure the appropriate amounts of resin to hardener for my resin adding ink and mica powder between the resin and the hardener. (when it comes to resin and mica powder a little goes a long way)
I then spend around 4/5 minutes stirring the concotion ensuring a good mix and trying not to add air bubbles.
Once the mixture is as fully mixed as I think it can be I use a pipet to transfer the resin from the plastic cup to the mold, I like using pipets as I feel I can almost inject the resin to the areas it needs to go and I can collect resin from below the surface further reducing the chances of polluting the dice with bubbles.
Once my molds are filled I arrange them in the pressure pot and let the resin cure for between 24 and 48 hours. (I tend to think there isn't any harm in giving the resin more time than the recommended amount, but demolding too early can have negative effects.
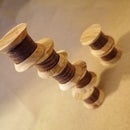
(Incidentally, I do try to mix only the amount of resin that I need but I have an extra cup for excess resin in the pot because this resin can be used later by woodturners. Once I run out of space in this cup I plan to add a pen blank mold which will allow me to make interesting pens with the excess which would otherwise be waste. )
Step 4: Demoulding Inking and Highlighting.


For those wondering why the dice no longer looks as ruby red as the resin, you saw in the previous step. A friend really wanted the ruby dice as a gift for his girlfriend so I made a new batch which included a large amount of carbon mica as well as the ruby and the red alcohol ink.
I take the now cured resin and silicone mold and open it up to reveal the brand new dice.
I use a watered-down black acrylic paint to darken the pips as well as anywhere where this inking solution will settle. I rub off the inking solution which might have settled on the higher areas of the dice and leave this solution to dry.
I then take a little time to roll the dice to see how out of balance it is.
As this dice is entirely hand-sculpted there is no real way to predict ahead of time how balanced or out of balance it is likely to be. But this test can inform the next mold which can have more clay added or taken away from areas to make for a more fun gaming session. Though historically dice have been made from many things which would not be balanced and the use of things like dice towers should help to randomize a throw.
As luck would have it these dice are pretty well ballenced and no odviouse oanomalies occured during testing.
You might have noticed an oogie boogie die being inked in the image.
I took one of the oogie boogie dice I had made in a previouse Instructable https://www.instructables.com/Oogie-Boogies-Dice/ and made a mold from it. I personally think the cast cersion of this dice looks even better than the origional wood carved version.
I hope you have enjoyed this short Instructable and feel inspired to make something fun.
If you have any questions or comments please leave some words below :)
Participated in the
Role Playing Game Challenge


