

Introduction: Celtic Knot Bone Ring


I love rings and I love to make them with bone, because it is strong and very durable. For this instructable I will show you how I made my new bone ring, with simple tools and materials.
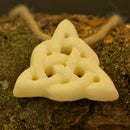
With a leftover piece I also made a pendant that you can see in this instructable: Triquetra Pendant
The close-up pictures were taken with a Pentax K10 D and a Tamron AF 90mm f/2.8 SP Di macro lens.
The other pictures, with a Pentax SMC-FA 50mm f/1.4.
Step 1: Materials


Just one: a Bone! Beef bones are the bigger and the most suitable ones.
In Italy, especially in my region, we prepare a very good sauce with bone marrow. It is called pevarà (sometimes pearà) and it is made of bread, bone marrow, beef broth, butter and a lot of pepper. In fact its name literally means peppered. So that is why I have those big bones lying around.
Cleaning
An important point is the cleaning of the bone. After the cooking the sponge-like part of the bone is full of red bone marrow and that is not good if you want to work with the bone. The best way to clean it is to put it in the dishwasher!
I was surprised, when I first tried this trick, how good it worked. It perfectly cleans every part of the bone and exposes the sponge-like part.
I put also some close-up pictures of the sponge-like part because it is too cool. Our bones have this kind of structure near the ends to make them light but strong.
Oh yeah... And some Brown India Ink.
Step 2: Tools


- Toy vise (I got it when I was a child but I still use it);
- Very old drill;
- Drill bit for wood;
- Drill saw;
- Drill bit to scrape;
- Dremel;
- Dremel drill press (this is not necessary but very usefull);
- A selection of Dremel bits;
- A brush.
Step 3: Cutting and Drilling #1


This is what I did:
- I cutted a rectangular piece out of the bone (trying to make the cuts as parallel as possible, otherwise the vise will not hold it well);
- Drilled a little hole with my drill bit.
- Checked if the hole is centered.
- Drilled the whole hole.
- Using the drill saw I cutted away pieces to get a rough round shape.
- Broke the ring...
Step 4: Cutting and Drilling #2


- Cut two parallel cuts till half the bone.
- Drilled the hole.
- Shaped the ring with small cuts while it is still attached to the main bone.
- Let the dog taste the bone with a lick. Just to check the quality of the bone.
Step 5: Shaping


Holding the drill upward and using the scrape bit, I shaped the ring.
I wanted it to be a wide band ring, a little thick so I could etch it. Unfortunately with the rough cuts I made it too thin on a side.
Step 6: Etching


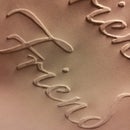
To prepare the etching I drew with a pencil some random Celtic Knot-ish decorations. With hindsight I should have planned better this part because it does not look very Celtic. But I like it anyhow.
Then I etched them with a Dremel bit. The side that was to thin was etched kust a little bit, to give the idea.
Step 7: Polishing


To clean rough edges I filed it a little bit with a simple file. Then I polished with a polishing felt.
Step 8: Coloring


Since the ring is white, it is difficult to see the edges and from a distance it looks like a simple white band ring.
So I decided to add a little bit of brown India ink in the etches.
With a brush I dripped a little bit of ink in the valleys and waited for it to dry, but not completely. Then with a wet cloth I cleaned the hills.
The bone is a little bit porous and absorbs the ink. This was a quick process so I could not take pictures.
I used this tecnique with another ring some years ago and the ink is still there.
Step 9: Done!


I am pretty satisfied with the result. This was my first experience in etching something and I think it turned out good.
Maybe I should have put more efford on the planning of the knots, instead of just drawing a random one.

Participated in the
Holiday Gifts Challenge


