

Introduction: Cutting Metal


This is the second lessons in my online Metalworking Class focused on cutting metal. Cutting is one of the most basic ways to modify a piece of metal. This process uses a cutting point to remove a small piece of metal from a larger piece of metal. There are two basic ways to cut metal. You can cut it with a blade or by abrasion. In this lesson we will briefly go over a few basic methods, and then demonstrate how to cut and shape an aluminum rod using a hacksaw and file. This experience of hand cutting metal should provide a solid foundation for later diving deeper into some of the more advanced metal cutting methods.
Step 1: The Basics
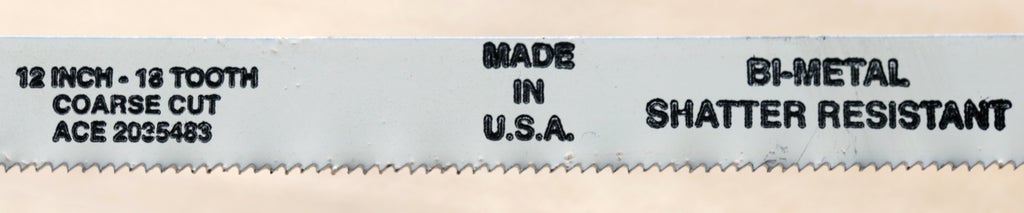
Blades consist of a continuous series of cutting points angled in the cutting direction of the blade. The hacksaw we will be using in this class uses a blade to cut. In fact, cutting blades are common of most if not all the metal saws you will encounter in the workshop. These saws tend to differ from wood saws primarily in speed and the size of the teeth on the blade. Metal saw blades have teeth which are smaller and closer together. Course blades such as the one picture are good for harder metals like steel. Finer blades are better for softer metals.

Blade-like teeth can also be found on hand files. The difference is that the tooth extends across the surface of the file. Unlike saw blades which cut a line through a piece of metal, files are designed to cut away the surface of a piece of metal.

Another way to cut metal is by abrasion, which is just a fancy way of saying sanding or grinding. Contrary to popular belief, abrasion works the same way as blades do. Each little piece of grit is actually a single cutting point, and each one removes a little bit of metal. This is largely meant to shape the surface of a piece of metal. In this way, abrasion tools are more similar to files than saws.
Step 2: Power Tools
While cutting or shaping metal by the way of hand tools has a rich history, very few people do everything by hand these days (for the purpose of this class, you can count yourself amongst this small group).
If you really want to get things done, you need to eventually graduate to the use of power tools. Again, we are not going to be using any power tools in this course, but I would be remiss if I did not talk about a few of them briefly.


A cold saw is a circular saw that is commonly used for cutting tubing and metal bar stock. It has a round toothed blade which transfers heat away from the part being cut, to the chips. Hence, the name cold saw.


A horizontal band saw is basically just a band saw turned on its side. Rather than moving the part into the blade by hand, the entire blade is automatically moved down into the part. This makes the saw great for making straight cuts down into metal stock, and it can handle some smaller sheet metal and generally larger pieces than you would want to cut with a cold saw. Some horizontal band saws can even make miter (angled) cuts.


A belt sander consists of a continuous loop of sandpaper traveling around two pulleys. In a way, it is like a band saw, except instead of a blade, it uses an abrasive sanding sheet. The exposed portion of the sandpaper sheet travels across a flat steel surface. By pressing a part against this surface, you can quickly remove large parts off the surface of a piece of metal and/or conform it to a shape.

Grinding wheels function much in the same way as belt sanders, but are meant for harder metals like steel, stainless steel, and all other hardened varieties of steel. This wheel is typically used for grinding away corners and sharp edges.
Step 3: Kerf

The kerf is the amount of materials that is removed from your metal by the cutting blade. This can be easily determined by measuring the width of your cutting blade. It is never less than this amount, and rarely considerably more.
When using a hacksaw with a relatively thin blade, like we do in our project, this is something we don't need to overly concern ourselves with quite as much. Nevertheless, this needs to be factored into all measurements when doing precise metal cutting.
Step 4:

When cutting metal, there are two major factors to be concerned with: speed and feed. The speed is the rate at which the blade is cutting, and the feed is the rate at which the blade is being lowered.
Different metals require different speeds and feeds. A soft metal like aluminum should be cut with a fast speed, and relatively fast rate. A hard metal like steel needs to be cut at a lower speed, and much slower rate. If you cut something too hard, or too fast, a lot of pressure is applied and blade, and it can break in various ways.
This largely applies to power tools. However, when you are using a handsaw, you are both controlling the speed and feed. You can try varying the speed you are cutting and the amount of downward pressure you apply, and notice how this affects your cut.
Step 5: Coolant

Cutting metal produces heat. Heat can be bad because metal can respond to heat unfavorably by changing shape, strength, ductility, or hardness. Not to mention, in extreme circumstances, if metal gets hot enough, it will turn red hot and possibly combust. Thus, a number of power saws use coolant to reduce friction by increasing lubrication, and generally keeping things chill.
Coolant also serves a double purpose of keeping metal chips contained, and free from the cutting area. This helps to prevent chips from hanging around and marring the part being cut. Additionally, it keeps the chips from getting all over your workshop, which is useful particularly for ferrous metals. These metals have a tendency to magnetize and stick around in unwanted places (so to speak).
Step 6: Deburring

When you cut a piece of metal, you are invariably going to leave behind burrs. A burr is a sharp uneven raised edge caused by the cutting blade passing through the piece of metal. As it cuts, it pushes out the then layer of metal that is left around the edges. Imagine the blade cuts a sheet of metal to the thinness of tin foil and as it nears the edge, rather than cutting away this material, it just pushes through and breaks it. That flake is essentially a burr.
Burrs tend to be sharp and unwanted and thus must be removed. One way to remove them is to use a deburring tool. This typically consists of a handle with a curved and hardened steel blade that is
dragged across the edge being deburred to cut it away.

Another way to remove them is with a hand file. Using the file you can lightly file the burrs away until the edges are smooth.
Step 7: Cutting Tube

Now that we have talked a lot about cutting metal, let's put all this theory into action. We are going to be cutting the 12" aluminum tube to an appropriate length to serve as the body of our teleidoscope. Over the remainder of this lesson we are going to work on measuring, marking, cutting and cleaning up an aluminum tube.
Step 8: Clamp the Tube


Clamp the tube into the vise. Often bench vises have texture which helps them grip your part. While this is useful, it can also leave marks in soft metal, like the aluminum rod we are using. Often people will get soft jaw liners consisting of soft metals like aluminum and copper, which prevent markings. However, they don't really make those for a 3" vise like I am using. Instead, I am simply using a shop rag between the metal tube and the jaws of the vise. This will prevent the vise from scuffing the tube.
Step 9: Measure and Mark


Measure approximately 7.5" from the edge of the tube, and coat the area to be cut with layout marking fluid. This will be used momentarily for marking the tube with a scribe.
A little bit of this goes a long way, so don't go overboard.
Once it is applied, wait for it to dry. Fortunately, it typically dries very quickly.
Step 10: Measure and Mark Again


Measure again from the edge of the tube, and lightly trace a line with the scribe at 7.625" from the edge. The scribe will scratch away the marking fluid and leave a nice easy-to-see cutting guide.
Step 11: Cut the Tube!

Position the saw such that the edge of the blade is on the outside edge of the cutting line (this is on the smaller side of the tube). We don't place it directly on the line because of the kerf we talked about earlier. Albeit, if centering on the line makes it easier for you to follow, go for it. The dimensions of our cut has a little bit of wiggle room.

The goal is to make a nice clean straight edge on the tube. Thus, it is important to make sure the saw is nice and perpendicular to the tube. Don't angle the blade in any way, or you will get an angled cut.


Move the blade forward to begin cutting. Remember that hacksaw blades have forward-facing teeth and cut only in one direction (on the forward stroke). When you get to the end of the stroke, lift the blade ever so slightly and bring it back towards you. Repeat this over and over until you have cut all the way through the aluminum tube.
As mentioned earlier, you can experiment with the speed you are cutting and the pressure you are applying. You should notice a cutting difference when you do this.
Step 12: Clean the Edges


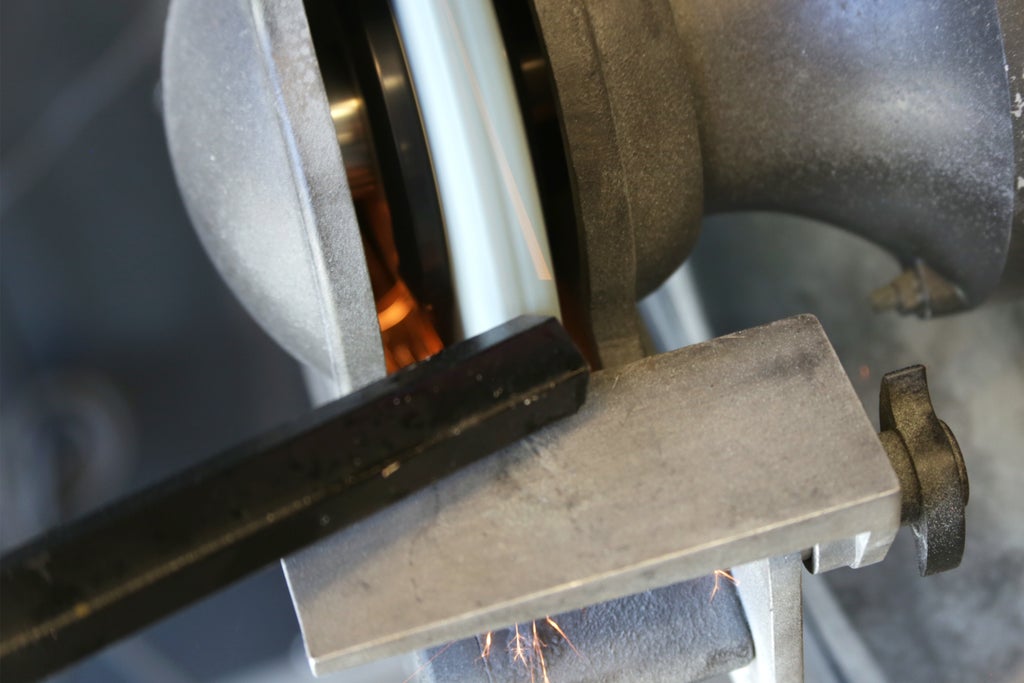
To deburr the inner edge we will use a deburring tool. This tool works really well on inner convex edges. Simply drag it around the inside of the circle and see how it easily peels the burr away.
Step 13: Check for Accuracy

If you place your cut edge on a flat surface you may notice it is slightly uneven, and the pipe is leaning to one side or another.
Step 14: Level It Off

To fix this, we can use a file to level off our cut and also deburr the outer edge.

To begin, file the top surface of the pipe until it is approximately flat. Hold the file's handle by one end, and press down on the other edge firmly to level off the surface.
Remember that the file is essentially like a saw blade and always cuts in one direction. When the file is pushed away from your body it will cut.

To deburr the outer edge, cut downward at about a 45 degree angle and gently apply a light pressure on the end of the file with your fingertips.
Step 15: Done!

Once the edge is leveled, the tube should sit squarely on the table and not be leaning to any one side (or, at least not as much).
You should now be ready to move on to the Drilling Metal lesson.

Did you find this useful, fun, or entertaining?
Follow @madeineuphoria to see my latest projects.


