

Introduction: How to Make FLEX Sensor at Home | DIY Flex Sensor


Hello people, in this instructable you will be learning how to make a FLEX Sensor for almost no money at home. These kinds of sensors cost quite a lot in the market ranging from 10$ to 30$.
They are useful at an industry-level but for making DIY tech projects at home, that is too much of a cost to pay. Thus I bring to you an alternative solution to the sensor and I will show you how you can build one yourself at home very easily. So, let's dive right in!
Step 1: Story, Research and Working

1.1 The Flex Sensor
A flex sensor or bend sensor is a sensor that measures the amount of deflection or bending. It is also referred to as a flexible potentiometer. It works on the principle of resistance and gives out various values based on the variations in resistance.
Its working is very simple. It has a low resistance when it is held straight because of the very low distance between the conductive particles present in the sensor. When it is bent, the distance between the particles increases which leads to higher resistance and a lower current passing through the sensor.
This way we can use a microcontroller board like Arduino very easily as what we need to do is just use the sensor as an input and we will get a value between 0 and 1023 where 0 will be when it is straight and 1023 when it is bent.
For more info regarding flex, sensor read this pdf from Sparkfun electronics!
1.2 Hacking The Sensor:
Now what we are going to be doing here is we will be replacing the inner resistive carbon elements with a paper that is shaded fully with a pencil. Pencil lead conducts electricity and we are going to use that to our advantage.
And for the main conducting plates of the sensor, we will be using two strips of tinfoil/aluminium foil as these conduct electricity quite well and again we will use these easily-accessible material found at every home, to our advantage.
The sensor will have two terminals and we can very easily connect it to an Arduino board. Flex sensors have a wide range of applications:
- Automotive controls
- Medical devices
- Industrial controls
- Computer peripherals
- Fitness products
- Musical instruments
- Measuring devices
- Virtual reality games
- Consumer products
- Physical therapy etc.
This was all about a flex sensor in easy terms and also how we will be hacking the sensor to meet our needs and also reduce the cost drastically using easily-accessible and low-cost material!
Now, let's move on to gathering the material required, to actually start building it!
Step 2: Gather Required Stuff


You will need very few and easily accessible things for this project.
2.1 Material Required:
- 2 x Cardboard Strips (10cm x 1.5cm)
- 1 x Paper Strip (10cm x 1.5cm)
- 2 x Tinfoil/Aluminium Foil Strips (9cm x 1cm)
- Some Glue
- A Pencil
- 2 x Small Pieces of Jumper Wire
2.2 Tools (Optional):
- Hot Glue Gun
Gather the above things and just move on to the next step!
I prefer Quartz Components personally for buying any kind of tech-related material.
Step 3: Stick Tinfoil Strips to Cardboard Strips


This is a very easy step. All you need to do here is just stick the two tinfoil strips onto the two cardboard strips that you had earlier cutout. You can use any kind of glue to stick the tinfoil strips onto the cardboard strips.
Make sure that the tinfoil strips are centred with respect to the cardboard strips and not sticking out on the edges of the strips. This has a very important reason that you will see later on!
You can even make use of the images above to follow along. Now move on to the next step!
Step 4: Shading the Paper Strip


This step too is going to be quite easy. The reason I am repeating this statement is that this project indeed is so easy to make that anyone can make it without any technical experience too. Now coming to this step, we just need to shade the paper strip that we had taken earlier on both sides. You can use any kind of pencil for it.
Just make sure that you shade the paper strip very dark. I am sure there is going to be a mess after you are done with black carbon prints everywhere but I guess that is OK :)
Without further ado, let's move ahead!
Step 5: Connecting Wire Ends to Strips


Now what we need to do is we need to "create" the sensor terminals using which the sensor will actually be able to interact with other electric components. We just need two pieces of wire. I took two female-headed jumper wires and cut-off them near the female wire joint so that later on we can just plug in two jumper wires into the sensor terminals.
You can also use any normal conducting wire as per convenience. Now we just need to stick these wire ends to each of our previously prepared card-foil strips. You can use hot glue like I did or you can also use some tape for the task.
Just make sure that the wire ends are properly pressed onto the tinfoil because if there is no proper conduction then it won't work properly.
You know the drill, just move on to the next step!
Step 6: Stacking the Material


Now we just need to bring together the previously made individual components. The stacking will be in this order:
- Any Card-Foil Strip
- Shaded Paper
- Any Card-Foil Strip
But, make sure that the card-foil strips are faced inwards. Now just use some hot glue or tape to make sure that the ends are joined so the sensor stays firmly held together and doesn't fall apart.
Step 7: Final Look


So that was it for the build of this DIY Flex Sensor. Make sure that after you are completing making it just bend it a couple of times and see whether the hot glue stays where it should be because at times what can happen is that upon bending the sensor the hot glue may rip off.
As you can see in the above images, our sensor has come out pretty neat. If you are in an artistic mood, you can also go ahead and customise it 😂
Now it is time for the final part. The Testing
Step 8: Building the Test Circuit
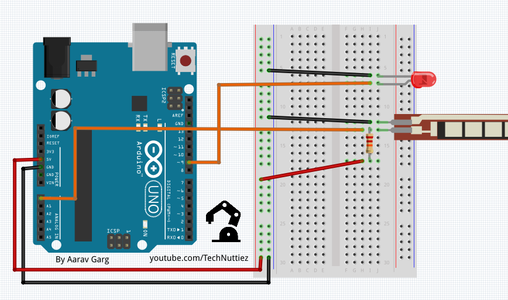
Now we need to test the sensor and see if it was really worth making it. We need an Arduino board and an LED to test our flex sensor out. We also need a 22kΩ resistor. It will be better if we use a breadboard because that will make the circuit-building process easy and fast.
I have attached all the required resources like the schematic and the code which will help you test your own flex sensor out and see if it works.
Just follow the circuit diagram and use my code or write it yourself and hope that it works.
Code:
   ////////////////////////////////////////////////////////
  //                 DIY Flex Sensor                    //
 //              By Aarav Garg - Tech Nuttiez          //
////////////////////////////////////////////////////////

//defining led and flex sensor pins
#define led_pin 9
#define flex_pin A0

//variables for flex sensor readings and led brightness output
int flex_reading;
int led_brightness;

void setup() {
  // put your setup code here, to run once:
  Serial.begin(9600); //setup serial monitor
}

void loop() {
  // put your main code here, to run repeatedly:

  flex_reading = analogRead(A0);
  Serial.println(flex_reading);

  led_brightness = map(flex_reading, 0, 300, 0, 1023);
  analogWrite(9, led_brightness);

  delay(200);
}<br>
Attachments

Step 9: Did It Work?

If you are here, then I assume that you have built the project and it either worked which is great or it didn't which is also great because you not only will know how you build something but also how you do not build it and this kind of learning is very useful.
9.1 It Did Not Work 😲:
If your sensor does not work then try doing some of the following things as measures of troubleshooting:
- Try using a better quality of tinfoil
- Make sure that the wire ends are firmly pressing on the strips and you can even do a small conduction test to test these out.
- Make sure that the two foil strips do not touch each other.
- Make sure that you have shaded the paper quite dark.
If after all of the fuss, you still have any problem you can always reach out to me.
9.2 It Worked 🎉🎊:
Great job mate. You overcome all the obstacles and finally are here, touching victory yourself and that is amazing. There is also a section down here "I Made It". Meet me there.
Thank You :)

Second Prize in the
Tinfoil Speed Challenge


