

Introduction: Kitchen Chemiluminescence


So you want to make something glow, eh? The usual suspects don't make you fly quite as high? LEDs don't float your boat anymore? Sick and tired of high-voltage shocks from your EL wire? Have solder fumes turned you into a rampaging monster, keenly destroying the creations of man, as they remind you of your long-lost humanity?
Well, as with all things, chemistry has an answer for you.
Let me pose a question: what do you associate light with? For the most part, I'd bet that light is something that is either associated with a) the sun, or b) human activity (LEDs, EL wire, big-ass Tesla coil discharges, etcetera).
But what about if you were to thing about the most interesting sources of light? I bet that your mind might stray to things like triboluminescent Life Savers, bioluminescent bacteria or agitateddinoflagellates, or maybe even the humble firefly.
I think that the subtle, clever nature of this light is what makes it so appealing. No brute force blackbody emission from shoving electrons through a tiny filament. None of that soulless, efficient light from an LED. Just a soft and subtle glow, emitted as a byproduct of a chemical reaction.
Humans have their own version of this magic, of course; green goblins, raver revealer, cyalume sunshine - the lightstick. Chemiluminescent creations of humans that ape the firefly's cold light. There's something fun about the nature of a chemical light - both from the eerie colors to the fact that the light can't be switched on and off, only enjoyed and then permanently extinguished.
Unfortunately, there's not really a simple way to demonstrate chemiluminescence at home. The best that I've come across is NurdRage's nice series of videos about manufacturing bis(2,4,6-trichlorophenyl) oxalate (or TCPO), the active ingredient in commercial glowsticks. Unfortunately, this requires trichlorophenol (an irritating carcinogen that's toxic to aquatic life), triethylamine (a flammable, toxic, corrosive base that smells of dead fish), and oxalyl chloride (which is seriously corrosive and unpleasantly toxic). And that's leaving aside the requirements for thoroughly dried solvents! Even if you wanted to do this at home, most chemical manufacturers won't ship to residential addresses, anyway.
But there is one option, if an obscure one. And, as a bonus, it doesn't require anything that you can't pick up at a well-stocked health food store!
Read on to find out more.
Step 1: Chemiluminescence of Singlet Oxygen: the Cliffs Notes Version
Chemiluminescence is primarily caused by a chemical reaction that forms a molecule that is not in its lowest possible energy state.
In this reaction, hydrogen peroxide is oxidized to oxygen by bleach, which contains sodium hypochlorite (NaOCl). Due to the quantum-mechanical requirements of this reaction, the electrons are not distributed in the lowest possible energy configuration (known as the "singlet" state).
This is not a stable arrangement, and the electrons quickly "relax" to the lowest energy state. When they do so, the excess energy is released in the form of light.
Creepy red light, to be precise.
Step 2: Chemiluminescence of Singlet Oxygen: the Long, Technical Version (Background)
Buckle your seatbelts and hold on to your butts. Time for some science.
First, a few terms and definitions. The diagram below is a molecular orbital diagram for oxygen. This is a way of graphically representing the energy levels (orbitals) available for electrons to fill in a molecule. The boxes on the left and right represent the atomic orbitals that each oxygen atom contributes to the molecule. They're labeled s (shaped like a sphere) and p (shaped like a peanut). In the center are the molecular orbitals that form when the atomic orbitals interact with each other. They are labeled σ (sigma, shaped like a sausage) and π (pi, shaped like, well, two π glued feet-to-feet). the asterisks show which are "antibonding" orbitals - these are just what they sound like, and effectively "cancel out" a bond. There are rules to what atomic orbitals can "mix" and which can't but we'll leave that for another day.
![]()
Ok - now that we have the energy levels all laid out, we can fill then with electrons. There are some rules for this, though, that will become relevant later! They are, in order:
1. The Afbau Principle: Electrons fill lower energy states before higher-energy states. In an atom or a molecule, lower energy for an electron means closer to an atomic nucleus. Nuclei are full of protons, and attract negatively-charged electrons.
2. Hund's rule: If there are energy levels that are equal in energy (called "degenerate," but not in the same way as your college roommate was), fill all of them with one electron before any of them gets two electrons. This is because negatively-charged electrons repel other negatively-charged electrons. Much like children, it requires less energy when each electron gets its own room. Electrons also have a property called "spin," that you can think about like the poles on a magnet - electrons can be "spin up" (north pole up) or "spin down" (north pole down) just like magnets place next to each other, electrons in degenerate orbitals will tend to have identical spins.
3. The Pauli Exclusion Principle: Electrons cannot have identical sets of quantum numbers. Basically, when you fill these energy levels with electrons, there are values associated with some of the properties of the electrons. Without going into too much detail, this means that each orbital can only hold two electrons, and the electrons have to have opposing "spins."
So, give these rules, here's what our filled energy diagram would look like. First, we'll fill the atomic energy levels (with the six valence electrons of oxygen).
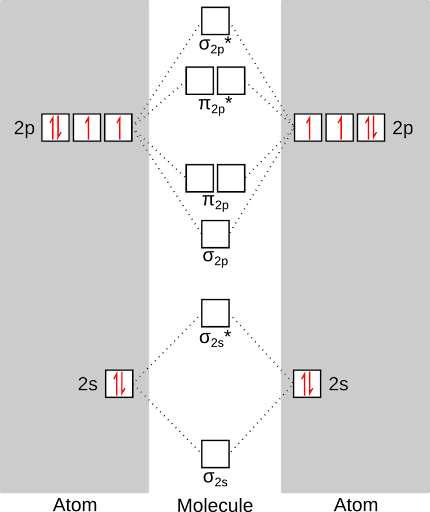
Next, we'll fill the molecular orbitals with the twelve total electrons contributed by each oxygen. This gives us the lowest energy state of oxygen, or the "triplet" state. Notice that there are two unpaired electrons in the oxygen molecule! This is why oxygen is so reactive - those unpaired electrons are just itching to react.
Step 3: Chemiluminescence of Singlet Oxygen: the Long, Technical Version (Continued)
OK, so what does any of this have to do with bleach and hydrogen peroxide?
All right, down to business.
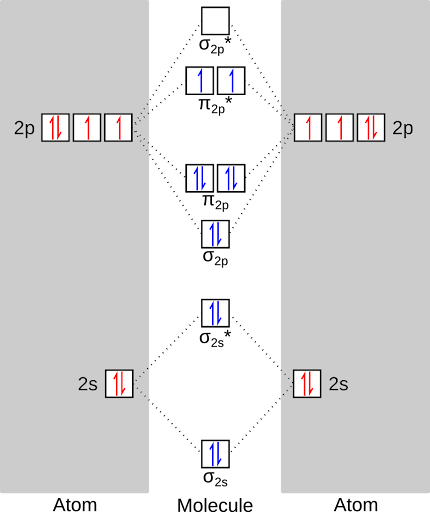
Hydrogen peroxide (H2O2) can be oxidized by a variety of oxidizing agents to give excited (singlet) oxygen (O2*).
The overall reaction is: H2O2 + [oxidant] → O2* + H2O + [reduced oxidant]
But why is the oxygen excited upon reaction? What makes it so special, huh?
The reason that the oxygen is in its excited state is that during the reaction, all of the electrons are paired. As a consequence, all of the electrons are paired in the product, as well! Check out the molecular orbital diagram:

Ah, so it violates Hund's rule!
Exactly! The two electrons crammed into the single orbital repel each other, and quickly* relax back down to the ground state. The excess energy is released as light, primarily at 1270 nanometers.
Wait a minute - 1270 nanometers? Like, deep infrared? Last I checked, my eyeballs bottomed out around 700 nanometers.
Ok, fine, maybe there are a few other details that I...
Out with it.
Are you sure? It's just one tiny detail.
I read this far, didn't I? Don't make me slap you.
All right, message received. If the concentration of singlet oxygen is high enough, two molecules will aggregate and relax simultaneously (2 O2* → (O2)2* → 2 O2 + photon), emitting light at 633 and 703 nanometers. For comparison, your classic red laser pointer emits red light around 630-650 nanometers. Hence, the eerie red light.
*Ok, there's another small detail I left out - the transition from singlet oxygen back to ground state oxygen is actually quantum-mechanically forbidden (doubly forbidden if we're being precise). In fact, it's one of nature's most forbidden transitions! On its own, singlet oxygen has a very long lifetime (up to an hour, which is a BIG DEAL for excited molecules) before it decays. However, in aqueous solutions, this transition is assisted by interactions with water molecules, which brings the average lifetime down to something on the order of 3.5 microseconds.
Step 4: Chemiluminescence of Singlet Oxygen: the Reaction
Ok, so let's get down to brass tacks, here. How are we going to do this?
So what we're going to do is bubble some chlorine gas...
Whoa, slow down there, hoss. I don't know about you, but I don't just go around blowing chlorine gas all over my kitchen.
No?
No.
All right, fine. Chlorine isn't the only oxidizing agent out there. In fact, it would probably be a lot safer (and more convenient) to use bleach, a strong oxidizing agent found in almost any kitchen.
The active ingredient in bleach is sodium hypochlorite. It oxidizes hydrogen peroxide to singlet oxygen and water, leaving behind sodium chloride. (H2O2 + NaOCl → O2* + H2O + NaCl)
The advantage to this method is that bleach is cheap and readily available - in both solid and liquid forms! We'll see that both will work for this method.
Step 5: Supplies and Safety


Chemical-wise, you'll need:
Bleach
Common household bleach is fine for this - extra-strength works even better. Don't get fancy bleach with scents or perfumes, but do buy fresh bleach. The sodium hypochlorite in bleach slowly decomposes (about 20% each year), so use fresh liquid bleach to get the maximum bang for your buck. An alternative to liquid bleach is calcium hypochlorite, which is sold in the pool supply section of your local heartless big-box store. My grocery store also sells Clearon brand bleach tablets,which work great. Safety: don't get it on you, or in your eyes. Wear goggles and gloves, and clothes that you don't mind getting bleached.
Hydrogen peroxide
"Normal" hydrogen peroxide that you buy from the grocery store is 3%. Fortunately, it's pretty innocuous as substances go. Unfortunately, the light that you'll get from such a weak solution is, well, weak. If you have a well-stocked health food store nearby, they might sell "hospital grade" 35% hydrogen peroxide. If that's not an alternative, check the local beauty supply store for "V40" peroxide (they might call it "developer"), which is about 20-23% concentrated. Be very careful handling concentrated solutions of hydrogen peroxide. If you spill it on you, you will get burned. Quickly. Hydrogen peroxide is testy stuff when concentrated, highly oxidizing and prone to violent decomposition. Keep it in the fridge, and make sure that you don't accidentally get dust or other impurities in the bottle.
Other supplies:
A syringe (or other mixing device)
Syringes are good for this because they let you mix the solutions rapidly, for the greatest amount of light. This will still work if you just pour one solution into the other, though!
That's it! Easier than pie*!
*This will not result in a pie. Don't eat any of these things.
Step 6: Step 1: Mix.


Put the peroxide solution into a transparent (preferably glass) container. If you're using the "high-test" peroxide, be careful. Respect it, or you will get burned.
Turn out the lights.
Add the bleach.
Behold the power of SCIENCE.
Step 7: Step 2

Participated in the
Make it Glow!


