

Introduction: Miniature Dowel Sculptures


Many of my projects involve visualizing 3D information. Back in 2016, I created a large scale dowel rod sculpture based on a digital image. In the sculpture, the intensity values at each pixel in the image are converted to a dowel rod height. The bright regions have a high height, and the dark regions have a low height.
In this project, I've returned to this concept except at a much smaller scale. These square dowels are only about 3x3mm, while the original project used 8mm diameter dowel rods. The serious downsize has been in the number of dowels. In this project I've aimed for 17x17 to 25x25 (289 to 625 dowels). The original sculpture... 53x80 (4240 dowels)!
I've returned to this project to figure out how to create these sculptures in a more manageable way. Smaller scale definitely helps in this. However, the major development has been in the implementation. I've created a device to automatically measure out each dowel length and have learned how to use resin mold to secure all dowels simultaneously.
Supplies
Arduino Uno - https://store-usa.arduino.cc/products/arduino-uno-rev3
Stepper motor - https://www.amazon.com/gp/product/B07TGJSNJB/ref=ppx_yo_dt_b_search_asin_title?ie=UTF8&psc=1
Rotary encoder
10k potentiometer
Push button
IR emitter
IR detector
100ohm resistor
470ohm resistor
1kohm resistor
Exacto saw - https://www.amazon.com/gp/product/B00004Z2U4/ref=ppx_yo_dt_b_search_asin_title?ie=UTF8&psc=1
Dowel rods - https://www.amazon.com/gp/product/B08HQQZ4X1/ref=ppx_yo_dt_b_search_asin_title?ie=UTF8&psc=1
Epoxy kit - https://www.amazon.com/gp/product/B07HKFY4QX/ref=ppx_yo_dt_b_search_asin_title?ie=UTF8&psc=1
Epoxy - https://www.amazon.com/gp/product/B08HN2XCDS/ref=ppx_yo_dt_b_search_asin_title?ie=UTF8&psc=1
Step 1: 3D Print the Components


The dowel rod length measuring device was designed using Fusion360. To begin the project, you will need to 3D print several parts attached here.


Step 2: Assemble the Dowel Length Measuring Device


Attach the dowel pusher to the lead nut using four metric bolts and nuts. Then slide the dowel pusher into the slotted 3D printer part.
The IR sensor and IR receiver are attached like in my previous instructable (step 5): https://www.instructables.com/Desktop-Gigapixel-Microscope/
Next attach the motor mount to the base stage and slotted part using two bolts and nuts. The lead screw should rotate into the dowel pusher part.
Finally, attach the support leg on the other end of the device using two bolts and nuts.
Step 3: Solder the Arduino Shield


Connect the components as shown in the schematic. Make sure to troubleshoot each part in isolation using Arduino code to make sure that everything is connected correctly. The stepper motor is controlled with an L9110 H-bridge. To home the motor, the dowel pusher part moves between the IR emitter and receiver. An LCD screen is required for providing the user important information about the current dowel rod.
The push button and rotary encoder are used for select the dowel of interest. Once the dowel is selected, the stepper motor will translate to the appropriate position for the corresponding dowel rod length.
Once you are confident the system works on a breadboard, you may want to build up an Arduino shield using a prototype board.
Step 4: Convert Matrix to Dowel Lengths With Matlab


Attached are text file versions of m-files that I wrote for generating the dowel rod lengths in Matlab.
I wrote code to generate interesting matrices that could be used for dowel rod sculptures. Three approaches were implemented:
- Rotate a 1D function 360deg to create a symmetric 2D function (miniDowels01)
- Create a 2D function using some 2D function (miniDowels02_2Dfunction)
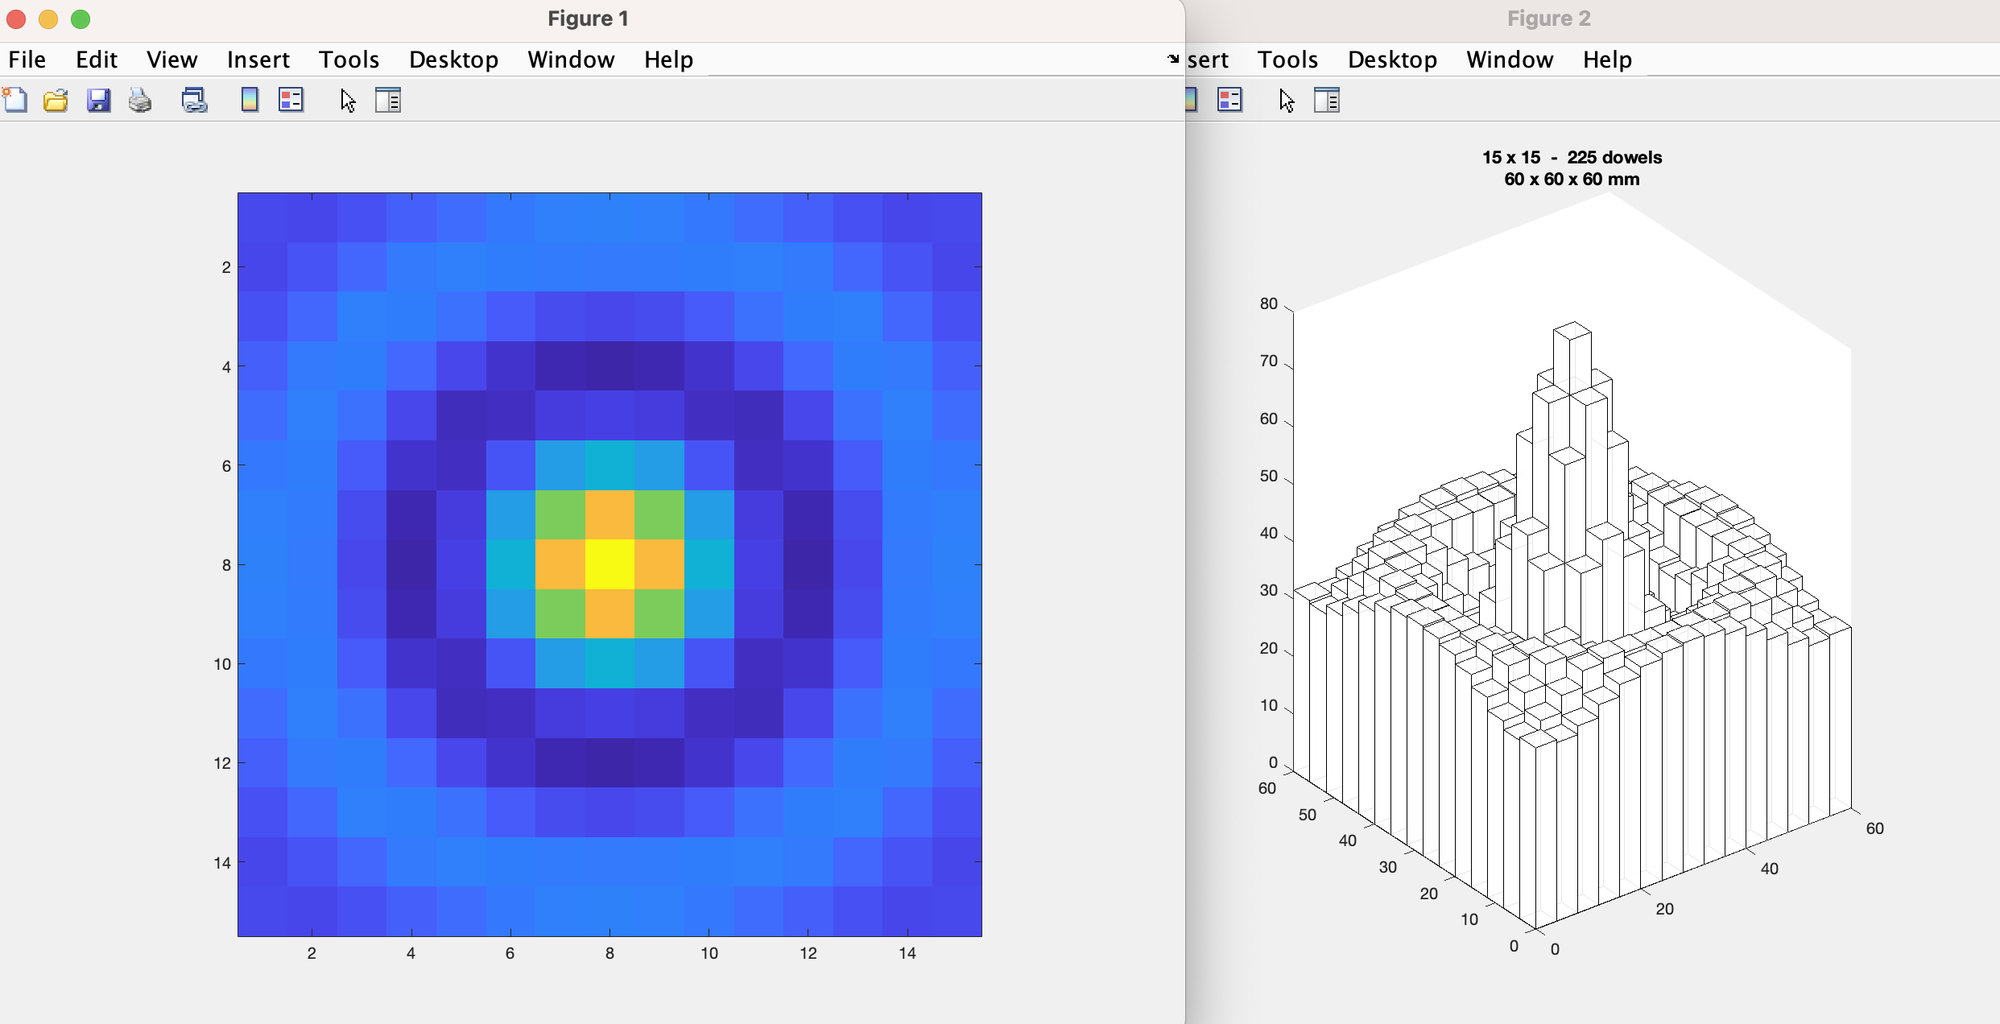
- Upload an image and downsample it for the dowel rod sculpture (miniDowels03_loadImage, like my first dowel rod project)
The Matlab code converts the information into dowel rod lengths that can be copied into an Arduino program (the important variable is stepperTxt). Figures are generated to visualize the function and potential dowel rod sculpture.

Step 5: Coding the Arduino


The Arduino loads up an array containing all the stepper motor positions, which are determined in the Matlab code. The sculptures shown here are 15x15 dowel rods. The primary goal of the code is to keep track of the current dowel rod and update the stepper motor to the appropriate position.
In the setup function, the motor is homed by rotated the lead screw until the part blocks the path between the IR emitter and detector. This reference point is critical for ensuring that all the dowels are cut relative to this home position.
During the loop function, the code determines if the rotary encoder or push button have been selected. If the push button is pushed, then the stepper motor advances to the next dowel rod in the sequence. If the rotary encoder is selected, the user can quickly select a specific dowel rod. Clicking the rotary encoder advances to the next row in the dowel structure. Rotating the rotary encoder cycles through dowel rods in order.
The rotary encoder is helpful for situations in which the user takes a break and shuts down the device. They can then easily turn the system back on and cycle to the appropriate dowel rod.
The LCD screen is updated to display the current dowel rod length and its position in the sculpture.
Attachments
Step 6: Cut the Dowels


The stepper motor rotates and the dowel pusher moves to the correct position. Place the dowel rod in the slot and cut it with the exacto saw. The dowel rod can then be placed in the dowel holder.
Make sure the dowel rod holder "trap door" is in place. I have taped this door so the dowel don't fall out accidentally.
Continue the process until all the dowel rods are cut for the sculpture.
Step 7: Epoxy Resin Base


Put on some gloves to protect yourself from the epoxy. Mix the epoxy resin according to the directions and pour it into the appropriate sized epoxy bed. Place the epoxy bed underneath the dowel rod grid holder.
Take a deep breath and slowly pull away the "trap door." The dowel rods will fall into the epoxy pool. Use another dowel rod or toothpick to push down every dowel rod to ensure all the dowels have reached the floor of the epoxy bed. Take some time to adjust the angle of the dowels by gently pushing them into position.
Warning: Don't move the grid holder once the dowels have dropped into the epoxy bed!
Warning: Make sure to sufficiently mix the epoxy!
Note: The technique hasn't been perfected. The poor tolerance of the dowel rod edge results in the dowels sitting loosely in the grid holder. As they fall into the epoxy, they are not perfectly spaced. The effect is more noticeable on the bottom of the sculpture compared to the top.
Wait until the epoxy has dried and then pull the sculpture out of the epoxy bed. You now have your miniature dowel rod sculpture!

Runner Up in the
Unusual Uses Contest


![Tim's Mechanical Spider Leg [LU9685-20CU]](https://content.instructables.com/FFB/5R4I/LVKZ6G6R/FFB5R4ILVKZ6G6R.png?auto=webp&crop=1.2%3A1&frame=1&width=306)


