

Introduction: Wizard Crisps


A tasty treat for wizards and muggles.
Step 1: Things You'll Need


- Flat Marshmallows (Stacker Mallows)
- Food Coloring Gel: Yellow, Red, Black
- Powdered Sugar
- Brush
- Toothpick or Skewer
- Cereal- like Honey Smacks or Rice Krispies
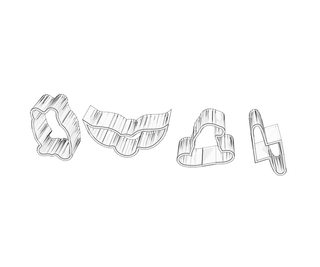
- 3D Printed Wizard Crisp Cookie Cutters: I provided the .stl file with the mini marshmallow/cookie cutters I made. All four cutters can be found in that file.
Attachments
Step 2: Coloring


- Brush one side of the marshmallow with food coloring gel. If the gel is too thick, a drop of water will help thin it out and make it easier to spread.
- The freshly colored side of the marshmallow will be sticky. We don’t want it to be sticky because a sticky marshmallow is hard to work with. Rolling the marshmallow in powdered sugar will take care of the stickiness. Anytime you cut or color a marshmallow it’s a good idea to roll in in powdered sugar right after.
- So, dip the freshly colored side of the marshmallow in powdered sugar.
- Dust off the powdered sugar. The marshmallow should now be dry to the touch.
- Do the same for the other side of the marshmallow.
Step 3: Cutting


- Put the cutter on top of the marshmallow.
- Press straight down to cut out the shape.
- Pick up the cutter- since the marshmallow is sticky, it might be stuck to the cutter.
- To remove the shape from the inside, use a toothpick or skewer to push down from the top, so that the marshmallow falls out through the bottom.
- Dust the freshly cut edges with powdered sugar.
- You’ll notice that one side of the marshmallow will look better than the other side. When you cut, the side of the marshmallow that is facing up will stretch and crack…So if you want to take any shortcuts, like only applying color to one side, make sure that that colored side is facing down when you go to cut it.
Step 4: Cutting and Then Coloring


Some shapes will have to be cut first and the details will be colored in after. For these,
- First cut out the shape.
- Dust with powdered sugar.
- Color in the detail with a brush, cotton swab, toothpick, or whatever tools you have. A brush or cotton swab would work better for larger areas and a toothpick would work best for small details.
- For the owl, I used two toothpicks- one dipped in black food gel, and the other in yellow. I made two black dots for the eyes, a line for the wing, and then I put some small black speckles on the wing. Then, I did one tiny yellow dot for the beak.
- After painting, dust with powdered sugar.
Step 5: Cereal


Add your marshmallows to some cereal. A plain looking cereal would be best, so that the marshmallows stand out.
I tried dehydrating the marshmallows in the oven (to make them crunchy), but the temperature was too high (even on the lowest setting) and they puffed up and then deflated into melted sugar blobs after I had removed them. I also left others outside in the sun for a several hours, they started to harden, but when I went to bring them in at the end of they day, I found that they had reverted back to squishy marshmallows. If anyone has tips on dehydrating marshmallows (without a dehydrator) please let me know.
A small Wizard Crisps cereal box is in the works.

Runner Up in the
Wizarding Contest


