

Introduction: Butterfly Automaton


"Butterfly Automaton" is a simple, press together manually operated butterfly automaton. Simply turn the handle and the butterfly's wings come alive.
As usual I probably forgot a file or two or who knows what else, so if you have any questions, please do not hesitate to comment as I do make plenty of mistakes.
Designed using Autodesk Fusion 360, sliced using Ultimaker Cura 4.12.1, and 3D printed in PLA on Ultimaker S5s and an Ultimaker 3 Extended.
Supplies
Thick cyanoacrylate glue.
Small jewelers files.
Step 1:
I 3D printed the following parts at .15mm layer height, 20% infill:
- One "Arm, Left.stl".
- One "Arm, Right.stl".
- One "Axle, Cam.stl".
- One "Axle, Handle.stl".
- One "Axle, Wings.stl".
- One "Base.stl".
- One "Cam.stl".
- One "Handle.stl".
- One "Head.stl".
- One "Tail.stl".
- One "Wing, Left.3mf", dual extrusion.
- One "Wing, Right.3mf", dual extrusion.
- One "Yoke.stl".
This model is a fairly high precision print and assembly using at times very small precision 3D printed parts in confined spaces with highly precise alignment. I sliced my parts using Ultimaker Cura 4.12.1 "Engineering Profile" which provides a highly accurate tolerance requiring minimal if any trimming, filing, drilling or sanding. However, prior to assembly, I still test fitted and trimmed, filed, drilled, sanded, etc. all parts as necessary for smooth movement of moving surfaces, and tight fit for non moving surfaces. Depending on your slicer, printer, printer settings and the colors you chose, more or less trimming, filing, drilling and/or sanding may be required to successfully recreate this model. I carefully filed all edges that contacted the build plate to make absolutely certain that all build plate "ooze" is removed and that all edges are smooth using small jewelers files and plenty of patience to perform this step.
Attachments


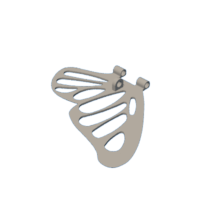


Step 2: Butterfly Assembly.


To assemble the butterfly, I performed the following steps:
- Pressed "Axle, Wings.stl" into "Tail.stl".
- Slid the axle part way into the rear axle hole in "Wing, Left.3mf".
- Positioned "Wing, Right.3mf" between the axle holes in the left wing.
- Slid the axle all the way forward.
- Pressed "Head.stl" onto the axle.
- Made certain the wings pivoted freely on the axle.
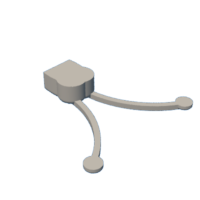
Step 3: Base Assembly.


To assemble the base, I performed the following steps:
- Slid "Axle, Handle.stl" into "Handle.stl".
- Pressed the handle assembly into "Axle, Cam.stl" (a small dot of glue may assist in securing this assembly).
- Slid "Yoke.stl" into the yoke slots in "Base.stl".
- Positioned "Arm, Right.stl" over the pin on "Arm, Left.stl".
- Slid the right arm pin into the hole in the yoke assembly.
- Slid the yoke down to hold the arms in place.
- Positioned "Cam.stl" such that the cam pin was in the yoke slot and the cam hexagonal hole aligned with the cam hole in the base.
- Slid the cam axle of the handle assembly into the hole in the base.
- Pressed the cam onto the cam axle (a small dot of glue may assist in securing this assembly).
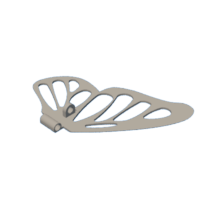
Step 4: Final Assembly.


For final assembly, I performed the following steps:
- Aligned the pins on the left and right arms with the pin holes on the left and right wings.
- Slid the butterfly forward onto the pins.
- Pressed the butterfly tail pin into the base.
And that is how I 3d printed and assembled "Butterfly Automaton".
I hope you enjoyed it!


