

Introduction: How to Make PAULDRONS Out of a Plastic Drum


What's up ladies and gents. So I was thinking the other day.......
Nevermind, I'll just say it straight.
Today I'm building some pauldrons out of a 55 gallon plastic drum.
"But why?" you ask.
"Wrong question." Jake answers.
"Huh?"
"The correct response, my friend, would be:
"'Duh! What took you so long?'"
Step 1: Design


All great projects start with a wide ruled notebook and a mechanical pencil and a large cup of strong black coffee. This was no exception.
I went onto the Google and dove head first into a sea of pauldron pics. It was terrible. I almost drowned.
(sips coffee)
At long last (after holding my breath for 14 minutes 37 seconds), I had found a number of designs I liked. I resurfaced, saved them to my desktop, swam to shore and imported them onto a blank page in Microsoft Publisher. I then hit the print button, forgot all about it and binged YouTube for 3 hours straight. When I got up to conduct some urgent business in the throne room I remembered I hadn't had breakfast, so I ambled into the kitchen where I stepped in a puddle of water on the floor. I logically went to get me a fresh pair of socks and enroute I walked by the printer and remembered the page I had printed. I went to retrieve it but found the tray empty. I was scratching my head wondering If I had dreamed the whole thing (again), when my eye fell on the display which read 'out of paper'.
Lovely.
Long story short I managed to get back to designing without any more serious mishaps (though for some reason when I looked at the clock it was another couple hours later in the day).
Then I drew up my own pauldron design, taking the parts I liked most about the ones in the pictures and incorporating them into mine.
All silliness aside, if you currently are not in the habit of drawing out your project plans I HIGHLY suggest you start doing so. I can't tell you how valuable it is, not just for sorting out your ideas, but it is also great to have them to look back on later.
Step 2: Templates


I'll tell you right off, the hardest part is going to be the template. That's where all the work is.
It isn't so much difficult but tedious and boring. Basically just hours of drawing, cutting, testing fit, adjusting, redrawing, recutting, more testing, more redrawing and cutting, repeat, etc, etc. I would give you a template to save some of the work but the pieces were too large to fit onto our scanner. So, you are on your own.
Step 3: Tools & Materials

Tools:
-Jigsaw
-Heatgun
-Drill
-Rivet gun
Materials:
-Big Blue Barrel
-Nylon (or leather) straps
-Velcro, buckles, etc (assorted obvious articles to go with the strapage)
-Spray Paint (i used flat black)
-Coffee
Nope, not much required. Super simple.
Step 4: Cut Apart Barrel


I used a sawzall to cut the barrel into halves, which would be easier to work with. I was going to use the sawzall to do all the cutting, but later found it didn't have enough control, so I switched to a jigsaw. I'd recommend just using a jigsaw as it works the best.
After cutting it apart I measured the thickness of the walls. They actually varied in thickness a bit, but average was 1/4", or about 6 mm for you metric weirdos.
Step 5: Trace the Template


Should I waste both my time and yours by describing a completely self explanatory step?
Nah.
But to make up for the time you spent reading my sentence on why I wasn't going to waste your time, I'll tell you a joke about construction.
Oh dang, I forgot I'm still working on it.
Yeah that was bad. Sorry.
Step 6: Cut Out


Using that jigsaw, go ahead and spend a very long time carefully tediously cutting out the plates. The more precisely on the lines your cuts are the less clean up you have to do.
And none of us like cleaning up.
After cutting them out I did a bit of aforementioned clean up with my belt sander. What? I'm not perfect.
Only 98.2% perfect.
Step 7: Heat Form Plastic


Now for the fun part, where there is a risk of burns. For real, don't touch the front of the heat gun. It's hot. Fortunately I don't speak from personal experience, but I've seen pictures......
I used a paint can as my form, it seemed about the right curve. Heat the plastic up (I actually used a toaster oven for the smaller pieces that would fit into it), bend it over the paint can and hold it down. Oh, and wear gloves. The plastic is 400 degrees (fahrenheit) at this point.
Use a towel soaked in cold water to cool it off once it is bent, and it will remain in that curve.
Step 8: Step Right Up My Good Sir

Testing, 1....2...3. Testing......1, 2, 3.
To test the fit of everything I duct taped the plates together.
Step 9: Paint Job


Now I know i'm not supposed to be racist here on instructables, but I must say I HATE blue armor. Sorry folks, but it's true. I am absolutely 100% prejudiced against it.
So I decided the only thing to do (besides start a secret society devoted to terrorized the population) was to paint it black.
You want to sand down all the surfaces with 220 grit sandpaper to give the paint something to grip to. Then you (like any sensible person), will logically decide to skip the primer coat and paint it in a 40 degree temperature shop, ignoring the sound advice on the can which states plainly in glorious black and white: "Do not use in temperatures under 50 degrees"
And yes, my paint did not stick well. I am sure that if you use a good primer and do it in the proper temperature you won't have a problem.
Step 10: Attach Neck Guard Thingy


Not sure what else to call it, its a neck guard thingie. Drill the holes, rivet down. I know, very complicated.
Step 11: Mark and Drill


Step 12: Rivet Away Me Hearties


Step 13: Strapage


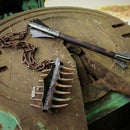
Step 14: Metalify


As I said earlier, the paint did not stick well on this. Even with just attaching the straps the paint was scraped off most of the edges, and had scratched through in other random places. Instead of just touching them up with more black paint, I had the idea to go over those parts with a silver sharpie. If you do it right, it looks just like the paint has worn away and is exposed metal underneath. It's a great trick for weathering props.
I think it looks quite good.
Step 15: Finished!


Step 16: THe Problemo

So..... I messed up. The range of motion for this pauldron is severely limited (as you can see if you watch the ending of the video). Two straps spaced several inches apart was a stupid idea. The rivets are too close together, and it makes the horizontal side to side movement pretty much impossible. I know my writing makes no sense, so watch the ending of the video to see what I mean.
This is frustrating because it would have been a very easy fix if I had seen it beforehand. Oh well, you live and you learn. I haven't felt like grinding off all the rivets to fix it so..... there it is.
Step 17: A Video Is Worth 1 Million Pictures
If you enjoy my projects on Instructables, you'd probably like my YouTube channel: https://www.youtube.com/channel/UCszMFa_qz5weFBoQ7olwlGw/videos

Participated in the
Reuse Contest


