

Introduction: Captain America Infinity War Shield (with Hidden Blade)


Unless you have been living under a rock the size of the Titanic, you know that Avengers Infinity War just came out. (Fine. It's been a month.)
As everyone who has not been living under the aforementioned giant rock also knows, Cap ditched his slick round flag-shield at the end of Civil War, and thus is unfortunately shield-less at the beginning of Infinity War. Black Panther (or whatever his other name was), being the helpful fellow he his (or rather; was) gave him a new one. Two new ones actually. Because they are so stinking cool, (and cause I want more views) I decided I had to build one.
The shield(s) in the movie have the super slick ability to expand and retract, as well as extend several blades. (Or so I'm told. Actually haven't seen the movie.) I don't have the equipment required to make an expandable shield, but I believe I can make a pretty sweet metal shield with a spring-loaded knife blade. With side blades. Just like the movie. (ish)
Step 1: Video
Shameless self advertising for my YouTube channel. Which could use some more subscribers.
Step 2: Tools & Materials
Tools I can remember using:
- Jigsaw
- Grinders (belt sander, bench grinder)
- Dremel Rotary Tool
- Angle Grinder
- Drill
- Files
- Metal Shears
Materials I can remember using:
- 1' x 2' piece of sheet steel. I honestly cannot remember what gauge it was, I want to say 16 gauge for some reason. Not sure. It was rather too thin for this project.
- Rusty circular sawblade (rust is optional)
- 1.5" x 1/8" steel barstock (I used mild steel as I don't really care if the blade holds an edge or not)
- 1/4" thick plywood
- 14" non-soft close drawer glide
- Assorted bolts, springs, thin sheet steel, and screws
- Nylon Strap
- Door Handle
- Wood stain
- Polyurethane
- Flat black spray paint
- A lot of Coffee
Step 3: Cutting Out Sheet Steel


I at first attempted using some metal shears to cut out the shape of the shield, but found that the metal was a tad too thick for them. I switched to the jigsaw with a metal cutting blade and that worked pretty well. You could of course use an angle grinder, but for material this thin its really overkill.
The shield's measurements were (roughly) 21" long and 10" at its widest point. Looking back, the shield is a little too narrow. I would go 11" or 12" wide if I were to do it again.
Step 4: Clean It Up (yeah, You're a Janitor Now)


The jigsaw leaves the edges of the metal jagged, sharp and all around untidy. We can't have that now, can we?
Step 5: Cut Out Plywood


I layed the shield down onto the board, traced around it, and cut out the shape. Could there be anything more straightforward?
Probably.
Didn't really get pictures, but I then positioned the drawer glide on the wood where it would go, and traced the outline of that onto the plywood. I then cut that out as well. You'll see what that is for later.
Step 6: Spring Blade


The tang of the spring blade is going to be bolted onto the drawer glide's modified slider.
I decided to just use mild steel for the spring blade, because it won't matter much if the knife can hold an edge or not. I'd rather save my high carbon stock for real knives.
I drew out a cool blade design and went to work.
Step 7: Spring Blade (didn't I Already Do This Step?)


Grinding, filing, and filing more. And sanding. Hand sanding. You all know how I feel about hand sanding.
Step 8: Side Blades


The side blades I decided to make out of an old sawblade I had kicking around. Just an angle grinder and a whole ton of (hand) sanding to get rid of the rust.
I. Hate. Hand. Sanding.
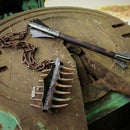
Step 9: Finished Blades (just Cause the Picta Is So Dang Cool)

Aren't they purty?
Step 10: Modifyering Drawer Glide


To make it work for our purposes, we are going to need to modify the drawer glide a bit. First, push the tab and remove the innermost slider. The one that is made to be removed and attached to a drawer. (already removed in the pictures)
Yeah. I get ahead of myself.
Then, you need to remove the black thingie that is on the end of the inner slider. (which, incidentally, is also already removed in the pictures)
Yeah. I get ahead of myself.
And then the small slider on ball bearings (which is the only one in the picture) needs to be removed. I just yanked it out with some pliers. (as you can see in the picture) (unlike the other parts.)
Step 11: Drill Holes in Shield


To mount the slider (The modificated drawer glide, which I have officially re-christened: De Slider) (pronounced with a french accent).
Yeah, so to mount the slider, (De Slider) we need to lay it down onto the metal exactly in the center (we is perfectionists in this hea business mister) and mark the position of the mounting holes.
Then drill them out.
Step 12: Attach Spring Blade


Drill holes. In both sections. Bolt together. Mark bolts. Take apart. Cut off bolts. Put back together.
Perfecto!!
Step 13: Attach Slider


Ditto the last step.
Step 14: Attach Side Blades (lots of Attachments Forming Around Here)


The side blades are just the correct thickness to fit under the slider (de slider) without interfering with its motion. I'd call it luck, but I don't believe in luck. It was the Force.
(duh)
Step 15: Screw Down the Wood. Just Don't Screw It Up.


I feel like this is fairly self explanatory.
Step 16: Trim Bolts Down (Not Like You Trim the Hedge in Your Yard. Actually Get Around to Trimming These)

I am using small bolts for everything because I found that the 1/4" plywood was too thin for regular screw to get any real grip.
Step 17: Extension Stop (can't Think of a Better Thing to Call It)

Don't know exactly what to call it, so "extension stop" will have to do. The drawer glide already has two little popups to keep the inner slide from coming completely out, but they didn't look like they would hold up long under the force of the springs. So I made an "extension stop" (to stop the extension) by cutting and bending down a tab of metal at the back of the inner slide, which will catch on on of the bolts, preventing it from extending any further. I designed it to give an extension of about 5 inches.
Step 18: Trigger and Locking Mechanisms


Ah, the fun (by which I mean most complicated) part.
I'm not even going to attempt a description.
Step 19: It Springies!!

Step 20: Building Up the Platforms


Because the slider is right where your arm needs to go to hold the shield, and having one's arm right up against the slider will prevent it from working well; we need to build up some sort of platform which will keep your arm up off of the slider (De Slider). And the same goes for the handle. It needs to be high enough above the slider so your hand will not touch it.
I cut out a bunch of pieces of plywood and firmly affixed them with wood glue.
Step 21: Finishing Up (it's a Pun. Get It?)


A coat of stain to make it look good, and a few coats of polyurethane.
Not too shabby if I do say so myself. (And yes. I do say so.)
Step 22: Attaching Handle and Arm Strap


I decided to use (guess what) a handle as the handle for the shield. I suppose you could say it made the most sense.
The strap was a piece of a (guess what) nylon strap. I suppose you could say it made the most sense.
Step 23: De Paint Job


A light coating of flat black spray paint did the trick. Light coating because the shield in the movie is not solid black, it is a dark metal color. Coating it lightly with flat black spray paint gave it a dark, but not quite black color.
Not movie accurate by any means, but closer than otherwise. As close as I could get without trying very hard at any rate.
Step 24: Finished!


Nope. Paint job isn't movie accurate. But it looks cool. And it has a stinking SPRINGLOADED hidden blade.
This was a very fun and challenging project. I learned alot building this, and I have to say I am pretty proud of myself with the results. The feeling you get when that blade springs out is...... Awesome. I love it.
Anyway.
Thanks for reading this Instructable. Hope you learned something. I'll see ya next time. Adios. Farewell. Goodbye. Etc.
Jake out.
Youtube: https://www.youtube.com/channel/UCszMFa_qz5weFBoQ7olwlGw/videos
Step 25: FIRE!!!!!

I'm getting carried away with these gifs........

Participated in the
Make it Move Contest


