

Introduction: Woody Fenders for a Classic Vintage Look


This is a project I did to enhance my Fat Rat. The bike is a 2012 Surly Pugsley frameset that started out in gloss white and then through a process of buffing the original paint, then spraying with a series of paint combined with some rubbing with sandpaper; resulted in the "rat rod" look. Some refer to this as "faux-tina".
The fenders are made from a 2' x 4' piece of 1/4" plywood with an oak veneer on one side. The hardware is a combination of bicycle rear rack and fender hardware, and a couple lengths of 1/8" steel rod. The final product was finished with a marine varnish. The entire project cost me $4 for the wood, picked up the hardware pieces in the junk drawer at the bike shop I work for, steel rod was $3 and I used some leftover varnish in my home workshop.
My goal was a sort of monster truck bike meets vintage rat rod "woody". Your thoughts?
Step 1:
Cut the wood to the dimension of your tire width. Remember to have a bit of overhang to block the spray. My fenders were 4" wide to cover my 3.7" wide tires. Sand the wood on all sides and edges. Soak towels in the hottest water you can stand putting your hands in. Wrap the towels completely around the fender. Let sit for 2-3 hours or as long as it takes to make the plywood pliable.
Step 2:

Be sure to sand the wood with a step by step procedure called "raising the grain". This involves sanding with descending grades of sandpaper and then wiping the wood with a damp towel in between sanding. Let the wood dry between dampening and the next sanding step. This will result in a smooth wood surface that has a real professional look.
Step 3:
Cut a form to bend the wood on based on the radius or profile of the tire on your bike. I used a leftover piece of 2x12 that was laying around the workshop. Trace the profile of the tire on the scrap wood and then cut with a hand jig saw. This form should be long enough to handle the full length of the fender. While the wood is still damp from the soaking hot towel, wrap the fender around the form and clamp to hold in place.
Step 4:
The clamps should be spaced so there is even pressure on the fender from tip to tail. Leave the clamps on for longer than you might think. Probably 4-5 hrs or even overnight might work. Basically you want all the cells in the wood to re-form to their new shape and then dry out and harden to that shape. I didn't wait long enough and mine wanted to straighten out some after a few weeks. But, I was so darn excited at the time......
Step 5:
Next cut the notches needed to fit the frame dimensions and the holes for the mounting hardware. Then stain if a color is desired. I went with the natural red oak look. Then varnish or apply a poly coat to protect from rain and puddles. Again, I went with a varnish to maintain the "woody" and vintage look. Let dry for as long as needed, or until you can't stand it any more....
Step 6:
Use frame "brazons" or mounts for attaching the fender. The rack hardware was used to attach the rear fender on the rack mounts and I used the 1/8" steel rod to hold down the tail. I used a needle-nosed pliers to bend the end of the rod into a loop and then ran a rack bolt through the loop into the seat stay threaded mount at the rear axle. The rods push through holes in the fender and are held with a push-nut on the top of the fender.
Step 7:
The front fender is mounted through the fork crown hole using an "L" shaped rack strap and the 1/8" steel rod fender stays.
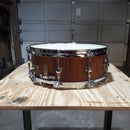
Step 8:

Here is the final product ready for the maiden voyage!
Step 9:
Return from the voyage....beer run! As you can see my fenders have a bit of a motocross look, which I wanted to fit the all-terrain look of the bike. One could definately shape the fenders closer to the frame and run the rear fender down to the bottom bracket for that traditional look. However, you decide....have fun!

Runner Up in the
Bicycle Contest


