

Introduction: Laser Cutting and Engraving an LED-Lit Acrylic & Plywood Sign


Welcome back to the Epilog studio! In this project overview we look at constructing an LED-lit sign. Watch the video above or read about the project below to see how cut and engraved acrylic, and a laser-cut sheet of plywood, can be used to create a simple but effective display piece.
One of the versatile and inspiring aspects of an Epilog Laser machine is that it can be used to engrave the graphics that will be the focal point of your finished item, and it can also be used to cut out the parts and pieces that will be used to produce the rest of your project. Many projects can make use of the laser’s ability to produce crisp, clean, and custom graphics, some can leverage the laser machine as a fabrication tool, and others can make use of both capabilities.
Project files available here.
Supplies
- 1/4" Plywood (2ft x 4ft sheet)
- 1/4" Acrylic (12in x 24in sheet)
- Foil tape
- Machine screws & nuts
- Wood glue
- Spray paint
- Adhesive, cuttable LED light strip
- USB extension cord (optional)
- USB wall adapter (optional)
- Epilog Laser System
We used a Fusion Pro 48 120w:
Plywood Vector - Speed: 25% // Power: 100% // Frequency: 10%
Acrylic Vector - Speed: 10% // Power: 100% // Frequency: 100%
Engraving - Speed: 100% // Power: 50% // Resolution: 500 DPI
Step 1: Preparing Our Acrylic

We’ll start by spray painting the back side of a 12”x24” acrylic sheet. You could use any color paint for this, but we’re using black to give us a nice sharp contrast. If your acrylic is pre-masked, be sure to unmask one side prior to painting.
Step 2: Cutting Our Plywood


While the paint is drying, let’s cut out the wooden components of our sign. We’ll load our plywood sheet into the machine. We’re using a 120-watt Fusion Pro 48, which fits a standard 2ftx4ft sheet of plywood from the hardware store quite nicely. If you’re using a smaller machine, just be sure to use a smaller sheet of wood and possibly cut out the components in multiple batches.
We’re using some light ¼-inch plywood, but you could use any wood or other laser-safe material you’d like - it will just affect the weight of your finished sign and the settings you need to use to when cutting with the laser. Always refer to your laser manual’s list of recommended materials settings for a good place to start honing in your speed and power.
Step 3: Adjust Artwork If Necessary

In actuality, our ¼-inch plywood is close to 0.2 inches in thickness, which we’ve accounted for in the finger joints of our design file. If you’re working with a thicker material, you’ll need to adjust the artwork accordingly.
Step 4: Preparing Our Laser Settings

All of our pieces fit nicely into about two-thirds of our plywood sheet, so we’ll apply our settings of 25% speed, 100% power, and 10 frequency, and send it to the laser to cut them out.
Step 5: Cutting Our Plywood


Cutting Settings (Plywood)
Machine: 120-Watt CO2 Fusion Pro
Speed: 12% // Power: 100% // Frequency: 100%
(Be sure to check the recommended materials settings in your machine's manual.)
Step 6: Painting Our Plywood Components

Once we have our plywood pieces, we’ll take the pieces that will be exposed to the outside of the sign and spray paint them black. This includes the front frame, the side faces, and the back panel. Painting them black will help the rest of the sign blend together, leaving the focus on our sign’s graphics. Once again, though, you could paint, stain, or otherwise finish the components however you like.
Step 7: Engraving Our Acrylic


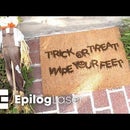
Next, while we wait for those pieces to dry, we’ll engrave our painted acrylic with our graphic. We’re using a 12in x 24in sheet, and we’ll be cutting out a rectangle slightly smaller than that. We’ve also made sure our acrylic has rounded corners. These corners will be covered by the front frame of the sign and will help ensure we don’t encounter any issues resulting from the fit being too snug.
We’ll be engraving on the back side of the acrylic, so we’ll mirror the graphic to make sure it reads correctly when viewed from the front. We’ll print the graphic to the laser and let the machine go to work.
Step 8: Engraving Our Acrylic (continued)


Adjust your settings appropriately for your machine.
Engraving Settings (Acrylic):
Speed: 100% // Power: 50% // 500 DPI
Cutting Settings (Acrylic):
Speed: 10% // Power: 100% // Frequency: 100%
Step 9: Assembling the Sign


Now it’s time for assembly. We’ll start with creating our inner frame by gluing together the corners, using some 1-2-3 blocks to help make sure we’re achieving right angles. We’ll also glue in our corner faces, which will give us a surface to mount the back panel to.
Step 10: Assembling the Sign (continued)


Next, we’ll attach the side faces of our outer frame. Be sure to flip the inner frame over so the flat corner faces are on the ground. This will ensure a lip is created on the inside of the outer frame, since the inner frame components are not as wide as the outer components. This lip will be where we insert our acrylic front later on.
Step 11: Assembling the Sign (continued)


Once that’s done, we need to apply some foil tape to the inner surfaces of the frame. We want to cover the inside of the box with reflective material so the light from our LEDs bounces around behind the acrylic and give us some even illumination.
We’ll apply the tape to our frame, and then we’ll apply it to the interior side of our back panel. We can be a little imprecise with our edges, as they will not be visible on the completed piece.
Step 12: Assembling the Sign (continued)

We’ll go back with a precision blade and a screwdriver to make sure our various mounting holes are not blocked.
Step 13: Assembling the Sign (continued)


We’ll secure our back panel with a few nuts and bolts.
Step 14: Assembling the Sign (continued)


Then it’s time to add our adhesive LED light strips. Our LEDs’ adhesive was not as tacky as we would have liked. They ended up working well enough, but you may want to explore other options.
Step 15: Assembling the Sign (continued)


Next, we’ll lay the frame on its back and lay the acrylic sheet onto the lip created by the inner frame.
Step 16: Assembling the Sign (continued)


We’ll test the LEDs to make sure everything’s working properly, then we’ll glue on the front frame.
Step 17: Plug the Sign in & Enjoy!

Once the glue has dried, we can plug the sign in and we’re good to go. We now have a completed LED-lit sign cut and engraved with an Epilog Laser.
Hopefully this project has helped inspire you to think about how a laser machine can be used to not only engrave detailed graphics, but also how it can be used in the production of parts and pieces. Until next time, happy lasering!
For more information about Epilog Laser, visit our website here!


