

Introduction: Mechanical Cam Toys


GRADES 6 - 8, Social Studies, Science, Engineering
Lesson Overview
Cam toys (aka automata) use hand-powered mechanisms to create cyclical motions that animate a scene. Students design and create cam toy machines with moving objects/characters that symbolize abstract concepts and represent dynamic situations.

The lesson is structured to follow the Engineering Design Process (EDP), a process widely used by designers in any discipline to tackle challenges. While there are many ways that people solve problems, designers often opt to use the EDP because it offers a roadmap for the project journey and will help them work efficiently and effectively. The process requires that the designer first clearly Define the challenge, then Learn about and Explore existing solutions, before beginning the design stage. This understanding of the problem, combined with the Design step requirement of generating at least 3 different ideas, allows for a rich set of creative solutions to draw from in choosing a design direction. The designer is now ready to prototype the solution in the Create step. An important feature of the EDP is the expectation that the designer will build 2 or more prototypes after the direction is set. This is done by cycling through the Create and Observe/Improve steps a few times. It is recommended that students have an opportunity for at least 2 design-build-improve cycles. When students feel they have to “get it right the first time” they are less willing to take risks and be creative. On the second and later times through the cycle, they can fix flaws and adopt successful ideas from classmates. Hopefully, the designer will have an opportunity to Reflect on the product they created and the process they followed, looking for learning habits and insights that will help in future challenges. The Share step involves documentation, publishing, or presenting to affirm the project and inspire others.
Essential Question(s)
How can creating metaphors be used to increase understanding and enhance communication skills?
How can movement and imagery be used to create metaphors for social, scientific, and other academic concepts?
Skills Practiced:
- Analysis and Abstract Modeling
- Mechanical design
- Engineering Design
- 3D modeling in Tinkercad
Time Required: 3-4 Hours
Materials Needed:
- Sketch paper
- 3D printer and filament
- Craft materials such as (cardstock, foam sheets, markers, hot glue)
- Flexible PVC tubing, ¼” inside diameter
- Wood dowels, ¼” diameter (optional, to reduced 3D printing time)
Step 1: Define
Context
Creating physical objects can be an engaging and useful way for students to process their learning. Some physical models are directly representative of the academic content, such as a depiction of a sound wave, or a model of a cell. Abstract concepts, like a balance of power, ecological interactions, or societal changes, are also well-suited to modeling. Students practice higher order thinking skills when creating metaphors and symbols for abstract concepts. Coming up with imagery for social, scientific, or other academic concepts pushes the student to research the topic and develop a deeper understanding of it. The addition of motion, as in the Cam Toy activity, can make the project even more engaging and lead to creative, entertaining products.
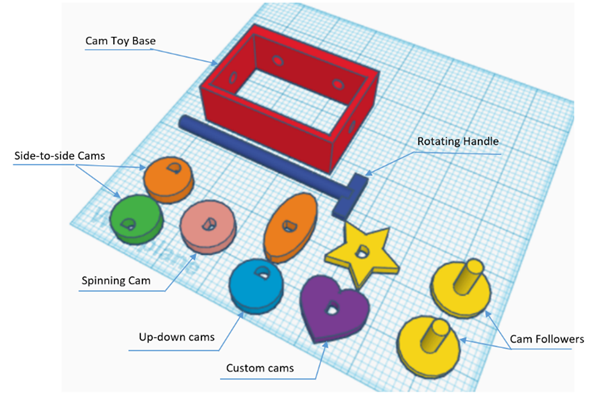
Cams are rotating shapes that push on / rub against mechanical elements to create other motions. One rotating shaft can power many cams, and each can create a different motion in its associated mechanical element. Students decide which of these motions is best for the specific concepts they want to represent. In this project, students design the cams and moving objects in Tinkercad for fabrication on a 3D printer or laser cutter. Backgrounds or other static objects can be designed in Tinkercad and fabricated in a variety of ways for a more elaborate Cam Toy machine.
Challenge: Design and build a Cam Toy with motions and scenery that represent concepts related to the specified topic. Students may work in groups of 2 or 3. A Cam Toy base, rotating shaft, and a few cam designs are provided at this Tinkercad link. The base accommodates 2 motions. Students can modify the models to make smaller or larger machines.
Criteria:
- Includes 2 characters/objects that move when the toy is operated. Possible motion types are:
Up-down
Spin
Side-to-side

- Includes 1 static object that is a background, piece of scenery, or other objects.
- The motions and scenery must represent concepts related to the specified topic.
Constraints:
- The 2 motions must be different. The same type of motion can be used twice if the 2 motions differ either in frequency or magnitude. (For example, if there are 2 up-down motions 1 can have 2 rises/falls per cycle while the other has 1. For spinning, 1 can spin at a faster speed than the other.
- The appearance and motions of the characters and objects must communicate the intended concept.
Student Product / Learning Goals
Students will choose motions that express physical or abstract concepts. They will design and build a working cam toy that expresses these concepts as a representative model or metaphor.
Step 2: Learn / Explore
1. Research:
Review the motions and mechanisms that are easily implemented in the Cam Toy. Show examples of the 3 motions that are simplest to build (up-down, spin, and side-to-side), An online search using the search term “student automata” will yield many videos. The Cabaret Mechanical Theater group in the UK has been creating fine wooden automata for decades. Their site is https://cabaret.co.uk/
Pick a topic for the class and see that each student group has a concept to represent in their Cam Toy.
2. Collect:
Have students document their research on the automata, noting mechanisms and features that they found interesting or may be relevant to their topic. Students can keep notes on the things they learned or that intrigued them on an inspiration page such as a blog, Google Docs, a notebook, poster, etc.
Step 3: Design
1. Design:
Students work together to brainstorm ideas on how to represent the topic they are assigned using the mechanical motions commonly done in automata. Use the inspiration page as a reference and create a design that is simple enough to build while still being complex enough to communicate an idea. Backgrounds, scenery and other static objects can be very helpful in communicating the idea. The design process is most effective when designers create at least 3 different ideas.
Option A: draw designs on how the Cam Toy will look and/or function. Use paper, whiteboard, drawing apps.
Option B: Build simple models using crafting materials (paper, glue, clay, pipe cleaners, etc.) to show look and/or function
Option C: Let the students play around in Tinkercad to get familiar with the program and make practice models.
Example project for Social Studies: Systems and Interactions and in the United States Government.
One concept to explore is the differences between the 2 parts of Congress, House of Representatives and the Senate.
- The House has 435 members as opposed to 100 in the
- Senate The length of term in the House is 2 years, while the Senate term is 6 years.
- The Senate has the power to confirm judges, Cabinet members etc, while the House does not.

This design shows the differences in term lengths and includes a non-traditional cam shape - a triangle. In one rotation of the camshaft, the triangle cam will move the House up-down three times while the eccentric circular cam will move the Senate up-down once. The student may express that one rotation of the camshaft represents 6 years.
Example projects for Earth Science:
Hurricanes. One factor in the creation of a hurricane is warm air rising off the ocean. This is shown with up/down motion. The spinning storm is shown with rotary motion.

Sea breezes on the beach. They are caused by heat rising from warm beach sand and can be shown with up/down motion. The breeze comes in from the ocean to fill the void from the rising air; it is shown with side-to-side motion or rotary motion.
Land breeze at the beach during nighttime - a reverse of the previous example.
2. Choose a Direction: Have the students choose a design that meets the criteria of the project. Consider also checking it against the “Thing” Checklist (this checklist can be found in the Resource section of the Lesson).
Step 4: Create
Sketch a front view of the overall Cam Toy idea including the base, the mechanism pieces, characters, and background. It can be helpful to lay it out on graph paper to get the sizes correct.
List the motions you expect to create and draw the appropriate cams.
- For the up-down motion, you need a circle cam with an off-center hole
- For the spinning motion draw a circle cam with a centered hole
- For a side-to-side motion, you need 2 circle cams with off-center holes. Make sure the D-shaped holes are reversed
Create models of the base and all mechanical parts on Tinkercad
- Samples of the Cam Toy base and mechanism parts https://www.tinkercad.com/things/3eR1cCpl8jA The next instructions will show you how to make them on your own.
- All dimensions for a basic toy are included in the videos here. If you want to design from a CAD drawing, you will find dimensioned drawings for all Cam Toy parts (Base, Various Cams, Rotating Handle, and Cam Followers) this document.
- Option to reduce 3D printing time: Choose whether you will use wood dowels for the Cam Shafts and/or Cam follower shafts. Use ¼” wood dowels for the drive shaft and the cam followers.
- Make the Cam Toy base. See video and/or the dimensioned drawing for a starter design. Students may want to modify this design to accommodate more mechanisms.
- Make mechanism parts (cams, drive shaft, cam followers) See video and/or drawing for a starter design. If using a wood dowel for the camshaft, then holes in cams should be circles, not “Ds”, and they will need to be glued on.
Make the characters/objects and all scenery/props using craft materials or 3D printer
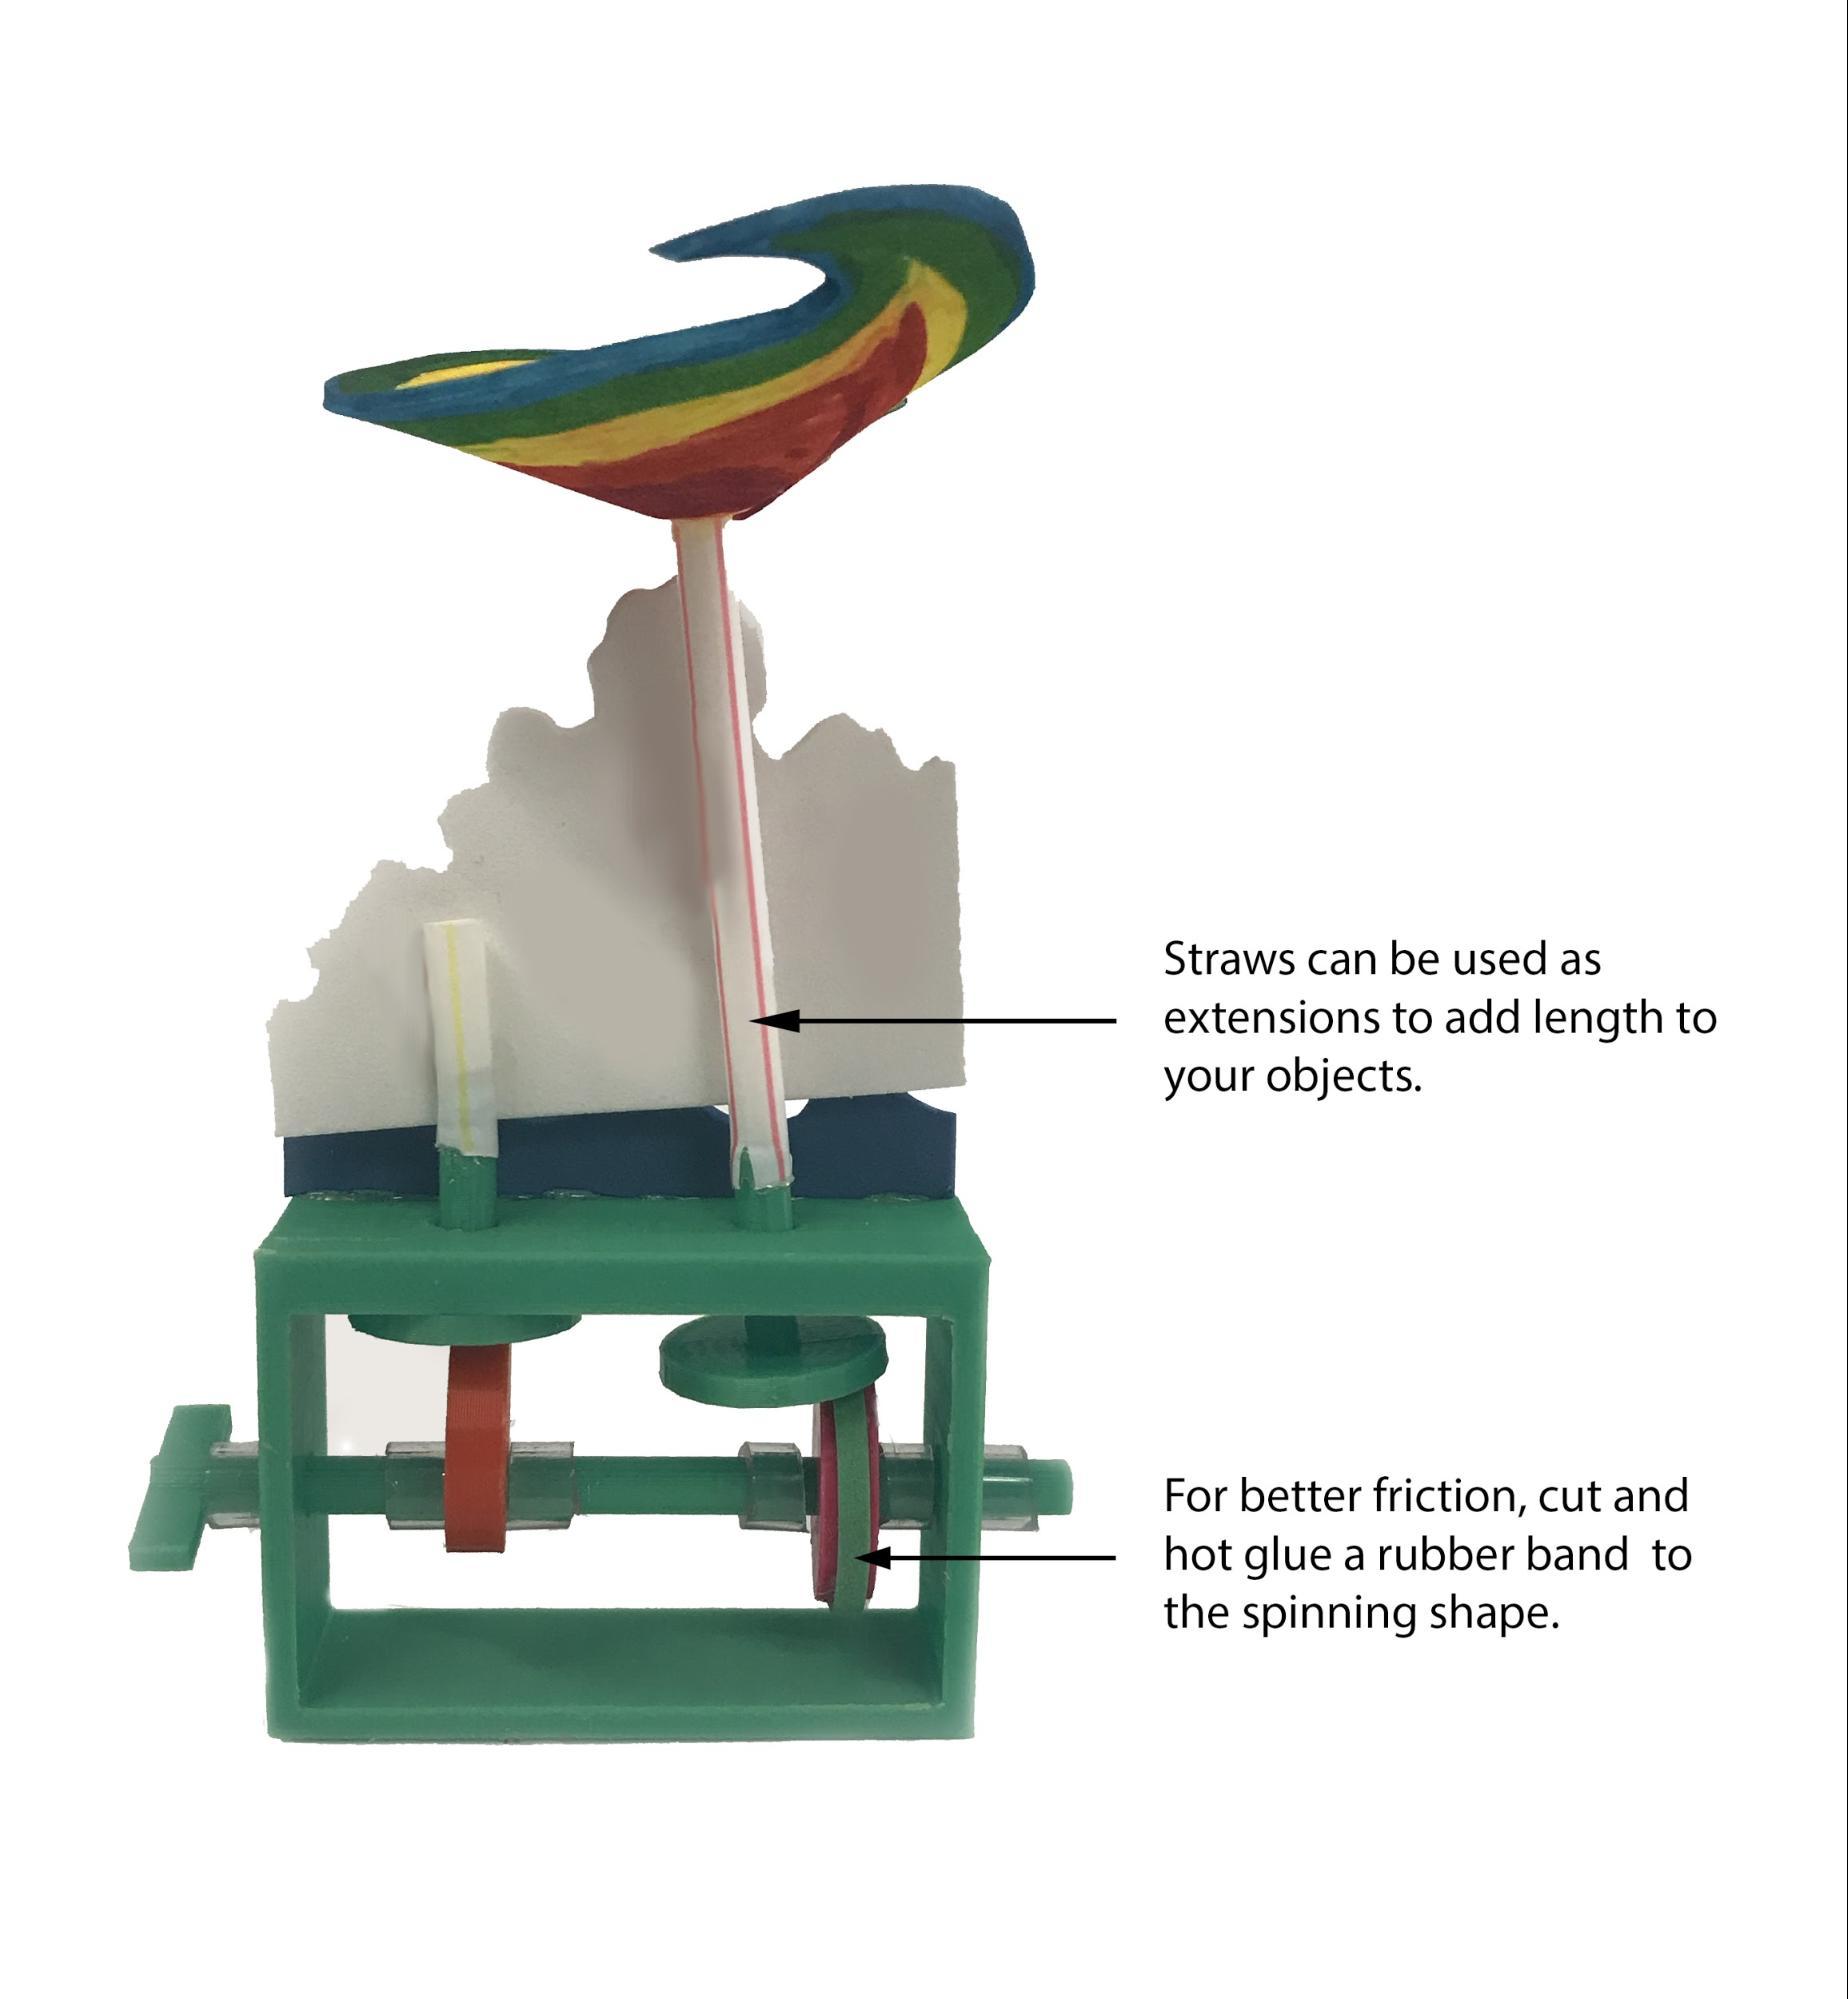
Assemble and align all the parts and use PVC tubing to hold them in place Will create assembly video
Step 5: Observe, Improve, Iterate
1. Play with the Cam Toys! See if others can figure out what they mean before they are explained. Encourage students to share their creations and get feedback from peers.
2. It is recommended that students have an opportunity for at least 2 design-build-improve cycles. When students feel they have to “get it right the first time” they are less willing to take risks and be creative. On the second time through they can fix flaws and adopt successful ideas from classmates.
3. Provide stopping points for the class where students can observe, evaluate, and document their design.
4. Give students a chance to record their thoughts and progress as they work through product iteration cycles. This can serve as a formative assessment.
5. Follow instructions in the Create Step as needed for the next iteration.

Step 6: Reflect
Reflect: After the design and build time is over, have students reflect on the process and product. This reflection is similar to the one in the “Observe, Improve, Iterate” step but now includes reflection on the process as well.
Step 7: Share
Give the students an opportunity to share their Cam Toy with the class or some other community. Options for sharing include presentation, demonstration, blog or online post, video clip, physical display, family events, and maker fairs, or in the use for which it was intended.
Step 8: Project Extensions
Create CamToys for physical and abstract concepts such as:
Science
- Chemical reactions/phase changes of matter
- Pollination/ plant growth
- Cell processes
- Effects of climate change/rising sea level
Math
- Mathematical relationships
Social Studies
- Personal growth - transformations in environment/appearance/ skills
- Change in power balance before/after conflict/event
- American westward expansion
- Medieval life and social structures
- Understanding of race in the US
- Women’s roles in society
- Reactions to social stresses such as taxes/tariffs/ cultural oppression/ work conditions
- Citizenship and stewardship examples
ELA
- Personal growth - transformations in environment/appearance/ skills
- Scenes from a story/novel/play/history
- Animated character from story/novel/play/history
- World Languages
- Cultural norms in world cultures
Students 13 and older can learn how to make a digital animation of a mechanical design using Fusion 360 (free for students and teachers):
We hope you had fun designing and sharing your Cam Toys. What did you make? What materials did you use? We want to see! If you did this in a K-12 classroom, what subject was it in?
Send us an email or leave us a comment so we can see what you're making.
Visit our website k12maker.mit.edu to get resources for K-12 teachers:
- Maker skills workshops for K-12 educators - Spring, Summer, and Fall
- Lists of Tools and Materials and illustrated charts to print and post
- Supervision and safety guidelines for shop administrators
- Training guides for common tools (including student checklists and refresher guides)
- Our Maker Methodology for designing Maker Projects for core curriculum, including sample projects


