

Introduction: Random Daisy Generator With Tinkercad Codeblocks


I made this random Daisy Generator based on the Random Snowflake Generator Instructable. There are fewer features in the daisy design, so the code is shorter. It also has the option of making the center separately so you can change the colors of the flowers when they are 3D printed.
Supplies
3D printer and filament
Glue
Optional: Magnets (round, or tape/strips)
Step 1: Learn How to Make a Petal From a Cylinder

Let’s get familiar with the 3-axis coordinate system in Tinkercad. The Origin is the center of the grid where X, Y, and Z all equal 0.
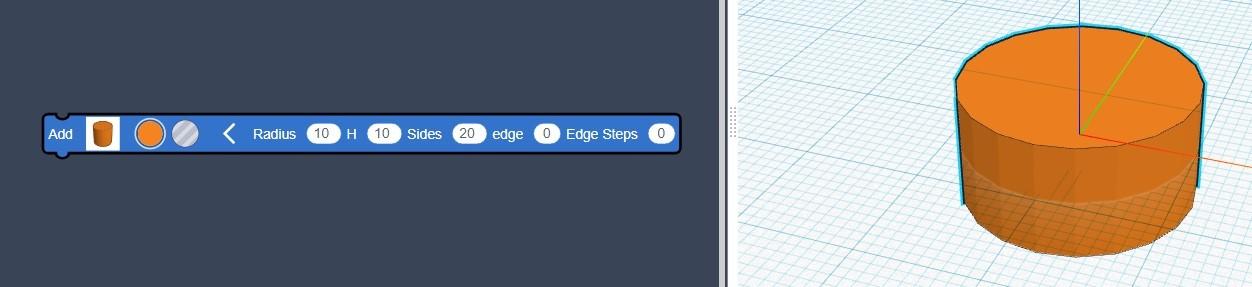
When a cylinder is added to the Workplane it is centered on the Origin, so half of it is below the Workplane.

To change the shape use a Scale block.
To round the edges (it's hard to see, but it's there), set “edge” to 1, and increase the number of “Edge Steps”
Create a new design to test out the shapes and various blocks. It will generally save you time to learn how the blocks work before using them in your real design.
Now onto the Daisy Generator!
Step 2: Define the Variables

In this code, the number of petals, their length and their width and random within defined ranges. Notice that PetalWidth is defined from the PetalLength so that the petals would not be wider than they were long
The variable Center-scale is not random here so that the Daisy can be 3D printed in 2 parts - the petals and the center - so they can be in 2 different colors. If you want to keep it all in 1 design, replace the “12” with a “Random between” block.
Step 3: Create the Petals

In this code each petal is created with radius 1 for easy scaling. It is then moved out from the Origin of the Workplane, and rotated around the Origin to its proper position.
“Count" loops use a counter variable, often called “i” or “j”. In this code the counter “i” is used to calculate the rotation angle for each petal. It starts with “i -1” so the first petal is not rotated.
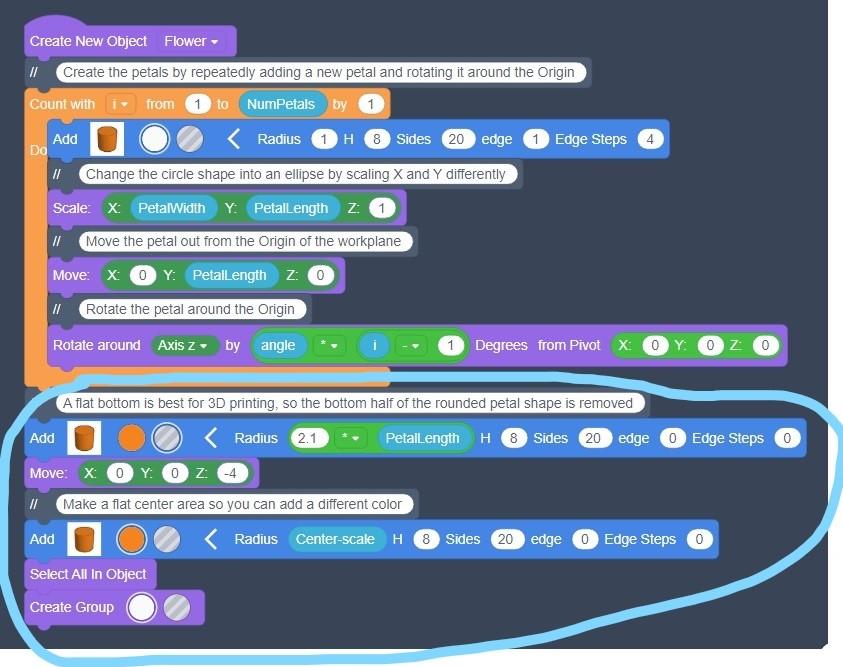
As you may have noticed, all the shapes come in centered on the Origin, so at this point the Daisy is half above and half below the Workplane. The bottom half can be removed by creating a Hole Cylinder a little bigger than the daisy, moving it below the Workplane, then grouping.
I added a flat center before creating a group, I can decorate it or add a center of a different color.

The flat center is slightly above the petals, though it looks like it is below in the image.
Step 4: Create the Center

Here you need to make a choice whether to create the daisy in 1 piece or 2.
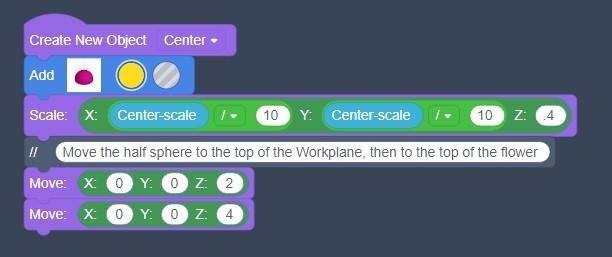
If it will all be one piece, add this code to your existing code.
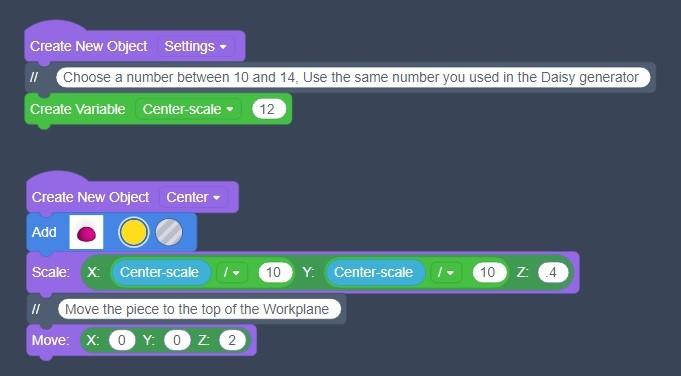
If you choose to make it in 2 pieces, create a new design and add this code.
The code described above is called Daisy Generator and can be found at
www.tinkercad.com/codeblocks/0p8K3ObtH0h
The separate code for the Center can be found at www.tinkercad.com/codeblocks/coqtvWYl1GX
Step 5: Generate Daisies and 3D Print Them

Run the code as you like. Try changing the ranges of the variables and see how it changes the design
When you find a daisy you like, export it in the .STL format. Import that file into the slicer of your 3D printer and make the pieces.
Brighten your whiteboard or refrigerator by putting magnets on the backs of your daisies!
Step 6: Enjoy and Share!
Thanks for trying our Instructable!
We hope you had fun creating random daisies with Tinkercad Codeblocks! What did you make? We want to see! Share your Makes here, or drop us a message. If you did this activity with K-12 students, let us know what grade level and content area.
Join our mailing list to get the latest news, tips, and insights from the K-12 Maker Lab!
Visit our website k12maker.mit.edu to get free Maker resources for K-12 teachers!
- Starter projects - simple things to make while you learn to use Maker tools
- Maker skills workshops for K-12 educators - Spring, Summer, and Fall.
- Makerspace Design Guide for K-12 Makerspaces.
- Lists of Tools and Materials and illustrated charts to print and post.
- Supervision and safety guidelines for shop administrators.
- Training guides for common tools (including student checklists and refresher guides).
- Our Maker Methodology for designing Maker Projects for core curriculum, including sample projects.


