

Introduction: Glowstick Dissection and Painting


Behind the ubiquitous decorations for dances parties is a chemist. A big party-loving super-nerd chemist. While glowsticks and other chemoluminescence patents were orginally for the US Navy (probably to party, okay maaaybe for emergency response), they have since sprung up everywhere. This project introduces the idea of chemical reactions while showing off the art and beauty than can come from complex chemistry. After all, science is beautiful.
Let's science these glowsticks and art with them, too.
Start by WATCHING THE VIDEO, and then let's glow! :)
- What: Glowstick Dissection + Painting
- Why: Because it's "Sandstorm" meets Chemistry
- Time: ~ 15-45 minutes, depending on depth of interest
- Cost: ~ $0.99 per big glowstick
- Materials:
- Glowstick (large, wide ones are easier)
- Paper Towel
- Cup of Water
- Plastic Containers
- Hydrogen Peroxide (optional, can get at any CVS or Walgreens)
- Ice (optional)
- Tools:
- Cutters (wire cutters are best, but scissors will work)
- Liquid Applicator (could be plastic pipettes, basters, syringe, anything)
- Petri Dishes (or other dish to paint in)
- Safety glasses
- Gloves
ADVISORY: Glowsticks are the funnest. You may just have too much fun with them. Also as you might imagine, the chemicals that create chemoluminescence are not great to touch to skin or eat. They are fine to dispose of regularly, but not good for direct human body-ing. So despite the temptation to paint yourself like a radioactive beast, avoid it. Old glowsticks used to use an activator that was believed to be carcinogenic if ingested, but that's not the case anymore. Wear adequate protection and you should be good to go!
Step 1: Prep Your Project


Yay, prep time!
First thing up, you should label all your plastic containers as it will get confusing once chemicals are in them. Each glowstick will have two parts to it: a clear activator fluid (hydrogen peroxide) in the plastic sheath, and a fluid (diphenyl oxalate) with a dye inside the glass tube. You'll want to keep those separate so the reaction doesn't start without you.
Throw on some gloves because one of the byproducts "phenol" is not good for the skin, and throw on some safety goggles too because we'll have a brief moment of breaking glass.
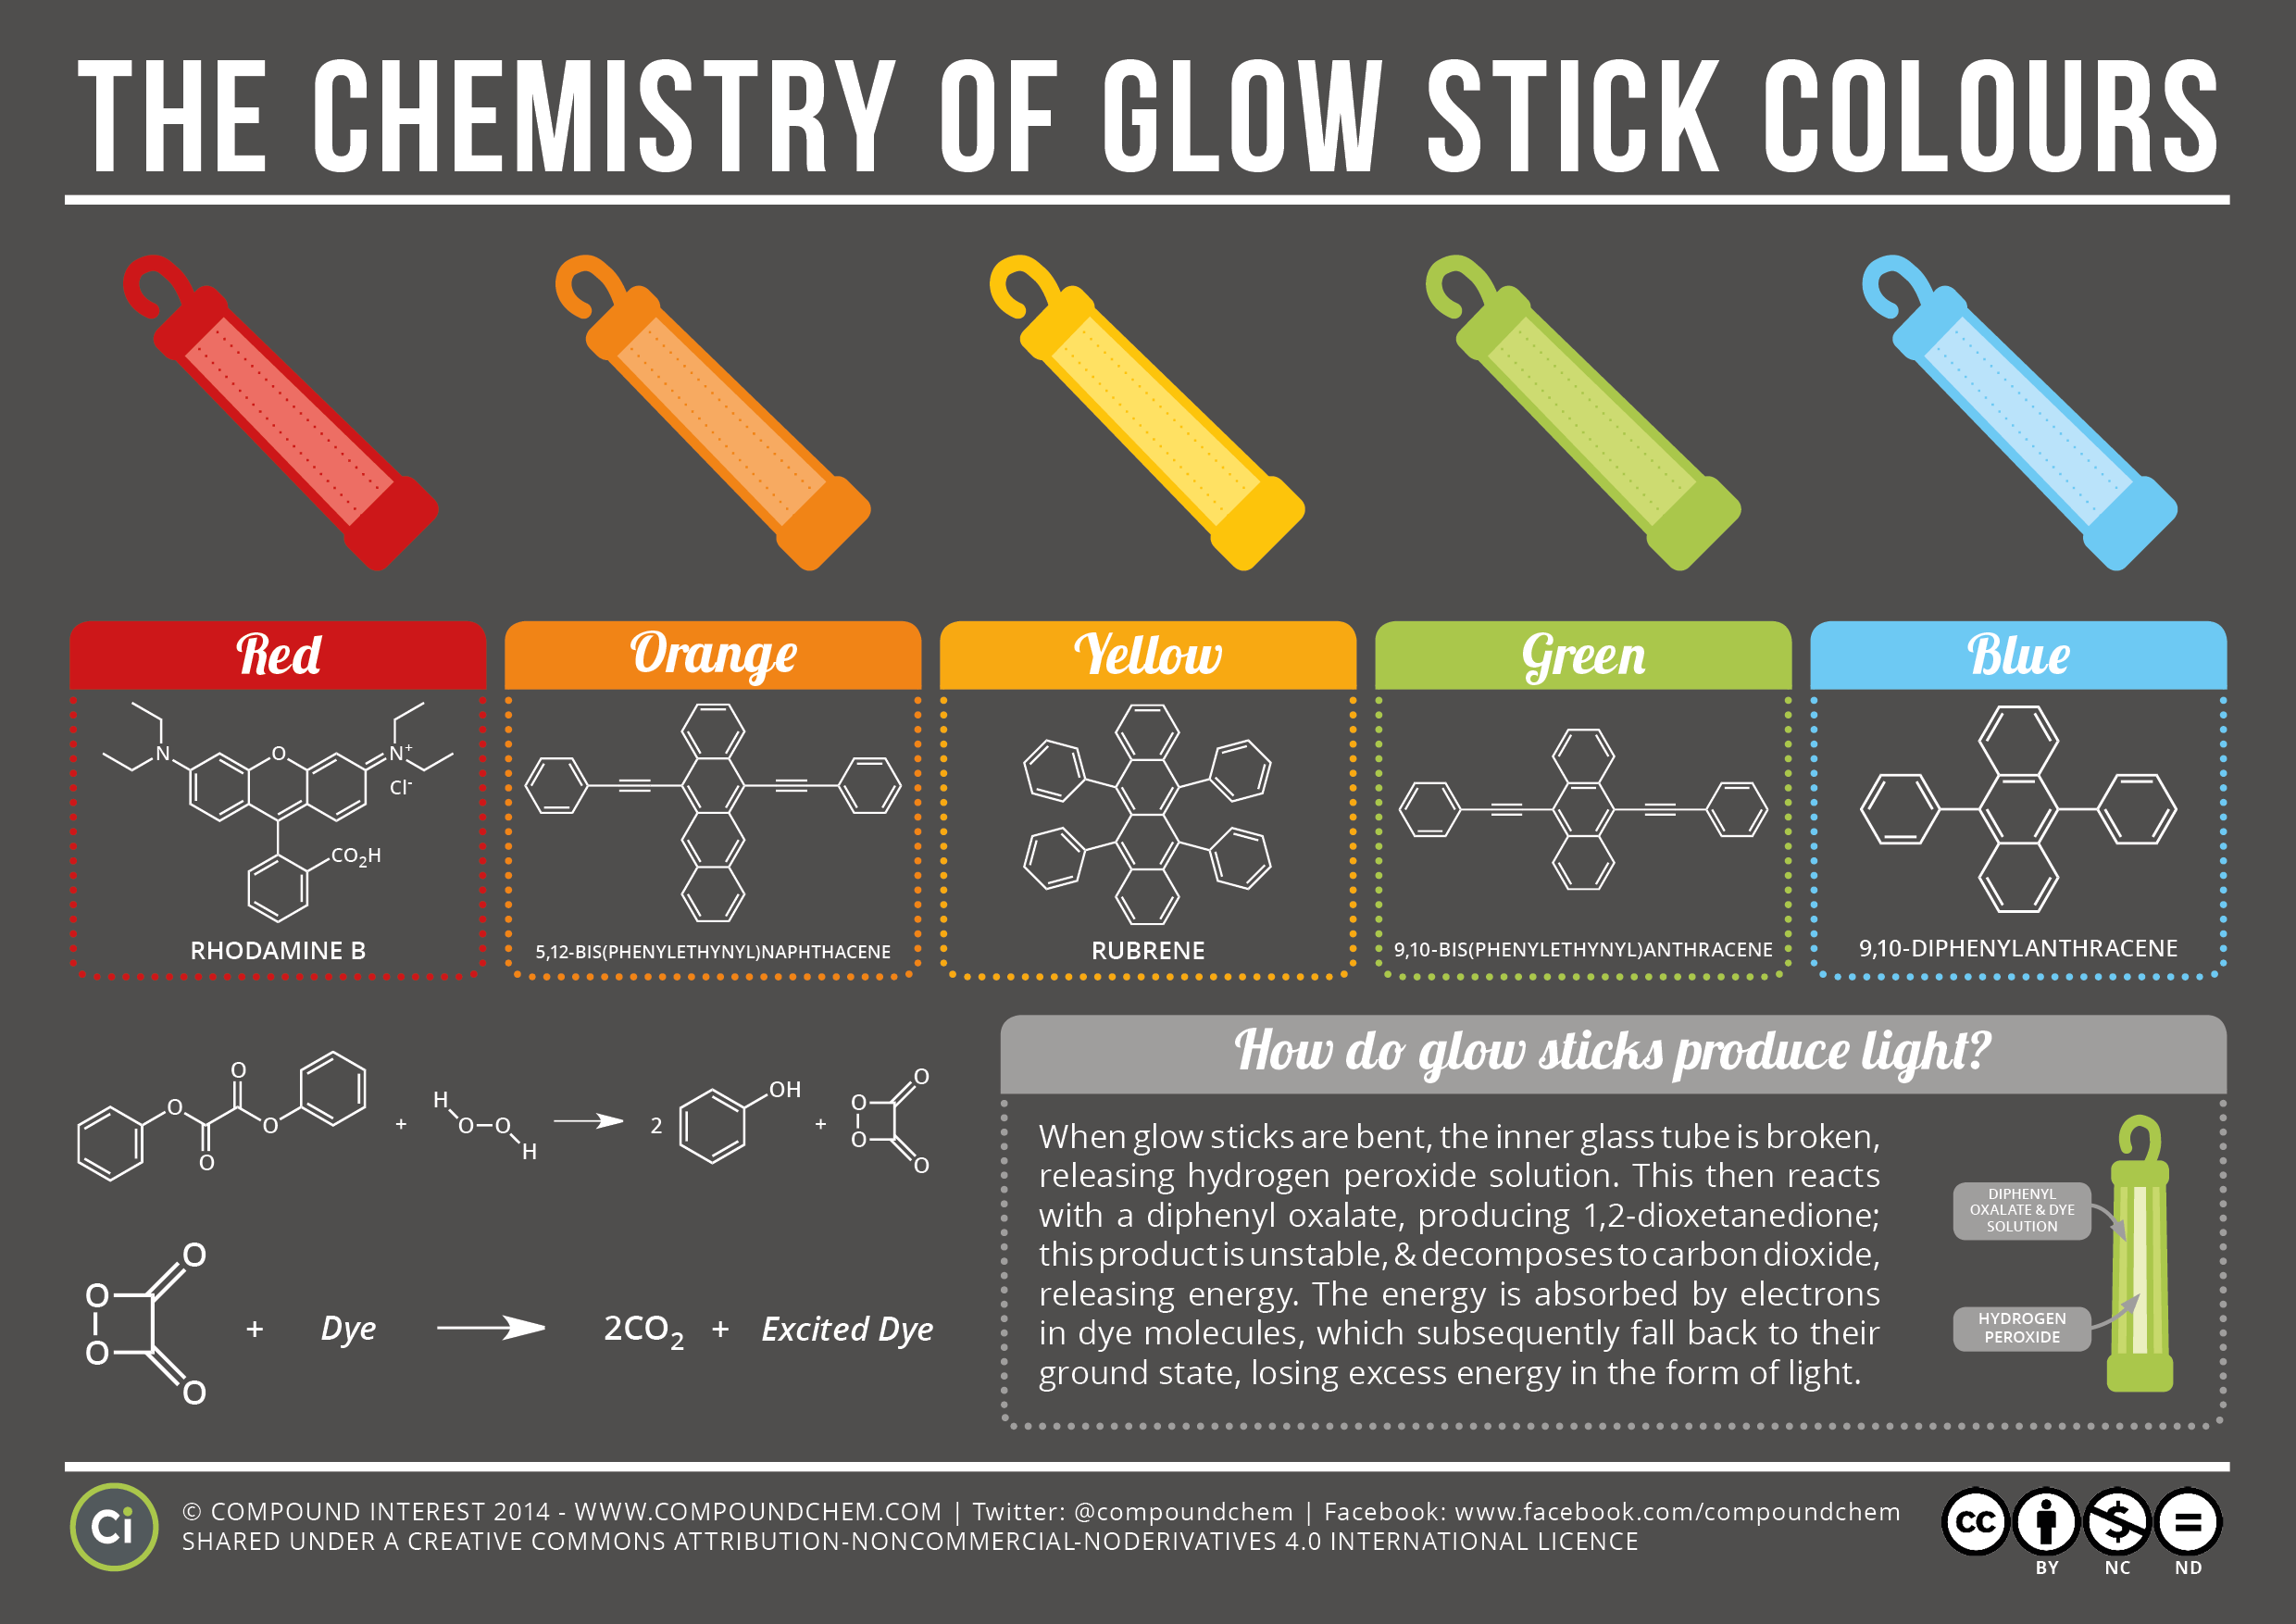
If you have a class, this is a great time to go over what a chemical reaction is. If you want to go deeper, you can talk about the hydrogen peroxide and diphenyl oaxalate reaction, and how it excites photons to be emitted via the dye. If you want to go super science powerhouse, you can check out this chart of the compositions of the different dyes.
Go for it!
Step 2: Cut Open and Drain First Liquid


Let's dissect! Some glowsticks have clear tubes, and some are translucent to make certain colors.
Regardless, they work pretty much the same. Hold your glowstick so the wider end is at the bottom, and look through it to see where the glass tube is. Use your cutters to snip off the top, and you should be able to see a reservoir of clear fluid surrounding the glass bottle.
Pour that fluid into your "activator" container. This is the same fluid across all glowsticks, and is simply hydrogen peroxide. That's right. The same stuff you throw on cuts to make them bubble.
OPTIONAL: If you want more activator, simply buy some hydrogen peroxide at the store and throw it in. You'll find that the store stuff is a much higher concentration than what's in most glowsticks. This will make your glowstick burn brighter but for less time, and is a great teaching point about the rates of chemical reactions. Chemical engineers have thought of this, and made what they believe to be the optimal concentration for party time: both bright and long-lasting.
Step 3: Remove and Clean Glass Tube


Inside your plastic tube is a glass one. With a little bit of finagling, you can remove it and see the liquid within. Dip it in water, and clean it so no hydrogen peroxide remains on the surface. This will keep it from prematurely reacting before we're ready to paint.
Step 4: Cover, Break, and Pour Glass Tube


Take a piece of paper towel and cover the glass tube. Use your cutters to break it at the top, making sure to have proper eye protection on. Pour the contents of your tube into a container. This is the other half of the reaction.
The contents of this tube are diphenyl oxalate and the dye involved. When mixed with hydrogen peroxide, it will decompose to carbon dioxide and phenol while exciting a photon in the dye to be emitted. As you can see in this tube, the dye is clearly not red, which is why they colored the tube red. For business purposes, glowstick companies vary in what dye goes into the plastic vs. the fluid, so you'll have to see what you get!
Make sure to cleanly dispose of the glass at the end of your experiment.
You're getting closer to the party!
Step 5: Repeat for Other Glowsticks


If you want a full palette to paint with, repeat the process with other glowsticks. You'll want to keep the contents of the glass tubes in separate containers as these are the dyes, but you can pour the activating liquid (hydrogen peroxide) all into the same container. Interestingly, you'll find you have much more diphenyl oxalate and dye mixture than hydrogen peroxide.
You're almost ready to party!
Step 6: Prep Painting Party


You're almost ready to paint! For painting, I found that petri dishes work great as a container with a dark background. If you have one, pour the activator into some sort of applicator bottle. If you don't you can use just about anything else (a stick, a syringe, anything).
Move your contents to somewhere that you can make pretty dark, and you're ready to go!
Activate party mode!
Step 7: Paint Glow-y Wonders


Time to start combining everything to bring a painting party to life. I poured a separate color in each dish, and then used the applicator bottle to drip in hydrogen peroxide slowly throughout. You'll find interesting patterns of diffusion as you go. At the end, of course, it's fun to combine them all to make wild galactic-type images.
You'll find that you can vary the brightness and intensity by the amount of peroxide used, the concentration, and the temperature of the whole experiment. Put ice below your petri dishes or refrigerate them to see what happens. At the end take some photos, wash out your supplies, dispose of the glass and tube, and you're all set.
I'm excited to see what you or your students make, so pass along photos or comments! I love hearing from you, so feel free to write below!
Have fun, and as always, keep exploring.

Participated in the
Make It Glow! Contest


