

Introduction: Squid Dissection


Squidward we go! Captivating the hearts of many starring in such worldwide venues as "Spongebob Squarepants" and all the oceans you've ever known, squid are truly amazing. There are over 300 species of these wonderful creatures, and being members of the cephalopod crew, they're also my favorite animal. Let's squid!
- What: Squid Dissection
- When: Now!
- Concepts: anatomy, marine biology
- Cost: ~$0.20 per squid
- Materials:
- Squid (smaller ones are actually easier for dissection, many East Asian grocery or seafood stores will have them)
- Tools:
- Nitrile or latex gloves
- Tweezers
- Cutting tool (we use a razor blade here)
- Magnifying glass (optional)
- Dissection tray (we use a lunch tray here)
A Note on Dissection
Dissecting animal organisms is a tricky subject which ultimately some will object to and that's okay. For us, we believe that with careful scientific exploration of animals who were treated in humane ways, we can learn and teach our students to be greater stewards of the environment, and especially toward the species they just learned about. There will always be some students who wish not to do a dissection, and we always allow whatever level of participation they choose in these experiences. Many prefer to just watch. Many of those eventually join in. But whatever it is, feel it out with your classroom or audience.
Okay, squid time!
Step 1: Prep Your Tools!


Slap on those clean gloves, and get your other implements ready. If you're doing a dissection to demonstrate to others, often they only need one glove to participate.
For tool use, tweezers and magnifying glasses are pretty straight forward. For razor blades, even though the hand is near the blade, we find them quite safe with student use (even young ones) if given the proper talk at the beginning. Talk about the safe side and the sharp side, and how only one student uses a cutting tool at once. You can devise your own safety talk of course.
For information on squid to complement the dissection, there is so much out there! A couple of sources we like include Squid World with tons of facts, Squids4Kids about dissecting squids with a class, and this video on squid anatomy.
Step 2: Check Out Your Squid!


In (1), we're checking out the mantle where you can see the squid's fins as well. The dark spots are all chromatophores, which they use to change color and communicate. In (2), we can count and find that squid have 8 tentacles and 2 longer arms used for catching their prey, all with suckers. If we flip it over in (3), you can find the siphon, which squid use to squirt out water taken in by the mantle to propel them along, kind of like a water rocket. This, however is not the mouth, which we will find soon. It is great to ask a class which way they think the squid moves based on its anatomy, and based on the siphon. In (4), we can see the eye with no eyelid, covered by a mostly transparent layer of flesh.
I heard a great first grade teacher say at the beginning of a dissection: "Some people say EWWWWW!!! but scientists say OOOOOO!!!!!" Well it's okay to say both. :)
Step 3: The Beak


Asking the students where the squid's mouth is will often lead to a lot of answers. If we spread the tentacles and arms apart, we can find it right in the center. With the tweezers, you can pull out the beak from the mouth enclosure called the buccal mass. When it comes out without breakage, it looks a lot like a parrot's beak. They use it to chomp up small fish and crustaceans. Nom nom!
Step 4: Open Your Squid!


Flip the squiddie over so that you are looking at the siphon. With a razor blade, lightly cut apart the mantle so as not to cut the internal organs. Spread out the mantle flat on the table and see what's inside!
Step 5: The Main Organs


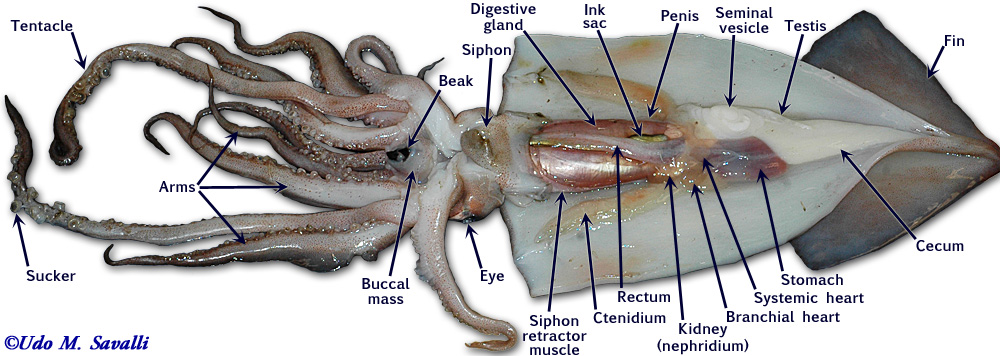
There are a lot of small organs inside the squid, a great diagram of which can be found here. In (1), we find the testes (large white sacks) since this one is a boy. In lady squid, you'll find a huge number of eggs (up to 700) which is pretty durn cool, and can be pulled out. In (2), we can see the gills splayed out along the mantle that the squid uses to breath. If you look at them up close, they are like tightly packed feathers. In (3) in the center, we see the squid's stomach. You can open that up to see what it ate!
Step 6: The Ink Sac


Right in the middle of it all will be something slightly iridescent, which looks a little bit like an anchovy. Pull it up and give it a poke with tweezers, and ink will come out! Depending on the squid and its condition, these can be very full, and you can even use it to write with.
One ink sac can be touched by a whole class with some ink for all. This is a great time for a discussion on ink sacs, and their use in confusing predators. Interestingly, the ink is composed almost entirely of melanin, the same type of pigment that gives skin, hair, and eyes their color!
Step 7: The Pen / Gladius


Remove the majority of the squid and it's organs so that only the mantle is left. If you feel down the middle, you'll notice a rigid structure, shaped like a feather. They are made of chitin, and they give the squid's body rigidity and acts as a location for muscle attachment despite not having bones. It's an amazing clear, almost plastic-like feature, and if you rinse it off it's a great keepsake (as far as keepsakes that come from the inside of a squid are concerned)!
Step 8: Chromatophores


Now you can really see the chromatophores on the mantle, which consist of pigment-containing and light-reflecting cells. Squid can use complex multicellular organs to change color rapidly, and by peeling this back with tweezers, you can look at them up close and see it is only skin deep. This is a great time for the magnifying glass!
If you are feeling like cooking up your squid, the mantle is the most commonly eaten part. So yum it up with some heat if you want a snack post-dissection!
Step 9: The Arms and Tentacles


Cut off the arms and tentacles so students can explore them individually. If you look at them closely, you can see the structures of the suckers, which in larger squid have visible curved "claws" that protrude from them.
Step 10: The Eye


Squid have an amazing sense of vision, not only for the ocean around them, but because they mostly communicate by visual display. They have no eyelid like many marine mammals, and interestingly have a hard lens. While humans change the shape of their lenses to change focus, squid simply move the location and orientation of their lens.
With a little fishing, you can pull out this almost perfect sphere from inside the squid eye for inspection (pictured in 2).
Step 11: Keep Exploring


Great job on your dissection! You get a high tentacle from us!
Keep exploring as long as you'd like, and then you're done! Remove those gloves, compost (or cook) your squid, and clean your dissection tools and tray with some water and dishwashing soap and/or bleach.
If you still have an ink-ling to do more, there are always.....DAA DAA DAA DAAAAAAAA.....JUMBO SQUID! (pictured here)


