

Introduction: Building Giant Articulated Hands (carved From Wood for Social Distancing)


So I know we’re all going through a lot right now. This whole distancing thing is really starting to wear on us and that’ll never be truer than during this holiday season. That’s why I invented these. Stay 6’ away from your friends and family while doing all the activities just like you used to. It’s almost like they’re not even there!
Step 1: Notable Tools
Inventables
► X-Carve Pro CNC https://bit.ly/3pwLKQo
► 1/4" Upcut Bit https://bit.ly/3kBUEZ4
Arbortech power carving tools (code "JackmanHands" gets you 20% off)
► Mini Carver https://bit.ly/2IMRTqu
► Power Carving Unit (NEW!) https://bit.ly/3pzNrfQ
► Turbo Plane https://bit.ly/3lFCqr9
► Power Chisel https://bit.ly/3nuLoIb
TotalBoat epoxy, varnish, etc. (code "Jackman15" gets you 15% off)
► Thixo Epoxy Adhesive (fast cure) https://bit.ly/2IEWQSa
► Halcyon Clear https://bit.ly/3psBXL3
ISOtunes bluetooth hearing protection (code "Jackman10" gets you $10 off every pair!)
► https://bit.ly/3kvodLJ (XTRA 2.0 shown in this video, available for preorder now)
Step 2: Preparing the Materials

The build all starts by planing down a bunch of basswood lumber that was reclaimed from a friend of mine. I chose basswood specifically for this project because of it's light weight and also because the grain is very even and straight, which makes it easier to carve. Each of these boards gets planed down and then sanded with the drum sander to exactly an inch thick.
Step 3: Cutting Out the Parts


These are my pile of "prototypical fingers", which is still seems like an uncomfortable phrase to use for some reason. It took a little while to work out the best design to make the finger function both by letting me collapse it down by pulling a string and then using a bungee cord to return it straight again. Luckily, the CNC router is perfect for something like this because I can tweak the design and cut fingers until I get a working prototype. But now that I've mentioned CNC, feel free to skip the rest of the album because the officially means this is no longer a real woodworking project any more.
With that figured out, I'm able to design all 5 fingers using the original pointer finger as a guide. I also separated out the holes that are the pivot points and cut those out first so that I could utilize those holes to insert screws to hold the board to the table while the CNC cut out the pieces.
Then I just let it cut out the fingers x10. The basswood is an easy cut on the X-Carve, it just frays a little bit, but that'll be easy to clean up later. You can also see the channel now where the string and bungee will live to operate each finger, which will both be almost entirely hidden from view when it's done.
Each board was good for one finger, so I cut down 10 boards, clean up the mess that my robot slave leaves behind, and then cut the tabs with a router that are holding all of the pieces together.
Step 4: Cleaning Up the Parts


I organize all of the pieces into each finger and keep them in place temporarily with some carriage bolts through the pivot point holes.
The edges of all of the pieces are smoothed out using the bench top belt sander. This removes the frizz from the CNC, but also smooths out the surface so that things will slide smoothly later. I figure this is easier to do now instead of after the glue-up when some of these edges will no longer be accessible.
Step 5: Assembling the Fingers


For each finger, I line the lower slot with a thin copper pipe. This pipe gives me a smooth tube for the paracord to slide down later to reduce the friction as much as possible.
Then the top slot in each finger gets a bungee cord. One end of the bungee is pressure fit into place in a circle at the end of the slot and then I crimp down the other end with a thin nail and cut it to length so that it's short enough to fit with a joint missing, that way when I install all the joints the bungee will always be in tension.
With all the preparations done, the fingers can finally be assembled. The copper tube is held in place with some epoxy adhesive, and then the rest of the finger is glued together with regular wood glue and then held together with an excessive number of clamps while the glue and epoxy dry.
Step 6: Cleaning Up the Fingers


After leaving everything for the night, the clamps can be carefully removed from the fingers.
With a little bit of glue squeeze-out to clean up, each of the fingers is run over the belt sander again to remove that and any small inconsistencies in the glue-up.
There is also some squeeze out between the joints, so I take the chance now to scrape that off with a chisel so that it doesn't interfere with the pivoting movement later.
Step 7: Creating Block Connector


With the fingers complete, the last parts I need are the ones that will connect all of the fingers together so that this thing at least vaguely resembles a hand. I start by gluing up a block of basswood that will connect the thumb to the rest of the hand at an angle.
This joint is going to remain rigged for the sake of simplicity (as if the rest of the build is simple), so I I cut an angle in the blocks that is precisely equal to whatever angle I think looks right at the time.
Then I trace out the profile of the thumb onto this block where the thumb is tilted at another precise random angle to give the thumb a compound angle to the hand overall. The excess from the outside of this block is removed on the bandsaw.
Step 8: Creating Splaying Connector


Now to splay the rest of the fingers out, it's a little simpler of a solution. I get some more blocks of basswood just over an inch thick and re-saw them down at an angle by temporarily attaching a block to the piece to hold it off the fence.
This creates a bunch of massive wedges that I then trace out from the bottom section of the fingers just like the first piece. These are cut to size all the way around on the bandsaw.
Step 9: Carving the 1st Hand


Now off camera I carve down the first hand using some power carving tools that I'll show in a bit. This allowed me to refine the shape of the hand using my large hand print-out (in the background) as a rough guide and my own hand as reference for what contour happened where. I was able to do this by hot gluing the hand together to carve it and then I could still pop the parts apart for the next step.
With the profile of the first hand set, I wanted to copy that exactly for the 2nd hand and it was fairly easy to do since I was able to pop the hand sections apart and then use those to trace the profiles on the sections of the hand that haven't been carved yet.
Step 10: Carving the 2nd Hand Parts


And now back to carving! The 2nd time was much easier than the first since I was able to basically connect the dots from one side to the other using the reference lines. To carve all of this I use the Arbortech Turbo Plane in their new Power Carving Unit angle grinder.
With the palm of the hand carved down to rough shape, I then do the same hot glue technique to temporarily fasten the sections of the hands together along with the wedges.
Step 11: Carving the 2nd Hand


From there I'm then able to carve the wedges down to size to meet the rest of the palm of the hand, and also refine the shape of the edge of the hand and of the thumb.
This is the connection piece between the thumb and the rest of the hand, but I though it was just an interesting shot to show the difference between carving with the grain (left side of the photo) vs carving against the grain (right side of the photo).
Step 12: Gluing the Thumb


I decide at this point to glue the thumb in place before I lose too much clamping surface. I make a big wedge and hot glue that to the bottom of the thumb connector part and then use that as a clamping surface to clamp and glue the thumb in place with wood glue.
With the thumb dry, I'm then able to separate all of the pieces again and remove the hot glue. Some come off easy by just slamming the hand on the table, but some require a putty knife in the joint along with a bit of persuasion.
Step 13: Hollowing Out the Palm

The 4 main fingers are brought back down to the CNC so that I can cut a cavity out of the palm section of the hand. This is simply to take weight off the hands to make them as usable as possible, and now that the profile of the hands is established, I'm able to safely carve away this material without worrying about carving into a hollow part later.
Step 14: Carving and Sanding the Fingers


The last part to carve down to shape is the fingers. This is a little tricky since they want to move around so much, but I just take light passes and clamp the finger to the table from the palm section. The bolts through the pivot holes also help keep things steady for carving.
I then switch over to the sanding disk in the grinder to do some rough sanding of the fingers. These surfaces are going to be difficult to reach after the final glue-up of the hand, so I want to do as much sanding now as possible.
And I follow up the rough sanding with some finish sanding with my random orbit sander. Don't ever neglect the tip, of your fingers.
Step 15: Assembling the Hand


Then one last step prior to the final glue-up is spreading wax inside the joint to lube things up before pinning that joint in place with a 1/4" wood dowel. This joint will be inaccessible after the glue-up, so I have to do it now.
Now this is one of the trickier glue-ups that I've ever done. The best process I figured out may or may not be a trick I invented (I definitely didn't, but I'm a genius, so I'm going to assume it's an original thought). The wedges are glued and fastened in place to one side with pin nails and then I shoot pin nails in the other side but allow them to protrude by 1/4". The pin nail are headless, so this allows for me to push the pieces together and the pin nails sink into the other piece and hold that join steady while I clamp (instead of everything sliding around and creating an inevitable nightmare).
After that dries, I then do the second final glue-up using the same technique to attach the thumb, but this time it's held together with a parallel clamp and a band clamp while the glue dries, since it's such a funky shape.
Step 16: Sanding and Adding Pivot Point


With everything glued together and all the glue dry, I'm able to do some palm sanding...... get it? A palm sander is a type of sander, but I'm also sanding a palm! A rare woodworking joke, and as we all know, the only way to make a joke better is by explaining it.
At this point I also do the finish sanding on the fingers and wash and pin all of the joints like I did to the first joint. For now I leave the palm rough sanded since there's still a little bit of work to do there.
Step 17: Creating Pocket for Arm


A giant hand needs a giant arm to go with it right? Well I wanted to keep the arm simple to keep it easy to hold onto and also to not distract from the hand (or maybe it's just my millennial laziness, I'll neve tell). It's kind of hard to show in a cramped space, but I made a little router jig out of 1/2" plywood with a recess so that my router follows it and cuts out a 5" wide pocket for the arm (jig cut on my CNC because I wouldn't be a millennial woodworker if I didn't). I take about an 1/8" off at a time until I get down to an inch deep pocket.
Here you can see the pocket a little better, it's also funny you get to see the hollow posts again when I clean it out with a leaf blower. I planned it though so that I'd have just enough meat to bight into to hold the arm in place (or maybe I just got lucky, I'll never tell).
Step 18: Creating the Arm


The arm needs a curve shape to fit comfortably against my arm since strapping a 15lb wooden hand to my arm is going to be uncomfortable enough as it is. This technique is known as cove cutting, you set up a fence at an angle to your table saw blade and raise the blade up about 1/16" at a time to carve out this curved recess in your workpiece. You can control the steepness of the curve by changing the angle of the fence relative to the blade and change the location of the cut by just moving the fence closer or further from the blade.
Once I'm happy with the depth of that cut, I refine the end of it by hand with my Mini Carver grinder, since the cutting on the table saw leaves a triangular shaped section that I still need to remove.
The flat spot that is left is then fit inside the pocket in the back of the hand and glued/screwed in place.
Step 19: Adding Handles


I still need some way to hold onto this hand and also to hold the strings that operate the fingers, so I scribe and cut some blocks to fit that coves that I just cut out.
These blocks are glued and clamped in place and will later hold some eye-bolts that will holds the paracord strings near my fingers. At this time I also install a drawer handle on each arm that I will use to hold on to to keep the hand steady in my... hand.
Step 20: Final Sanding

Now the final palm sanding can commence.... and this time it's an actual palm sander on the palm... comedy!
Step 21: Adding Lines to the Palm

Last little bit of detail to add was the lines on the palm of my hand using the Power Chisel. These are copied from the my actual palm, so if you can get a clean shot of the lines, then you can figure out my social security number (I think that's how that works?).
Step 22: Adding Finish


Nothing weirder than seeing giant handles dangle from your shop ceiling right? It's a privileged problem, I know. It was getting to cold outside at this point to spray finish, so I moved everything out of the way and did this instead.
A handful of coats of TotalBoat varnish later and the hands are all wrapped up before things get too out of hands.
Step 23: Use Cases!


Now let's finally answer the question "why?" It's people's favorite question to ask when they see my work, and my opinion of that is that if not one person who sees a piece of my work and asks "why?", then that piece of work was a failure. Any way, let's skip past my weird self-obsession, it's for social distancing of course! They worked great for trick-or-treating.
Then Thanksgiving dinner was a breeze (we had a lot of Halloween candy left over, don't judge...)
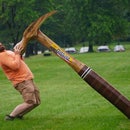
You'd better believe that our annual Thanksgiving day football game isn't going to end just because of a pandemic.
And shout-out to Santa for coming for a visit early to film this scene with us, this was before he even got the vaccine! We really don't pay essential workers like Santa enough, it's almost like we don't even pay them anything (way to end this fun post on a downer, Jackman).
Step 24: Glamour Shots


Hope you enjoyed the build! As always, for the full experience watch the full build video:
----------------------------------------------------------------------
Thirsty for more? You can also find me in other places on the interwebs!
My Website: Essentially my entire life
YouTube: Me, in moving picture form
https://www.youtube.com/jackmanworks
Instagram: Preview my projects as they progress #nofilter
https://www.instagram.com/jackman_works
Twitter: Riveting thoughts, in very small doses
https://www.twitter.com/jackmanworks
----------------------------------------------------------------------
Note: This post may contain affiliate links. Thank you for supporting what I do!

Grand Prize in the
Anything Goes Contest


