

Introduction: Giant Ping Pong Paddle (from Pallet Wood)


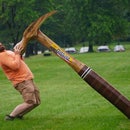
I used to suck at ping pong, I still do, but I used to too, so what am I supposed to do? I don't have the time to practice for endless hours to get good at ping pong, this is America, and I want need my gratification NOW! I consider it patriotic to not learn to be better, but to just cheat better, and that's how we got here today. This is my giant ping pong paddle, a little over 4x scale (3'6" long) and it will ensure that I never miss a serve ever again.
Watch the full build video above for the full experience!
Templates are attached below in case you're weird enough to try to recreate this, available in full size, or broken down in letter and A4 size paper that you can tape together.

Supplies
Materials:
- Pallet wood
- Wood glue
- Ping pong paddles
- Yoga mat
- Spray adhesive
Tools (in order of appearance):
- Hearing protection (with bluetooth) (coupon code "Jackman10" gets you 10% off)
- Circular saw
- Thickness planer
- Straight line rip jig
- Table saw
- Aluminum bar clamps
- Glue roller bottle
- Silicone glue mat
- T-track table
- Spring clamps
- Bandsaw
- Disc sander
- Belt sander
- Miter saw
- CA glue/activator
- Router table
- Flush trim router bit
- Drill
- Random orbit sander
- Arbortech Turbo Plane carving disk (coupon code "ACP10" gets you 10% off)
- Angle grinder
Step 1:


This journey starts with the finest pallets Italy has to offer. I actually did this build at a friends shop and found out that Italy has decidedly lower quality pallets than the good old USA, but I was able to scrounge up this single hardwood pallet for the handle (it's either sycamore or london plane). I cut the pallet apart to get all of the pieces for the handle, I also disassemble a classic pine Euro pallet to use for the rest of the paddle.
The hardwood slats get run through the planer first to smooth out both sides and flatten them out as much as possible. I'll be gluing these together later to get pieces the size that I need, so I want the faces to be as clean as possible.
Cleaning up the edges consists of using this jig to cut one edge straight and then I use the fence on the table saw to both cut the slats in half and cut the last rough edge off.
This leaves me with a bunch of strips of wood roughly 1.5" wide, which I laminate together into a couple of larger blanks. Notice the fancy Egyption pyramids drawn on these pieces, that's to ensure that I laminate these pieces in the correct order, but also remember to leave glue out of the center joint because this is actually 2 different glue ups that I'm clamping at once... I'm clever like that, I told you not to ever underestimate me dad!
Step 2:


While the handle blanks dry, I gather the rest of the pallet material for the paddle and cut it all down to rough length on the miter saw and rough width on the table saw. There are currently 2 layers of material here, which you'll see why later, stop trying to skip ahead!
I start the milling by smoothing out both faces of all of these pieces in the planer. I also smooth out the edges on the table saw for the next step which is yet another lamination.
I carefully line everything up in my rough paddle shape and glue all of the edges together...
Step 3:


Except I lied! Ha! There's me being clever again. The paddle for now is actually glued up as 3 chunks, that way all of the pieces still fit through the planer. I do the final smoothing passes on these pieces now.
Then carefully clamp them together, gluing all the joints this time, and making sure the faces are all flush with each other. These "cauls" as they're called, are just some straight pieces of wood that are clamped across the wide part of the lamination to make sure that those center parts of the joints are all flush with one another. Future Jackman will get angry if we don't take this preventative step now, and you don't want future Jackman to get angry.
Step 4:


I go ahead and steal a ping pong paddle graphic off the interwebs, scale it up to a couple inches short of my paddle blank, print it out, tape it together, and trace it on the wood.
This shape is carefully cut to size on the bandsaw. Luckily each of the pieces individually are lightweight and easy to work... that folks is what we call foreshadowing.
On the bandsaw, I make sure to cut just outside the line, and then after that I use various sanders to both smooth out the cut and also bring the paddle down to it's final shape.
Step 5:


Would you look at that, the handle blanks are out of the clamps and I already smoothed them down and brought them down to thickness in the planer. I trace out the shape of the handle on each of these pieces. All meanwhile my friends taunt me with their epic ping pong skills... if only they know what I have up my sleeve, I'm sure they haven't noticed anything suspicious.
The shape of the handle is then cut out on the bandsaw.
Step 6:


In the meantimewhile, I actually resawed one of the sets of pine pallet boards that I showed earlier and glued these together to create 2 thin paddle sheets. I cut these to rough size on the bandsaw, but then temporarily glue them together with the good ol' blue tape and super glue trick.
The purpose of that is for this whole operation, I use a flush trim bit in the router table and the original paddle acts as the template while I trace around the piece and make all 3 of them an exact match of one another.
Step 7:


I then pop these 3 sheets apart and trace out a regular size paddle on the thicker paddle sheet... because, I'm up to something.
I do the same trace on both sides and cut out the shape of the paddles. After that I also drill a bunch of holes in the paddle in an attempt to reduce the weight as much as possible. This center core piece will be sandwiched between those 2 thinner pieces, so you won't even know about this hack job once they're laminated.
Here we go, hiding all of those holes now. I painted the paddle pockets black to try to get that to blend in better, good to do that now while it's accessible. I spread glue on both sides of the core and clamp the 3 paddle pieces together permanently, til death do them part.
Step 8:


One woodworking pro tip from the proest of woodworkers, is that you always want to carefully and gently remove your clamps.
A little sanding cleans up the faces and the edges and the main part of the paddle is done. Time to get back to the handle that I definitely didn't forget about.
Step 9:


The handle is carved to shape freehanded using a TurboPlane in an angle grinder. I start by creating the flat tapered section at the top of the handle.
And then the whole handle is rounded over to match the profile of the regular paddle, it's essentially just a massive 1.5" radius roundover.
PRO-TIP ALERT: Another one for all of you peasant woodworkers, use a pencil and quickly scribble some lines on your piece before you sand it, this will easily show you where you have/haven't sanded yet so you can be sure that you haven't missed any spots.
Step 10:


Guess what, another lamination. I spread out some more glue on each of the handles with my 3 hands and then clamp one of the handle pieces on each side and wait for it to try. You'll also notice that at some point in the past few photos I've painted the edge of the paddle black to help make it look like the real deal.
With the glue try, it just takes a bit of sanding overall to wrap up the woodworking on the paddle. It's also a great opportunity to create a totally normal photo like this.
Step 11:


Pretty much the last step is the rubber padding that goes on the face of the paddles. The closest approximation that I could come up with for this was actually a yoga mat, it scaled up to the right thickness and also was nice and lightweight and also squishy to maybe give it a bit of rebound. I attach it in place with contact cement, applying it to both surfaces individually and then sticking those together. Then I simply trim the mat with a knife.
Before I add the yoga mat to the opposite face, I'm sure to screw my auxiliary paddle into place, just for safekeeping. No reason in particular.
Last step is the addition of a bit of varnish to finish the whole thing up and then there's no other option but to have an epic ping pong battle.
Step 12:


Honestly, you really just have to watch the whole video for the full experience of the battle scene (linked in the first photo), but I obviously won, I mean, we all know that size is the only thing that matters.
Turns out this thing has some excessive mass to it, much like myself, so it turns out that I'm going to have to hit the gym and probably spend just as much time there as I would have learning ping pong. I still count this as a win.
And the final reveal that nobody was waiting for, in case my cheating wasn't good enough, I have a couple of flip out paddles for good measure. Leatherman has their notorious flip-out multi-tools, so we'll just all agree to call this the Jackman.
Step 13:


I call this photo "Jackman takes all the balls to the face"... Thanks for sticking around until the end, I hope you enjoyed my little piece of the world. Watch the full build/battle video linked in the first photo for the full experience!
----------------------------------------------------------------------
Thirsty for more? You can also find me in other places on the interwebs!
My Website: Essentially my entire life
YouTube: Me, in moving picture form
https://www.youtube.com/jackmanworks
Instagram: Preview my projects as they progress #nofilter
https://www.instagram.com/jackman_works
Twitter: Riveting thoughts, in very small doses
https://www.twitter.com/jackmanworks
----------------------------------------------------------------------
Note: This post may contain affiliate links. Thank you for supporting what I do!


